Home Automation Using Particle & Amazon Echo
For this project, I used a particle photon linked to ohm resistors, LED lights, and a DHT22 temperature sensor. I linked the particle photon to an amazon echo in order for the amazon echo to work with all of the components. I initially had all of my components on a breadboard, but I eventually placed them onto a PCB, or printed circuit board.
Engineer
Zachary R
Area of Interest
Computer engineering
School
Hong Kong International School
Grade
Rising Sophmore
Reflection:
Overall, I feel as if I got what I wanted from these few weeks. While completing my project was a blast, there were many times where it was quite difficult. I felt as if I wanted to really quit at many points, but I pulled through. There was a point where I really was convinced that I had to stop, but I still pulled through. The experience of facing roadblocks is one that I have had before, but solving them in the ways that I did makes my time at bluestamp worthwhile, and something to remember for the future.
Demonstration Night
A picture of me demonstrating how my project works.
Modification Milestone: Placing every component onto a printed circuit board
For my modification milestone, I decided to transfer all of my components to a PCB (Printed Circuit Board). This may seem like a simple modification, but it took a while to do, as I had to learn about circuitry, and I had to solder & desolder quite a lot of wires and joints, which was something that I was initially not too good with.
The main struggle with this portion of the project was doing all of the soldering and desoldering. Not only did this take a long time, but I almost got burned several times. I had to enlist the help of several instructors, and this portion required more time and effort in the hardware portion than any other part of the project.
The Project After My Modification
Placing the components onto a PCB was a good modification, as it made my project seem much more compact and sleek. Hopefully for another potential milestone, I could make more custom commands for the amazon echo
Third & Final Milestone: Making the humidity sensor work
For my third milestone, I was able to code the humidity sensor settings for the amazon echo. It works in the same way as the temperature sensor, as it uses the same module to detect data. Working on this milestone was completely software based, as all of the wiring was done during the completion of my second milestone. I didn’t have many struggles with this part of my project, as I had finished most of the hardware portion of my project, so this part was mostly software oriented.
The Project's Outcome
This is the project that was based on the fritzing schematic. When doing the hardware portion of my project, it felt as if the layout was a bit of a mess, so I did lots of rearranging.
Second Milestone: Getting the temperature sensor to work
For my second milestone, I was able to code the temperature sensor settings for the amazon echo. This works as I placed the wires for the temperature sensor in its respective pins. I didn’t do as much work for this milestone as I did my 1st milestone, as I didn’t have to set many things up, since they were set up when I completed my first milestone. For this milestone, the challenge came in finding out how the schematic worked, and how to input wires in accordance to my project.
The DHT22 Temperature sensor is comprised of thermistors that change their resistance when exposed to heat, or lack thereof. The resistance change in the thermistors are read by the particle core, via the respective positive-negative wires. Once read by the particle core, the data is transferred to the AWS Lambda code, which lets the amazon echo say a programmed utterance from the amazon skill code that I coded on json.
For this portion of my project, I didn’t have many problems, but it took some time to figure out the wiring for the Temperature sensor, as I wasn’t initially familiar with fritzing schematics.
Schematic of my project
This is the fritzing schematic for my main project. As you can see, there is a sensor linked, along with the LED lights. That sensor is the temperature sensor
First Milestone: Coding the LED lights and letting them turn on and off
For my first milestone, I made the red and green LED lights connected to the particle core able to turn on and off by issuing verbal commands to an amazon echo. This works as the amazon echo recognizes the light-turning commands, which is passed to the Alexa skill I created, then the AWS Lambda service. The AWS Lambda service then sends the spoken data to the Particle API that I connected to my computer, which is connected to LED lights on specific pins that switch on and off respectively.
I first defined the prompts that Alexa would respond to when it would do what I wanted it to. For this, I first used an intent schema file downloaded from the project page’s github.
Basically, the intent schema file uses a predefined function of the Alexa which determines how Alexa will handle the request. In that intent, I defined three slots: sensor, light, and onoff. These slots are used to define user commands.
If I were to say “Alexa, tell particle to turn on red light”, the 2 conditional words are “on” & “red” because they (the colour of the light and whether the light is on or off) can change depending on what the user says (“on” to “off, “red” to “green”, etc). I initially made these values LITERAL on the JSON code, as they only had 2 values, but LITERAL slot types had been rendered invalid and non – viable. Because of that, I had to create my own slot types for the colour of the light and the state of the light, and place the conditional values myself.
After defining the prompts and coding for the skill set, I modified the aws lambda code that was given from the project page. I initially placed the code as a .zip file into the aws console, but then edited it to fit the project. The .zip file had 2 files: Index.js and AlexaSkill.js. AlexaSkill.js handles the background process, and index.js is the main code, which sends specific points of data to the particle photon core, which is connected to the LED lights.
Picture of my progress
This is a picture of my first project in the beginning stages.
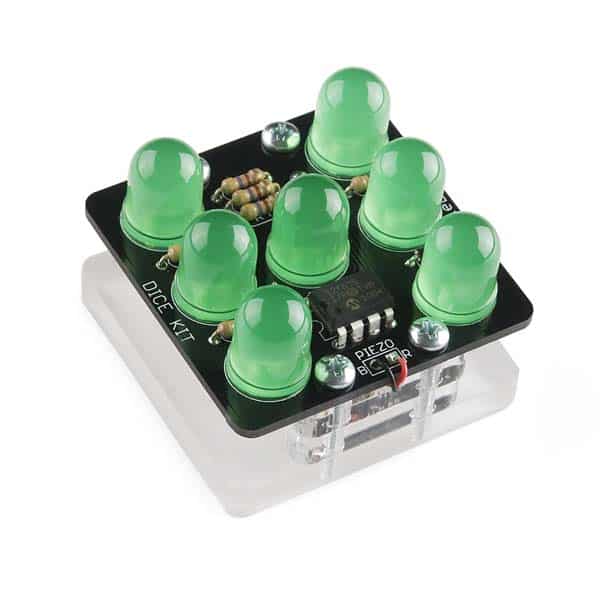
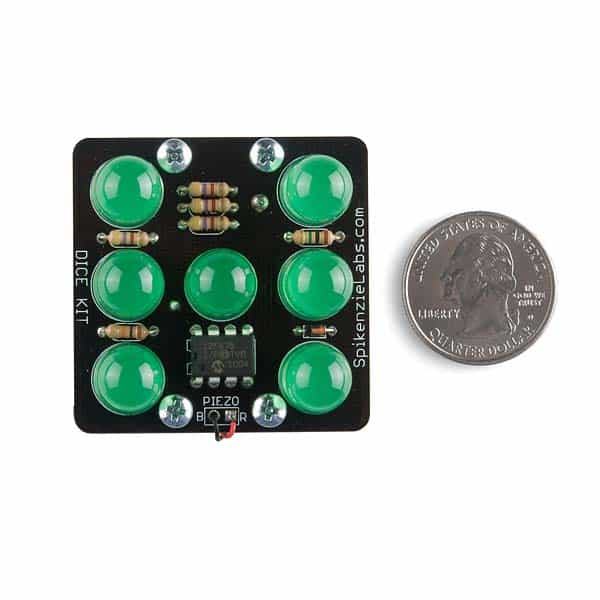
Starter Project: Electronic Dice Kit
My Starter Project is the Electronic Dice Kit. This dice functions similarly to a regular dice, as it shows a number from 1 to 6. However, it shows said number on 7 LED lights soldered onto a circuit board, along with a diode, several OHM resistors and a piezo, all soldered onto the circuit board. The process of soldering was pretty difficult for me, as it was my first time using a soldering iron. My hands were very shaky at first, but eventually I got better at the process.