About Me!

Dublin High School
Hello, my name is Jeffrey C and I am a proud freshman attending Dublin High School in Dublin, CA. I enjoy robotics as I have been on my school’s robotics team since sixth grade. In doing so, my team and I have collected many prizes along the way and has really improved my skills, I have learned to cooperate with my team even when tensions between us are tight, to keep calm while setting the robot for the competition, and to be creative in coming up ways to impress the judges through the robot and the presentation. Here in high school, I had to make a robot to present at the robotics booth for the carnival. I am an intern at the Lawrence Hall of Science, there I gain skills through engaging members and guests into the activities. While I am also a volunteer at Chabot Space and Science center, there I inform the public about the telescopes and the cosmos. By working with these programs, I am very cooperative, creative, cheerful, and calm.
Projects:
Main Project
Piano Playing Robot: 6/18/15 – 7/23/15
Final Milestone: 7/15/15 – 7/23/15
Skip the text! Watch the Video!
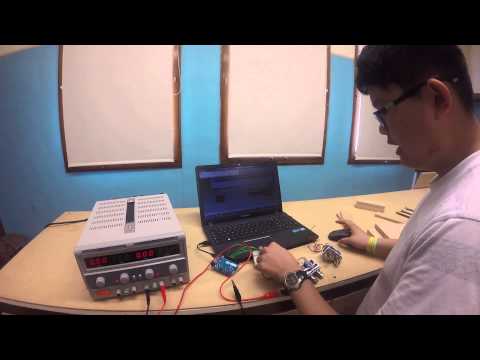
The final milestone has finally arrived! I have finished the robot and I am ready to take it home. Since the last milestone I have attached all of the electronics onto the base of the robot including the breadboard, the h-bridge, the Arduino Leonardo, and the motor. Along with that I have found out that the solenoids were placed upside down, so I have taken them off and turned them right side up. Some challenges that I have come across these last few weeks are mainly wiring and programming issues. First, the Arduino had uploading issues, to fix that I have replaced it. Then I am presented with the issue of wiring, the cables are so tightly compact that to troubleshoot it takes quite along time, to fix this I have fixed up the cables to where I can follow the cables. Next, my h-bridge started to malfunction, so I replaced it with one that Mathew didn’t need. After that, an accident happened to where the robot fell off the table and onto the floor causing the base of the robot to split in half, by this I quickly glued it back together, and let it dry over night. Finally came the coding issues, the problem however wasn’t the code, it was the laptop that I was working on. It ran out of power, I searched around for a charger that might fit my laptop’s charging port but came out empty handed. I ended up borrowing Omer’s laptop, by which I then realized that I would have to rewrite the code, being showcase night I worked frantically on a new demo code and barely finished before the showcase started. After Blue stamp has ends, I will be making a few modifications to the robot regarding the coding, and the power supply. For the coding I will be implementing the encoder, this will let my robot know where the rig is, and will be able to move to a certain position with extreme accuracy. The power supply that I chose outputs 12v and 5a, the 12 volts is perfect, but is 2.5a too high for my needs, so I will either find a power resistor, or get a whole new power supply. A few more solenoids wouldn’t hurt either. The time at Blue Stamp has been amazing, I have learned more about circuitry, electronics, and engineering in general than I have would have ever imagined. The guest speakers, the limited help of the instructors, the student defined projects, the amount of friends that I have made, and even the food have added to this wonderful experience. It’s been tough with the amount of set backs, but in the end this was the most productive six weeks of my life.
Documentation
BOM – Bill of Materials
Item |
Vendor |
Item Number |
Quantity |
Price |
Link |
| Arduino Leonardo | SparkFun | DEV-11286 | 1 | $24.95 | Link |
| Solenoids | Amazon | s13041200am0079 | 6 | $12.29 | Link |
| MDF Wood 3/4 in, 1/2 in, 1/4 in | -- | -- | 3 | -- | -- |
| Breadboard Jumper Wires | Amazon | WSJ-100 | 1 (Pack of 100) | $4.37 | Link |
| 50:1 Gear Motor | Pololu | 1444 | 1 | $39.95 | Link |
| Solderless Breadboard | Amazon | 090302_F | 1 | $5.30 | Link |
| Logic Level Mosfets | SparkFun | 10213 | 6 | $0.95 | Link |
| H-Bridge Motor Driver 1A | SparkFun | 315 | 1 | $2.35 | Link |
| 10K Ohm Resistors | -- | -- | 6 | -- | -- |
| Ribbon Cable – 10 wire (15ft) | SparkFun | 10647 | 1 (15ft Spool) | $4.95 | Link |
| Helical Shaft Coupler | McMaster | 6208K595 | 1 | $55.37 | Link |
| Furniture Pads | AceHardware | -- | 1 (Set) | -- | -- |
| Flange Sleave Bearings | McMaster | 3113K17 | 5 | $2.62 | Link |
| 1/2 in Collars | -- | -- | 6 | -- | -- |
| Double Sided Tape | -- | -- | 1 (Roll) | -- | -- |
| ACME Threaded Rod | McMaster | 98940A627 | 1 | $43.45 | Link |
| Steel Drive Shaft | McMaster | 1346K19 | 1 | $23.53 | Link |
| ACME Flange Nut | McMaster | 95072A145 | 1 | $32.92 | Link |
| USB Micro-B Cable – 6″ | SparkFun | 13244 | 1 | $1.95 | Link |
Mosfet Circuit Diagram:

H-Bridge Diagram:

2nd Milestone: 7/3/15 – 7/14/15

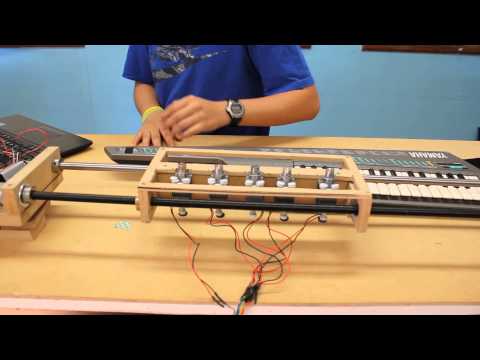
Rig of Robot
For my second milestone, I have technically finished the robot as it can move of the rods and press things(keys). To get to this point I have received the rest of my parts (Threaded rod, secondary rod, flange bearings, the nut, mosfets, power supply, helical bearing, and Pololu motor), aligned all wooden pieces to fit perfectly on the rod to move smoothly and easily, connected the motors and solenoids up to my mosfet circuit, and finally program it. In this process I have faced several difficulties, first the original nuts that I had ordered didn’t fit the rod, so I had to get a new one which costed $40, after that the wooden pieces that I had cut out weren’t perfectly aligned, so the pieces didn’t ride smoothly on the two rods, to fix that I figured out which pieces were out of alignment and dremeled them to the point that everything ran smoothly. Next two of my solenoids have stopped working, Fred is trying to return these and trying to get a couple new ones, I suspect that I may be putting too much power into the solenoids. Finally, the ribbon cable issue, I am using a ribbon cable to send power to my solenoids as they move around however, the cable seemed to lose all of it’s power somehow, what ever power I put in didn’t come out the other end, to fix this I took a multimeter and scanned all around the circuit and I also checked if the cable could conduct electricity easily, I found out that the connector pins that I had soldered my ribbon cable to had a major flaw which was that whenever I pushed the connector into the breadboard, the pins would push back, and not touch the rails at the bottom of the breadboard. To fix this Brenden and I soldered the ribbon cable to male to male headers instead so that I can push the cable into the breadboard without any issues. In this milestone, the main thing that I learned is that to truly get the perfect alignment of something, I should have the two pieces of wood on the rods, then put the rig together, this will prevent you from having misaligned holes or whatever you are working with. In the future I will get a motor controller to let my motor spin backwards, as my motor can only spin in one directions currently, then I would like to get my coding for the robot all done.
Video!
1st Milestone: 6/18/15 – 7/2/15

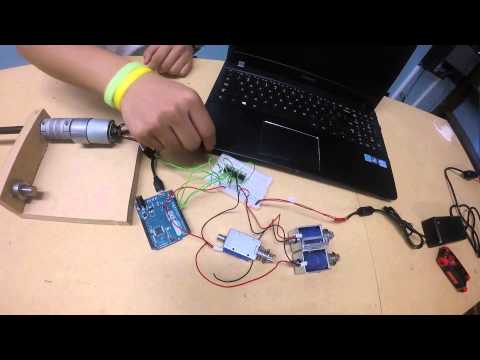
solenoids with wooden pieces and motor mounts

Top View of Robot
I have gotten a lot done to set up for the building of the robot itself when all of the parts arrive. All of my solenoids work and I can play them in sequences, all of the wooden pieces necessary for the robot have been cut up and are ready for the mechanical bits to arrive and be inserted with in them. I have several challenges along the way, shipping being one of them. Besides that I have had to figure out power solutions, ways to mount the solenoids, how to deal with slow motors, and budget. To fix the power issue, I will be using a 12V 5amp power supply that will be powering the solenoids, to control when power is being released, I am using mosfets controlled by the Arduino Leonardo. To mount the solenoids, I am using 1/4 of a screw that connects the two solenoids, I then have a vex angle gusset sandwiched in between the solenoids, I have added rubber bands to prevent the solenoids from ever becoming loose. The fact that the motor “only” spins at 200 rpm, the rig will not move real fast. (This is a prediction) To solve this issue, I will only play songs in one position without the rig moving around, if I want to play a different song in a different octave I will move the robot and play from that position. Budget will always be a problem, so I can’t by my $300 motors, so I will stick with my original $40 Pololu motor. Other than that I have had an easy time with budget. The main thing that I have learned is that before you buy a part, I should think about it and make sure that all parts are compatible and that they will work as intended. For the second milestone I would like to complete the structure of the robot and have the solenoids push keys as intended.
Video!
Starter project
Laser Target Kit: 6/15/15 – 6/17/15

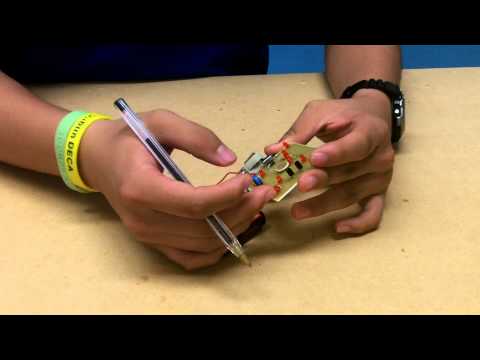
Completed Laser Target Kit
The laser target project was a kit by Chaney Electronics, where I had to solder resistors, diodes, and transistors onto a fiberglass board. When done, the kit becomes a laser target/optical sensor. The way it works is, the battery powers the board, going through resistors, transistors, diodes, finally powering the LEDs (Light Emitting Diode). I learned how to read the color signs on resistors, for example, for one of my resistors, the colors are orange, white, black, and gold. Orange being three, white being nine, black being a multiplier of one, and gold giving it a tolerance of five percent. I also learned about diodes, they allow electricity to flow in only one direction, transistors act as a gate, and switches allow current through or not. I struggled with understanding transistors work in this project. In the end I can show of my accuracy skills with my laser and my laser target.
Video!