
Hi my name is Jason. I am a rising senior at Bronx Science. I decided to attend BlueStamp this summer to immerse myself in a hands on engineering experience. I appreciate BlueStamp for providing students with a creativity stimulating lab setting and sufficient resources for them to really focus on developing their projects. I look to take advantage of this as an introductory to the engineering field I am interested in majoring in.
Reflection
Main Project
I chose the 3-joint Robotic Arm as my main project because it is associated with the field I am interested in, Biomedical Engineering, as it relates to prosthetics. It also has crossover with electrical and mechanical fields. I find this appealing because I want to broaden my horizons within the various engineering fields. My modification on this is using the iconic Wiimote controller to control the robotic arm’s motion. The Wiimote is a unique take on the standard joystick and analog button controllers. I decided to implement this in my robotic arm because I thought that it mimics the actual motion of the arm.
Schematic

3D Printed parts
Final Milestone
Since my last milestone, I completed building the robotic arm and resolved the issue with the accelerometer sensitivity. To smooth out the analog signal, I took in 10 values at a time from the accelerometer and averaged them out to be the new input for the servos. This decreased servo jitter and resulted in a much smoother motion for my pan and tilt mechanism.
Milestone #2
I was able to read the values from the Wiimote’s accelerometer and translate this into operating the servo motors controlling my robotic arm. First, to get the Wiimote and Arduino to communicate, I had to establish a Bluetooth connection through the use of a The Wiimote contains a 3-axis accelerometer for motion sensing by measuring acceleration along the Roll, Pitch, and Yaw axis. These are actually the same as the Aircraft principal axes. To visualize this , imagine the Wiimote as an airplane. Rotating the Wiimote laterally in the direction such that the top of the remote faces outwards induces a change in the Roll axis readings while tilting it vertically changes the reading in the Pitch axis. Yaw is rotation around the vertical axis. For the purposes of my robotic arm, I am only using the Roll axis and Pitch axis values. The Roll axis will rotate the arm while the Pitch axis will lift the arm up and down. The values from each axis in the accelerometer ranged from 0 to 360. Since the servos I’m using are limited at 180 degrees of rotation, I constrained the values I received from the accelerometer to match the rotation of the servo better. The values from the Roll axis were restricted to between 90 and 270. I scaled these limits with the limits of the servo rotation. As the Wiimote rotates, it approaches these limits and moves the servo along with it. One problem I encountered was the sensitivity of the accelerometer. This made the servos respond to even the slightest change in values. I hope to address this issue in the next milestone.
Milestone #1
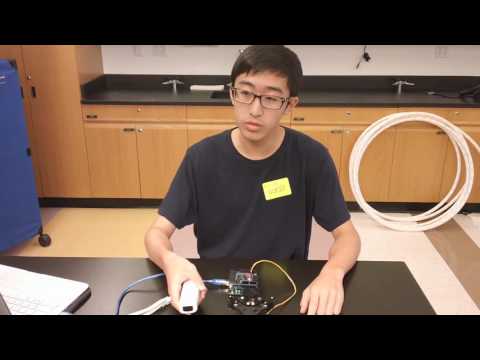
I decided to use the Wiimote to control my robotic arm because it incorporates many features such as a 3-axis accelerometer along with the standard game controls. The Wiimote’s default communication method to the Wii console is through Bluetooth. Bluetooth is a form of wireless communication technology that uses radio waves. In order to establish this connection with the Arduino board I had to use a USB Host shield to connect a bluetooth dongle. I used a Wiimote Library’s example sketch to detect the Wiimote through its bluetooth address. The first function I programmed the Wiimote to do was open the servo gripper based on how long I held down the B trigger button down. Since the Wiimote buttons are analog inputs, it was easy to program the gripper to extend as long as the trigger was pushed down. The trigger button can detect how long the button is pushed down for. In the code, I used analogRead to read the values from the trigger button. AnalogRead translates input voltages to integer values from 0 to 1023. Next I used the map function to scale these readings to opening the gripper to a designated position in the servo’s rotation from 0 to 180 degrees. Finally analogWrite was used to translate these to actually run the servo. One challenge I faced was the bluetooth devices used by other students which would sometimes interrupt the Wiimote’s connection to my Arduino. One possible solution to this would be identifying the Bluetooth address associated with the Wiimote and programming the Arduino to only respond to this connection.
Starter Project
For my starter project, I worked on the Sparkfun Gram Piano which introduced me to the fundamentals of circuitry and soldering. The Gram Piano keys functioned through capacitive touch sensing which employs the human finger as a conductor to induce a current on touch. Based on this, the microcontroller plays the corresponding preprogrammed note through the speakers. This project also deepened my understanding of electrical circuits and its components. One problem I realized was that I burned a connection in the pins from bad soldering. To test if current was running through, I hooked up a multimeter to the joint and applied my knowledge of Ohm’s law. I just finished my Physics course this past school year and it felt really rewarding to see some of my conceptual knowledge in electricity being applied in something tangible.