Iron Man Arc Reactor
Engineer
Damont D
Area of Interest
Electrical Engineering
School
Promise Academy 1
Grade
Rising Junior
Reflection
I think that my time at bluestamp worth the problems and challenges I faced in making my projects here. I learned a lot of skills which I can use in other projects that require skills such as soldering and coding software. By using this opportunity at bluestamp, I an one step closer to becoming a engineer. What’s next is coming back, learning more skills, and building more projects. Maybe even building projects at home and taking another step towards my future in engineering.
Final Milestone
#inc
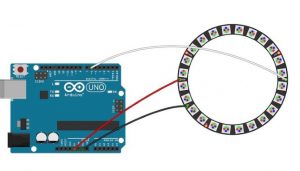
#define PIN 6
// Parameter 1 = number of pixels in strip
// Parameter 2 = Arduino pin number (most are valid)
// Parameter 3 = pixel type flags, add together as needed:
// NEO_KHZ800 800 KHz bitstream (most NeoPixel products w/WS2812 LEDs)
// NEO_KHZ400 400 KHz (classic ‘v1’ (not v2) FLORA pixels, WS2811 drivers)
// NEO_GRB Pixels are wired for GRB bitstream (most NeoPixel products)
// NEO_RGB Pixels are wired for RGB bitstream (v1 FLORA pixels, not v2)
// NEO_RGBW Pixels are wired for RGBW bitstream (NeoPixel RGBW products)
Adafruit_NeoPixel strip = Adafruit_NeoPixel(60, PIN, NEO_GRB + NEO_KHZ800);
// IMPORTANT: To reduce NeoPixel burnout risk, add 1000 uF capacitor across
// pixel power leads, add 300 – 500 Ohm resistor on first pixel’s data input
// and minimize distance between Arduino and first pixel. Avoid connecting
// on a live circuit…if you must, connect GND first.
void setup() {
// This is for Trinket 5V 16MHz, you can remove these three lines if you are not using a Trinket
#if defined (__AVR_ATtiny85__)
if (F_CPU == 16000000) clock_prescale_set(clock_div_1);
#endif
// End of trinket special code
strip.begin();
strip.show(); // Initialize all pixels to ‘off’
}
void loop() {
// Some example procedures showing how to display to the pixels:
colorWipe(strip.Color(255, 0, 0), 50); // Red
colorWipe(strip.Color(0, 255, 0), 50); // Green
colorWipe(strip.Color(0, 0, 255), 50); // Blue
Bill of Materials bluestamp-bill-of-materials-bom-template-sheet1

Second Milestone
First Milestone