R/C Tank
This year I had worked on making an R/C tank. This taught me how to use Arduino and motors. This taught me to stick to a project and to not give up even when things seemed impossible. I used a PS2 controller and a power bank to move and power my R/C tank.
Engineer
Brayan A
Area of Interest
Robotic Engineering
School
KIPP NYC College Prep
Grade
Incoming Sophomore
Bill Of Materials
Reflection
With BlueStamp, I, not only learned the basics of engineering such as learning to solder, wire, and heatsink, but also learn more about myself. I learned that I love assembling, working with and through electronics such as Arduino and Raspberry Pi. With this in mind, I want to learn more about building electronics and become a better engineer. I want to build more projects that are connected to my other hobbies such as gaming and convenience and learn more about mechatronics. The struggles such as constant solder problems and coding errors helped me learn more about code and electronics and the skills needed to be an engineer. I thank BlueStamp for this opportunity.
Final Milestone
#include <PS2X_lib.h> //for v1.6
#include <Servo.h>
#include <AFMotor.h>
AF_DCMotor motor3(3);
AF_DCMotor motor4(4);
PS2X ps2x; // create PS2 Controller Class
Servo myservo;
//right now, the library does NOT support hot pluggable controllers, meaning
//you must always either restart your Arduino after you conect the controller,
//or call config_gamepad(pins) again after connecting the controller.
int error = 0;
byte type = 0;
byte vibrate = 0;
void setup() {
myservo.attach(9);
Serial.begin(57600);
motor3.run(BACKWARD);
motor3.setSpeed(0);
motor4.run(FORWARD);
motor4.setSpeed(0);
//CHANGES for v1.6 HERE!!! **************PAY ATTENTION*************
error = ps2x.config_gamepad(13, 11, 10, 12, true, true); //setup pins and settings: GamePad(clock, command, attention, data, Pressures?, Rumble?) check for error
}
void loop() {
delay(10);
ps2x.read_gamepad(); //read controller and set large motor to spin at ‘vibrate’ speed
if (ps2x.Button(PSB_START)) //will be TRUE as long as button is pressed
Serial.println(“Start is being held”);
if (ps2x.Button(PSB_SELECT))
Serial.println(“Select is being held”);
if (ps2x.Button(PSB_PAD_UP)) { //will be TRUE as long as button is pressed
Serial.print(“Up held this hard: “);
Serial.println(ps2x.Analog(PSAB_PAD_UP), DEC);
}
if (ps2x.Button(PSB_PAD_RIGHT)) {
Serial.print(“Right held this hard: “);
Serial.println(ps2x.Analog(PSAB_PAD_RIGHT), DEC);
}
if (ps2x.Button(PSB_PAD_LEFT)) {
Serial.print(“LEFT held this hard: “);
Serial.println(ps2x.Analog(PSAB_PAD_LEFT), DEC);
}
if (ps2x.Button(PSB_PAD_DOWN)) {
Serial.print(“DOWN held this hard: “);
Serial.println(ps2x.Analog(PSAB_PAD_DOWN), DEC);
}
vibrate = ps2x.Analog(PSAB_BLUE); //this will set the large motor vibrate speed based on
//how hard you press the blue (X) button
if (ps2x.NewButtonState()) //will be TRUE if any button changes state (on to off, or off to on)
{ if (ps2x.Button(PSB_L3))
Serial.println(“L3 pressed”);
if (ps2x.Button(PSB_R3))
Serial.println(“R3 pressed”);
if (ps2x.Button(PSB_L2))
Serial.println(“L2 pressed”);
if (ps2x.Button(PSB_R2))
Serial.println(“R2 pressed”);
if (ps2x.Button(PSB_GREEN))
Serial.println(“Triangle pressed”);
}
if (ps2x.ButtonPressed(PSB_RED)) //will be TRUE if button was JUST pressed
Serial.println(“Circle just pressed”);
if (ps2x.ButtonReleased(PSB_PINK)) //will be TRUE if button was JUST released
Serial.println(“Square just released”);
if (ps2x.NewButtonState(PSB_BLUE)) //will be TRUE if button was JUST pressed OR released
Serial.println(“X just changed”);
Serial.print(“Stick Values:”);
Serial.print(ps2x.Analog(PSS_LY), DEC); //Left stick, Y axis. Other options: LX, RY, RX
Serial.print(“,”);
Serial.print(ps2x.Analog(PSS_LX), DEC);
Serial.print(“,”);
Serial.print(ps2x.Analog(PSS_RY), DEC);
Serial.print(“,”);
Serial.println(ps2x.Analog(PSS_RX), DEC);
int left_speed= map(ps2x.Analog(PSS_LY),0,255,255,-255);
int right_speed=map(ps2x.Analog(PSS_RY),0,255,255,-255);
int right_move=map(ps2x.Analog(PSS_RX),0,255,180,-180);
if ( left_speed < 0) {
motor3.run(FORWARD);
motor3.setSpeed(abs(left_speed));
delay(10);
}
if (right_speed < 0 ) {
motor4.run(FORWARD);
motor4.setSpeed(abs(right_speed));
delay(10);
}
if (right_speed > 0) {
motor4.run(BACKWARD);
motor4.setSpeed(abs(right_speed));
delay(10);
}
if (left_speed > 0) {
motor3.run(BACKWARD);
motor3.setSpeed(abs(left_speed));
delay(10);
myservo.write(abs(right_move));
delay(50);
}
}
Third Milestone
MotorShield
This motor shield is the L293D motor shield from Adafruit. It has 3 H-bridges ICs which allows DC motors to move backward and forward. It has its own library, the AF motors library, this allows me to code my Arduino using code that isn’t complicated. Be wary of the fact that you need to solder your pins in.
#include <PS2X_lib.h> //for v1.6
#include <AFMotor.h>
AF_DCMotor motor3(3);
AF_DCMotor motor4(4);
PS2X ps2x; // create PS2 Controller Class
//right now, the library does NOT support hot pluggable controllers, meaning
//you must always either restart your Arduino after you conect the controller,
//or call config_gamepad(pins) again after connecting the controller.
int error = 0;
byte type = 0;
byte vibrate = 0;
void setup() {
Serial.begin(57600);
motor3.run(BACKWARD);
motor3.setSpeed(0);
motor4.run(FORWARD);
motor4.setSpeed(0);
//CHANGES for v1.6 HERE!!! **************PAY ATTENTION*************
error = ps2x.config_gamepad(13, 11, 10, 12, true, true); //setup pins and settings: GamePad(clock, command, attention, data, Pressures?, Rumble?) check for error
}
void loop() {
delay(10);
ps2x.read_gamepad(); //read controller and set large motor to spin at ‘vibrate’ speed
if (ps2x.Button(PSB_START)) //will be TRUE as long as button is pressed
Serial.println(“Start is being held”);
if (ps2x.Button(PSB_SELECT))
Serial.println(“Select is being held”);
if (ps2x.Button(PSB_PAD_UP)) { //will be TRUE as long as button is pressed
Serial.print(“Up held this hard: “);
Serial.println(ps2x.Analog(PSAB_PAD_UP), DEC);
}
if (ps2x.Button(PSB_PAD_RIGHT)) {
Serial.print(“Right held this hard: “);
Serial.println(ps2x.Analog(PSAB_PAD_RIGHT), DEC);
}
if (ps2x.Button(PSB_PAD_LEFT)) {
Serial.print(“LEFT held this hard: “);
Serial.println(ps2x.Analog(PSAB_PAD_LEFT), DEC);
}
if (ps2x.Button(PSB_PAD_DOWN)) {
Serial.print(“DOWN held this hard: “);
Serial.println(ps2x.Analog(PSAB_PAD_DOWN), DEC);
}
vibrate = ps2x.Analog(PSAB_BLUE); //this will set the large motor vibrate speed based on
//how hard you press the blue (X) button
if (ps2x.NewButtonState()) //will be TRUE if any button changes state (on to off, or off to on)
{ if (ps2x.Button(PSB_L3))
Serial.println(“L3 pressed”);
if (ps2x.Button(PSB_R3))
Serial.println(“R3 pressed”);
if (ps2x.Button(PSB_L2))
Serial.println(“L2 pressed”);
if (ps2x.Button(PSB_R2))
Serial.println(“R2 pressed”);
if (ps2x.Button(PSB_GREEN))
Serial.println(“Triangle pressed”);
}
if (ps2x.ButtonPressed(PSB_RED)) //will be TRUE if button was JUST pressed
Serial.println(“Circle just pressed”);
if (ps2x.ButtonReleased(PSB_PINK)) //will be TRUE if button was JUST released
Serial.println(“Square just released”);
if (ps2x.NewButtonState(PSB_BLUE)) //will be TRUE if button was JUST pressed OR released
Serial.println(“X just changed”);
Serial.print(“Stick Values:”);
Serial.print(ps2x.Analog(PSS_LY), DEC); //Left stick, Y axis. Other options: LX, RY, RX
Serial.print(“,”);
Serial.print(ps2x.Analog(PSS_LX), DEC);
Serial.print(“,”);
Serial.print(ps2x.Analog(PSS_RY), DEC);
Serial.print(“,”);
Serial.println(ps2x.Analog(PSS_RX), DEC);
int left_speed= map(ps2x.Analog(PSS_LY),0,255, 255,-255);
int right_speed=map(ps2x.Analog(PSS_RY),0,255, 255,-255);
if ( left_speed < 0) {
motor3.run(FORWARD);
motor3.setSpeed(abs(left_speed));
delay(50);
}
if (right_speed < 0 ) {
motor4.run(FORWARD);
motor4.setSpeed(abs(right_speed));
delay(50);
}
if (right_speed > 0) {
motor4.run(BACKWARD);
motor4.setSpeed(abs(right_speed));
delay(50);
}
if (left_speed > 0) {
motor3.run(BACKWARD);
motor3.setSpeed(abs(left_speed));
delay(50);
}
delay(50);
}
Second Milestone
After 2 weeks in Bluestamp Engineering, I had completed my Second Milestone for my main project. For this milestone, I had finished assembling my tank that will soon be controlled by the PlayStation 2 controller. In my tank, there is a gearbox that holds the motors and a bunch of screws and other components from the assembly kit that work together to move, carry weight and later be controlled by the PS2 controller. Because most pieces work together, the order is essential. The gearbox is important because the gearbox transmits the high speed of the dc motor to a low speed, high torque at the wheels. This was a very difficult milestone because most of the instructions were of a language that I don’t understand so I had to analyze the system and brainstorm a lot. I had used a lot of pictures to help my analysis and to figure out how the pieces go together. For my next milestone, I plan on making my tank move by using my PS2 controller.
First Milestone
#include <PS2X_lib.h> //for v1.6
#include <AFMotor.h>
AF_DCMotor motor3(3);
AF_DCMotor motor4(4);
PS2X ps2x; // create PS2 Controller Class
//right now, the library does NOT support hot pluggable controllers, meaning
//you must always either restart your Arduino after you conect the controller,
//or call config_gamepad(pins) again after connecting the controller.
int error = 0;
byte type = 0;
byte vibrate = 0;
void setup() {
Serial.begin(57600);
motor3.run(BACKWARD);
motor3.setSpeed(0);
motor4.run(FORWARD);
motor4.setSpeed(0);
//CHANGES for v1.6 HERE!!! **************PAY ATTENTION*************
error = ps2x.config_gamepad(13, 11, 10, 12, true, true); //setup pins and settings: GamePad(clock, command, attention, data, Pressures?, Rumble?) check for error
}
void loop() {
delay(10);
ps2x.read_gamepad(); //read controller and set large motor to spin at ‘vibrate’ speed
if (ps2x.Button(PSB_START)) //will be TRUE as long as button is pressed
Serial.println(“Start is being held”);
if (ps2x.Button(PSB_SELECT))
Serial.println(“Select is being held”);
if (ps2x.Button(PSB_PAD_UP)) { //will be TRUE as long as button is pressed
Serial.print(“Up held this hard: “);
Serial.println(ps2x.Analog(PSAB_PAD_UP), DEC);
}
if (ps2x.Button(PSB_PAD_RIGHT)) {
Serial.print(“Right held this hard: “);
Serial.println(ps2x.Analog(PSAB_PAD_RIGHT), DEC);
}
if (ps2x.Button(PSB_PAD_LEFT)) {
Serial.print(“LEFT held this hard: “);
Serial.println(ps2x.Analog(PSAB_PAD_LEFT), DEC);
}
if (ps2x.Button(PSB_PAD_DOWN)) {
Serial.print(“DOWN held this hard: “);
Serial.println(ps2x.Analog(PSAB_PAD_DOWN), DEC);
}
vibrate = ps2x.Analog(PSAB_BLUE); //this will set the large motor vibrate speed based on
//how hard you press the blue (X) button
if (ps2x.NewButtonState()) //will be TRUE if any button changes state (on to off, or off to on)
{ if (ps2x.Button(PSB_L3))
Serial.println(“L3 pressed”);
if (ps2x.Button(PSB_R3))
Serial.println(“R3 pressed”);
if (ps2x.Button(PSB_L2))
Serial.println(“L2 pressed”);
if (ps2x.Button(PSB_R2))
Serial.println(“R2 pressed”);
if (ps2x.Button(PSB_GREEN))
Serial.println(“Triangle pressed”);
}
if (ps2x.ButtonPressed(PSB_RED)) //will be TRUE if button was JUST pressed
Serial.println(“Circle just pressed”);
if (ps2x.ButtonReleased(PSB_PINK)) //will be TRUE if button was JUST released
Serial.println(“Square just released”);
if (ps2x.NewButtonState(PSB_BLUE)) //will be TRUE if button was JUST pressed OR released
Serial.println(“X just changed”);
Serial.print(“Stick Values:”);
Serial.print(ps2x.Analog(PSS_LY), DEC); //Left stick, Y axis. Other options: LX, RY, RX
Serial.print(“,”);
Serial.print(ps2x.Analog(PSS_LX), DEC);
Serial.print(“,”);
Serial.print(ps2x.Analog(PSS_RY), DEC);
Serial.print(“,”);
Serial.println(ps2x.Analog(PSS_RX), DEC);
int left_speed= map(ps2x.Analog(PSS_LY),0,255, 255,-255);
int right_speed=map(ps2x.Analog(PSS_RY),0,255, 255,-255);
if ( left_speed < 0) {
motor3.run(FORWARD);
motor3.setSpeed(abs(left_speed));
delay(10);
}
if (right_speed < 0 ) {
motor4.run(FORWARD);
motor4.setSpeed(abs(right_speed));
delay(10);
}
if (right_speed > 0) {
motor4.run(BACKWARD);
motor4.setSpeed(abs(right_speed));
delay(10);
}
if (left_speed > 0) {
motor3.run(BACKWARD);
motor3.setSpeed(abs(left_speed));
delay(10);
}
delay(50);
}
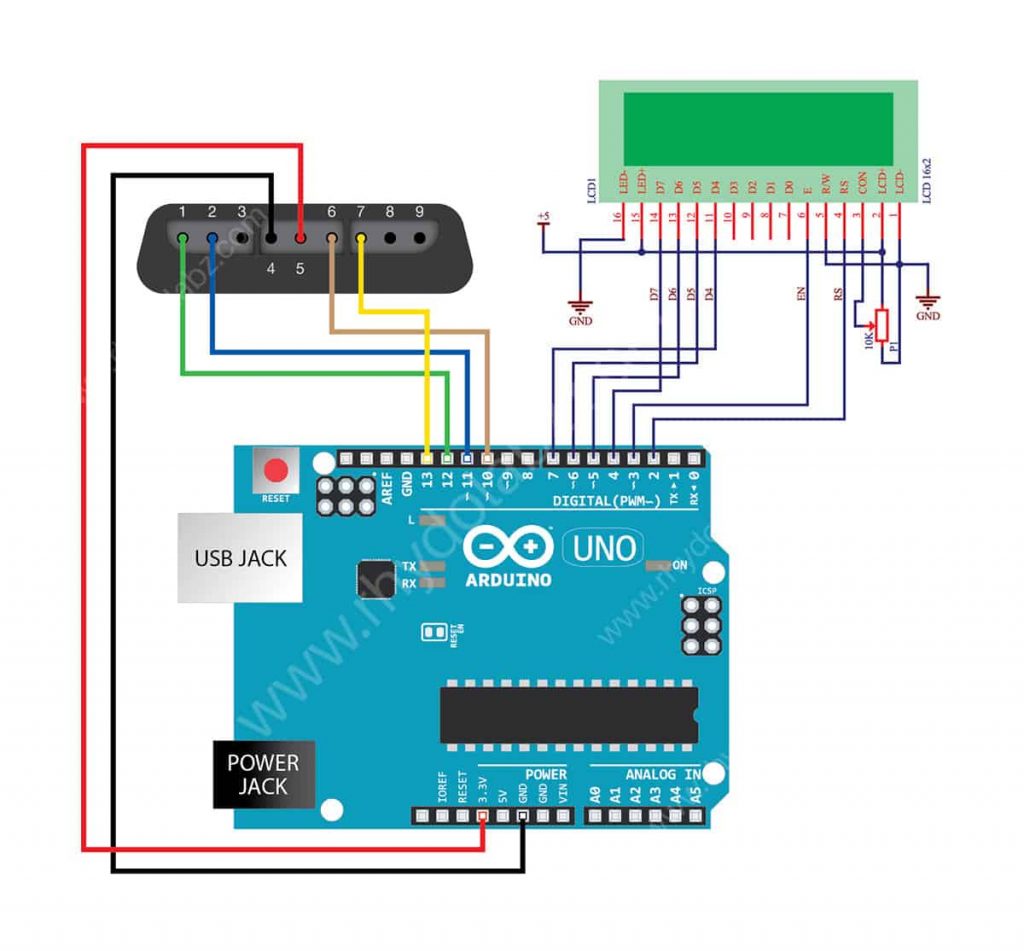
Wiring from Arduino to PS2 controller reciever