IOT Weather Indicator
In this project, I am using a Particle Photon to draw real time weather data from weather stations all over the world, and then displaying the forecast for the day with a NeoPixel LED Ring. I have also added a pressure sensor and a 7-segment 4 digit as modifications in an effort to broaden the capabilities of the project.
Engineer
Arnuv T
Area of Interest
Computer Science
School
Homestead High School
Grade
Rising Sophomore
Third Milestone
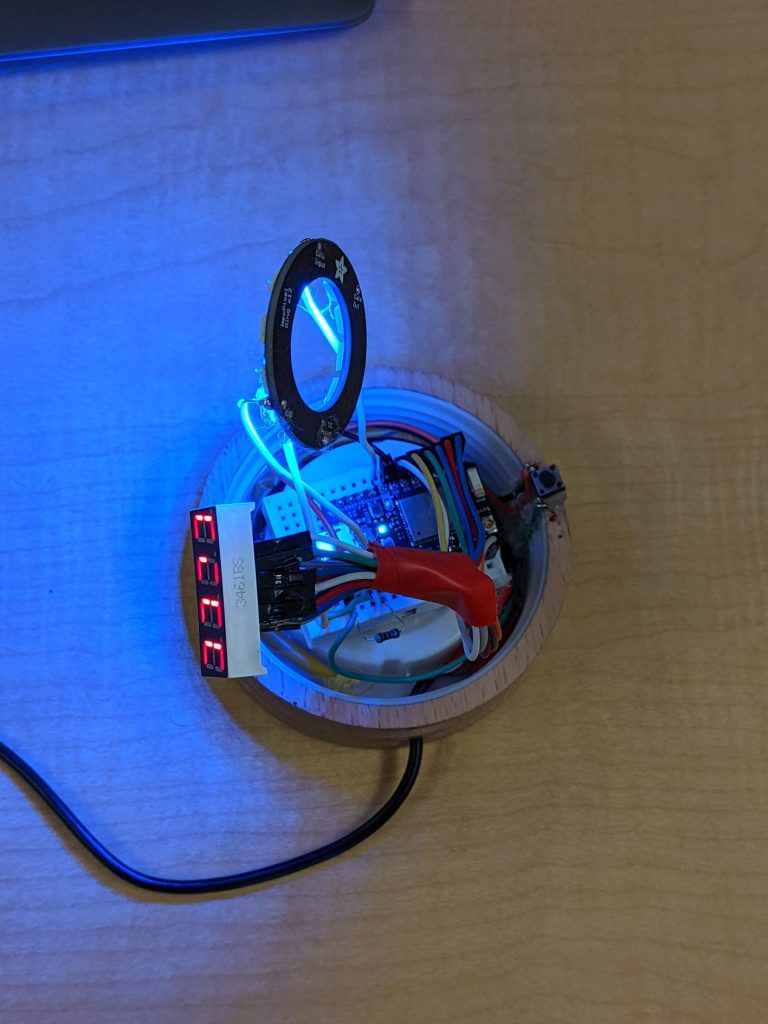
My Third Milestone was simple in theory, but proved to be much more challenging than anticipated. In this milestone I planned on putting everything together and fitting the display and NeoPixel ring into the jar.
Initially, I planned on simply gluing the breadboard to the lid, and then having the display and NeoPixel ring dangle down into the jar. However, because this is a screw-on lid, I couldn’t have any wires blocking the creases in the lid.
This stumped me for a while, but I found the drilling holes through the creases in the lid would allow the wires to fit while allowing the lid to screw on. I had to drill over 20 holes to accommodate all 20 wires, and this was one of the most tedious parts of the project.
Once all the wires were snuggly fit in the holes I had drilled, all the components perfectly fit in place, and I was able to fit everything in the little space I had.
This completed the project, and I felt palpable satisfaction as all my hard work, research, and time spent on this project had all paid off into a functional end result.
Future Modifications
If I had to modify this project in the future, I would definitely explore using a bigger jar as it would allow me to fit several more components, as well as an LCD display which would exponentially increase the possible things I could use this weather indicator for.
Second Milestone
My second milestone entailed two tasks, adding a display to my project as well as using webhooks to get data instead of using a Web API:
WebHooks
Initially, I used HTTP client, which is a client which can grab data from any HTTP website. It cannot get data from HTTPS websites, posing a large problem for me. In order to solve this, I explored several options such as editing the HTTP client library myself as well as exploring creating my own server that redirected HTTPS websites to HTTP. While both these ideas do work if done correctly, the amount of time taken to do either of the ideas would have taken a week at minimum – prompting me to explore other solutions.
After 2 days of intense research, I discovered webhooks, which is a way of getting a custom callback from a website, allowing me to call HTTP and HTTPS websites. After creating several custom webhooks in the Particle IDE, I was pleased to see that I was finally able to get data from the APIs I was calling.
7 – Segment Display
This IOT Weather Indicator initially only had the NeoPixel LED ring which displayed the weather, however I wanted more versatility and functionality from the lamp, so I decided to add in the 7-segment display.
This display can show all numbers and most letters, allowing me to display multiple widgets on the display such as stock data, Google calendar events, and most importantly time.
Implementing this display hardware wise was not a large task, and just required 12 data pins to be connected to the display. However, software wise the display was a challenge. The library for this display is optimized for Arduino, not Particle Photon (the micro-controller I am using), meaning some of the methods and byte codes I was passing to the display were incorrect. I had to spend around 2 days editing and testing the library until I finally got the result I was looking for
First Milestone
Motion Detecting Motor
STEM, Summer Camp, Arnuv Tandon STEM, Arnuv Tandon Coding, Arnuv, Arnuv Computer Science, Arnuv Tandon electornics, Arnuv Tandon, Arnuv Tandon, Arnuv Tandon, Arnuv Tandon Projects, Arnuv Tandon Project