Desktop CNC Drawing Machine
As my main project, I chose the Desktop CNC Drawing Machine. It takes instructions from a computer in the form of Gcode, and uses them to accurately reproduce a drawing with an amazing level of precision. I was able to create this project during my enrollment in Bluestamp Engineering, an engineering summer program available for highschoolers in New York, San Francisco, Palo Alto, and Denver.
School
Collegiate
Grade
Rising Freshman
Engineer
Tyler
Area of Interest
Mechanical Engineering
Final Milestone
The final result of my project was a CNC plotter capable of producing accurate drawings from instructions sent to it in the form of G-Code. It uses stepper motors and a servo motor to have a complete range of motion on a 40mm x 40mm drawing surface.
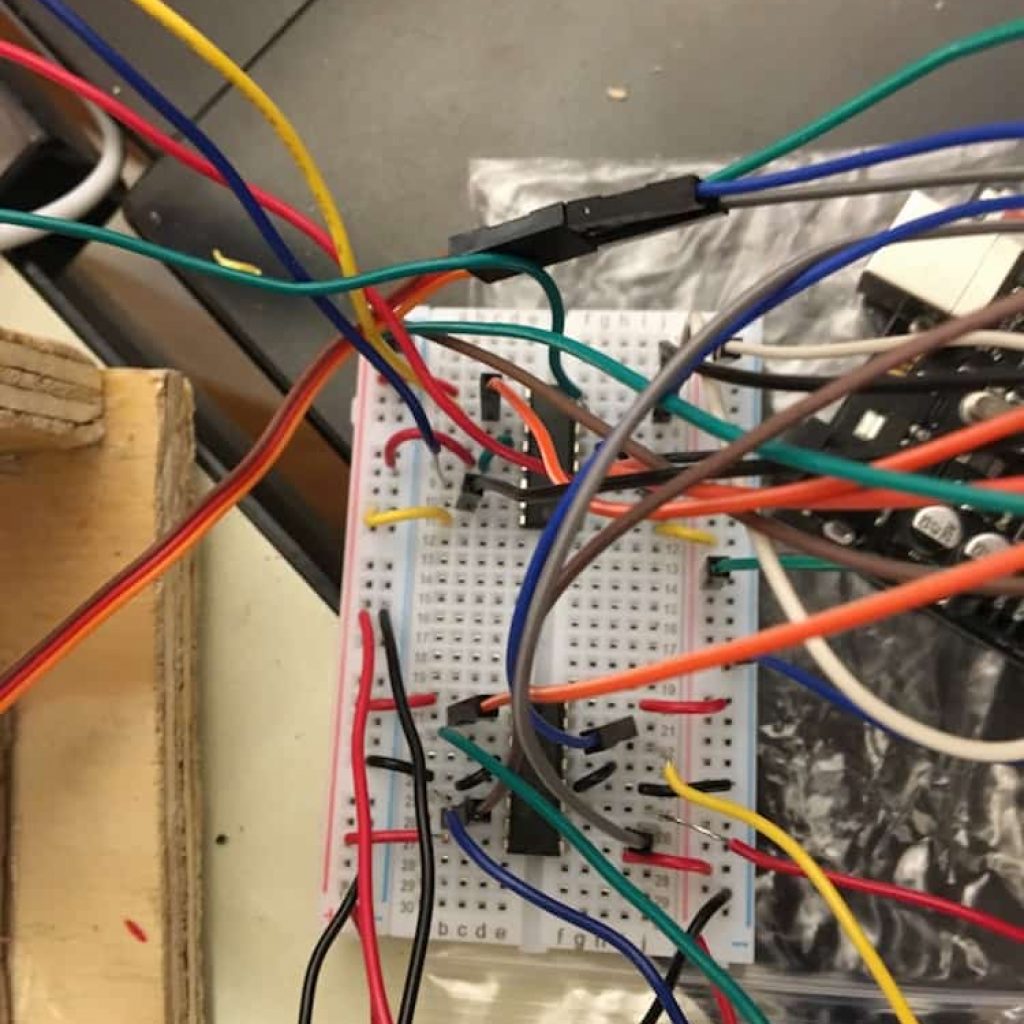
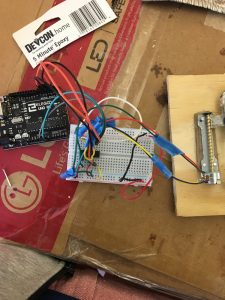
I faced many challenges getting from the last milestone to this one, as I had to re identify my stepper motor leads multiple times, because I had to transfer the circuit back to the breadboard after transferring it to the PERF board was unsuccessful. Overall, this has been a fantastic project, giving me the opportunity to realize what I was capable of building in just two short weeks, while teaching me many new skills at the same time.
Third Milestone
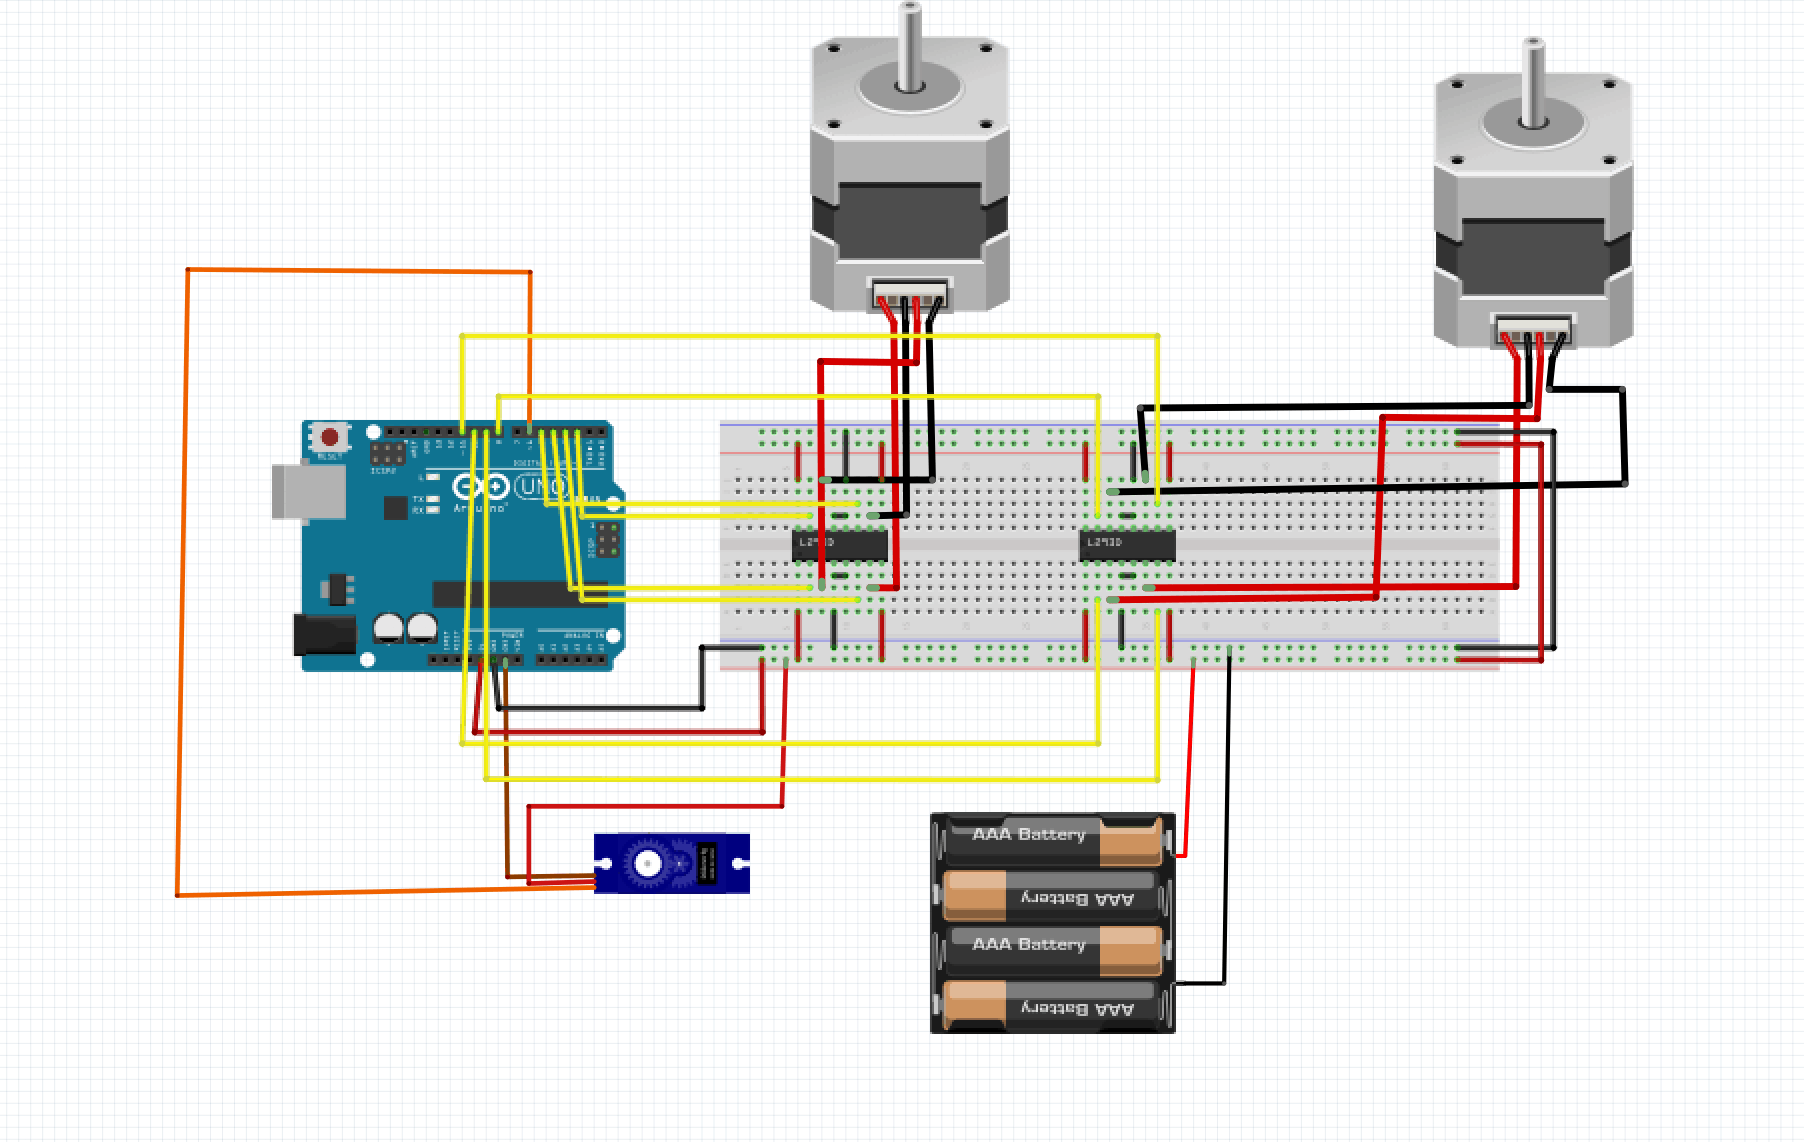
Schematic (note: I'm not using 4 AA batteries, but rather a portable cell phone battery)
/*
Mini CNC Plotter firmware, based in TinyCNC https://github.com/MakerBlock/TinyCNC-Sketches
Send GCODE to this Sketch using gctrl.pde https://github.com/damellis/gctrl
Convert SVG to GCODE with MakerBot Unicorn plugin for Inkscape available here https://github.com/martymcguire/inkscape-unicorn
More information about the Mini CNC Plotter here (german, sorry): http://www.makerblog.at/2015/02/projekt-mini-cnc-plotter-aus-alten-cddvd-laufwerken/
*/
#include <Servo.h>
#include <Stepper.h>
#define LINE_BUFFER_LENGTH 512
// Servo position for Up and Down
const int penZUp = 130;
const int penZDown = 166;
// Servo on PWM pin 6
const int penServoPin = 6;
// Should be right for DVD steppers, but is not too important here
const int stepsPerRevolution = 20;
// create servo object to control a servo
Servo penServo;
// Initialize steppers for X- and Y-axis using this Arduino pins for the L293D H-bridge
Stepper myStepperY(stepsPerRevolution, 2,3,4,5);
Stepper myStepperX(stepsPerRevolution, 8,9,10,11);
/* Structures, global variables */
struct point {
float x;
float y;
float z;
};
// Current position of plothead
struct point actuatorPos;
// Drawing settings, should be OK
float StepInc = 1;
int StepDelay = 0;
int LineDelay = 50;
int penDelay = 50;
// Motor steps to go 1 millimeter.
// Use test sketch to go 100 steps. Measure the length of line.
// Calculate steps per mm. Enter here.
float StepsPerMillimeterX = 6.5;
float StepsPerMillimeterY = 6.5;
// Drawing robot limits, in mm
// OK to start with. Could go up to 50 mm if calibrated well.
float Xmin = 0;
float Xmax = 35;
float Ymin = 0;
float Ymax = 35;
float Zmin = 0;
float Zmax = 1;
float Xpos = Xmin;
float Ypos = Ymin;
float Zpos = Zmax;
// Set to true to get debug output.
boolean verbose = false;
// Needs to interpret
// G1 for moving
// G4 P300 (wait 150ms)
// M300 S30 (pen down)
// M300 S50 (pen up)
// Discard anything with a (
// Discard any other command!
/**********************
* void setup() – Initialisations
***********************/
void setup() {
// Setup
Serial.begin( 9600 );
penServo.attach(penServoPin);
penServo.write(penZUp);
delay(200);
// Decrease if necessary
myStepperX.setSpeed(180);
myStepperY.setSpeed(180);
// Set & move to initial default position
// TBD
// Notifications!!!
Serial.println(“Mini CNC Plotter alive and kicking!”);
Serial.print(“X range is from “);
Serial.print(Xmin);
Serial.print(” to “);
Serial.print(Xmax);
Serial.println(” mm.”);
Serial.print(“Y range is from “);
Serial.print(Ymin);
Serial.print(” to “);
Serial.print(Ymax);
Serial.println(” mm.”);
}
/**********************
* void loop() – Main loop
***********************/
void loop()
{
delay(200);
char line[ LINE_BUFFER_LENGTH ];
char c;
int lineIndex;
bool lineIsComment, lineSemiColon;
lineIndex = 0;
lineSemiColon = false;
lineIsComment = false;
while (1) {
// Serial reception – Mostly from Grbl, added semicolon support
while ( Serial.available()>0 ) {
c = Serial.read();
if (( c == ‘\n’) || (c == ‘\r’) ) { // End of line reached
if ( lineIndex > 0 ) { // Line is complete. Then execute!
line[ lineIndex ] = ‘\0’; // Terminate string
if (verbose) {
Serial.print( “Received : “);
Serial.println( line );
}
processIncomingLine( line, lineIndex );
lineIndex = 0;
}
else {
// Empty or comment line. Skip block.
}
lineIsComment = false;
lineSemiColon = false;
Serial.println(“ok”);
}
else {
if ( (lineIsComment) || (lineSemiColon) ) { // Throw away all comment characters
if ( c == ‘)’ ) lineIsComment = false; // End of comment. Resume line.
}
else {
if ( c <= ‘ ‘ ) { // Throw away whitepace and control characters
}
else if ( c == ‘/’ ) { // Block delete not supported. Ignore character.
}
else if ( c == ‘(‘ ) { // Enable comments flag and ignore all characters until ‘)’ or EOL.
lineIsComment = true;
}
else if ( c == ‘;’ ) {
lineSemiColon = true;
}
else if ( lineIndex >= LINE_BUFFER_LENGTH-1 ) {
Serial.println( “ERROR – lineBuffer overflow” );
lineIsComment = false;
lineSemiColon = false;
}
else if ( c >= ‘a’ && c <= ‘z’ ) { // Upcase lowercase
line[ lineIndex++ ] = c-‘a’+’A’;
}
else {
line[ lineIndex++ ] = c;
}
}
}
}
}
}
void processIncomingLine( char* line, int charNB ) {
int currentIndex = 0;
char buffer[ 64 ]; // Hope that 64 is enough for 1 parameter
struct point newPos;
newPos.x = 0.0;
newPos.y = 0.0;
// Needs to interpret
// G1 for moving
// G4 P300 (wait 150ms)
// G1 X60 Y30
// G1 X30 Y50
// M300 S30 (pen down)
// M300 S50 (pen up)
// Discard anything with a (
// Discard any other command!
while( currentIndex < charNB ) {
switch ( line[ currentIndex++ ] ) { // Select command, if any
case ‘U’:
penUp();
break;
case ‘D’:
penDown();
break;
case ‘G’:
buffer[0] = line[ currentIndex++ ]; // /!\ Dirty – Only works with 2 digit commands
// buffer[1] = line[ currentIndex++ ];
// buffer[2] = ‘\0’;
buffer[1] = ‘\0’;
switch ( atoi( buffer ) ){ // Select G command
case 0: // G00 & G01 – Movement or fast movement. Same here
case 1:
// /!\ Dirty – Suppose that X is before Y
char* indexX = strchr( line+currentIndex, ‘X’ ); // Get X/Y position in the string (if any)
char* indexY = strchr( line+currentIndex, ‘Y’ );
if ( indexY <= 0 ) {
newPos.x = atof( indexX + 1);
newPos.y = actuatorPos.y;
}
else if ( indexX <= 0 ) {
newPos.y = atof( indexY + 1);
newPos.x = actuatorPos.x;
}
else {
newPos.y = atof( indexY + 1);
indexY = ‘\0’;
newPos.x = atof( indexX + 1);
}
drawLine(newPos.x, newPos.y );
// Serial.println(“ok”);
actuatorPos.x = newPos.x;
actuatorPos.y = newPos.y;
break;
}
break;
case ‘M’:
buffer[0] = line[ currentIndex++ ]; // /!\ Dirty – Only works with 3 digit commands
buffer[1] = line[ currentIndex++ ];
buffer[2] = line[ currentIndex++ ];
buffer[3] = ‘\0’;
switch ( atoi( buffer ) ){
case 300:
{
char* indexS = strchr( line+currentIndex, ‘S’ );
float Spos = atof( indexS + 1);
// Serial.println(“ok”);
if (Spos == 30) {
penDown();
}
if (Spos == 50) {
penUp();
}
break;
}
case 114: // M114 – Repport position
Serial.print( “Absolute position : X = ” );
Serial.print( actuatorPos.x );
Serial.print( ” – Y = ” );
Serial.println( actuatorPos.y );
break;
default:
Serial.print( “Command not recognized : M”);
Serial.println( buffer );
}
}
}
}
/*********************************
* Draw a line from (x0;y0) to (x1;y1).
* Bresenham algo from https://www.marginallyclever.com/blog/2013/08/how-to-build-an-2-axis-arduino-cnc-gcode-interpreter/
* int (x1;y1) : Starting coordinates
* int (x2;y2) : Ending coordinates
**********************************/
void drawLine(float x1, float y1) {
if (verbose)
{
Serial.print(“fx1, fy1: “);
Serial.print(x1);
Serial.print(“,”);
Serial.print(y1);
Serial.println(“”);
}
// Bring instructions within limits
if (x1 >= Xmax) {
x1 = Xmax;
}
if (x1 <= Xmin) {
x1 = Xmin;
}
if (y1 >= Ymax) {
y1 = Ymax;
}
if (y1 <= Ymin) {
y1 = Ymin;
}
if (verbose)
{
Serial.print(“Xpos, Ypos: “);
Serial.print(Xpos);
Serial.print(“,”);
Serial.print(Ypos);
Serial.println(“”);
}
if (verbose)
{
Serial.print(“x1, y1: “);
Serial.print(x1);
Serial.print(“,”);
Serial.print(y1);
Serial.println(“”);
}
// Convert coordinates to steps
x1 = (int)(x1*StepsPerMillimeterX);
y1 = (int)(y1*StepsPerMillimeterY);
float x0 = Xpos;
float y0 = Ypos;
// Let’s find out the change for the coordinates
long dx = abs(x1-x0);
long dy = abs(y1-y0);
int sx = x0<x1 ? StepInc : -StepInc;
int sy = y0<y1 ? StepInc : -StepInc;
long i;
long over = 0;
if (dx > dy) {
for (i=0; i<dx; ++i) {
myStepperX.step(sx);
over+=dy;
if (over>=dx) {
over-=dx;
myStepperY.step(sy);
}
delay(StepDelay);
}
}
else {
for (i=0; i<dy; ++i) {
myStepperY.step(sy);
over+=dx;
if (over>=dy) {
over-=dy;
myStepperX.step(sx);
}
delay(StepDelay);
}
}
if (verbose)
{
Serial.print(“dx, dy:”);
Serial.print(dx);
Serial.print(“,”);
Serial.print(dy);
Serial.println(“”);
}
if (verbose)
{
Serial.print(“Going to (“);
Serial.print(x0);
Serial.print(“,”);
Serial.print(y0);
Serial.println(“)”);
}
// Delay before any next lines are submitted
delay(LineDelay);
// Update the positions
Xpos = x1;
Ypos = y1;
}
// Raises pen
void penUp() {
penServo.write(penZUp);
delay(LineDelay);
Zpos=Zmax;
if (verbose) {
Serial.println(“Pen up!”);
}
}
// Lowers pen
void penDown() {
penServo.write(penZDown);
delay(LineDelay);
Zpos=Zmin;
if (verbose) {
Serial.println(“Pen down.”);
}
}
import java.awt.event.KeyEvent;
import javax.swing.JOptionPane;
import processing.serial.*;
Serial port = null;
// select and modify the appropriate line for your operating system
// leave as null to use interactive port (press ‘p’ in the program)
String portname = null;
//String portname = Serial.list()[0]; // Mac OS X
//String portname = “/dev/ttyUSB0”; // Linux
//String portname = “COM6”; // Windows
boolean streaming = false;
float speed = 0.001;
String[] gcode;
int i = 0;
void openSerialPort()
{
if (portname == null) return;
if (port != null) port.stop();
port = new Serial(this, portname, 9600);
port.bufferUntil(‘\n’);
}
void selectSerialPort()
{
String result = (String) JOptionPane.showInputDialog(frame,
“Select the serial port that corresponds to your Arduino board.”,
“Select serial port”,
JOptionPane.QUESTION_MESSAGE,
null,
Serial.list(),
0);
if (result != null) {
portname = result;
openSerialPort();
}
}
void setup()
{
size(500, 250);
openSerialPort();
}
void draw()
{
background(0);
fill(255);
int y = 24, dy = 12;
text(“INSTRUCTIONS”, 12, y); y += dy;
text(“p: select serial port”, 12, y); y += dy;
text(“1: set speed to 0.001 inches (1 mil) per jog”, 12, y); y += dy;
text(“2: set speed to 0.010 inches (10 mil) per jog”, 12, y); y += dy;
text(“3: set speed to 0.100 inches (100 mil) per jog”, 12, y); y += dy;
text(“arrow keys: jog in x-y plane”, 12, y); y += dy;
text(“page up & page down: jog in z axis”, 12, y); y += dy;
text(“$: display grbl settings”, 12, y); y+= dy;
text(“h: go home”, 12, y); y += dy;
text(“0: zero machine (set home to the current location)”, 12, y); y += dy;
text(“g: stream a g-code file”, 12, y); y += dy;
text(“x: stop streaming g-code (this is NOT immediate)”, 12, y); y += dy;
y = height – dy;
text(“current jog speed: ” + speed + ” inches per step”, 12, y); y -= dy;
text(“current serial port: ” + portname, 12, y); y -= dy;
}
void keyPressed()
{
if (key == ‘1’) speed = 0.001;
if (key == ‘2’) speed = 0.01;
if (key == ‘3’) speed = 0.1;
if (!streaming) {
if (keyCode == LEFT) port.write(“G91\nG20\nG00 X-” + speed + ” Y0.000 Z0.000\n”);
if (keyCode == RIGHT) port.write(“G91\nG20\nG00 X” + speed + ” Y0.000 Z0.000\n”);
if (keyCode == UP) port.write(“G91\nG20\nG00 X0.000 Y” + speed + ” Z0.000\n”);
if (keyCode == DOWN) port.write(“G91\nG20\nG00 X0.000 Y-” + speed + ” Z0.000\n”);
if (keyCode == KeyEvent.VK_PAGE_UP) port.write(“G91\nG20\nG00 X0.000 Y0.000 Z” + speed + “\n”);
if (keyCode == KeyEvent.VK_PAGE_DOWN) port.write(“G91\nG20\nG00 X0.000 Y0.000 Z-” + speed + “\n”);
if (key == ‘h’) port.write(“G90\nG20\nG00 X0.000 Y0.000 Z0.000\n”);
if (key == ‘v’) port.write(“$0=75\n$1=74\n$2=75\n”);
//if (key == ‘v’) port.write(“$0=100\n$1=74\n$2=75\n”);
if (key == ‘s’) port.write(“$3=10\n”);
if (key == ‘e’) port.write(“$16=1\n”);
if (key == ‘d’) port.write(“$16=0\n”);
if (key == ‘0’) openSerialPort();
if (key == ‘p’) selectSerialPort();
if (key == ‘$’) port.write(“$$\n”);
}
if (!streaming && key == ‘g’) {
gcode = null; i = 0;
File file = null;
println(“Loading file…”);
selectInput(“Select a file to process:”, “fileSelected”, file);
}
if (key == ‘x’) streaming = false;
}
void fileSelected(File selection) {
if (selection == null) {
println(“Window was closed or the user hit cancel.”);
} else {
println(“User selected ” + selection.getAbsolutePath());
gcode = loadStrings(selection.getAbsolutePath());
if (gcode == null) return;
streaming = true;
stream();
}
}
void stream()
{
if (!streaming) return;
while (true) {
if (i == gcode.length) {
streaming = false;
return;
}
if (gcode[i].trim().length() == 0) i++;
else break;
}
println(gcode[i]);
port.write(gcode[i] + ‘\n’);
i++;
}
void serialEvent(Serial p)
{
String s = p.readStringUntil(‘\n’);
println(s.trim());
if (s.trim().startsWith(“ok”)) stream();
if (s.trim().startsWith(“error”)) stream(); // XXX: really?
}
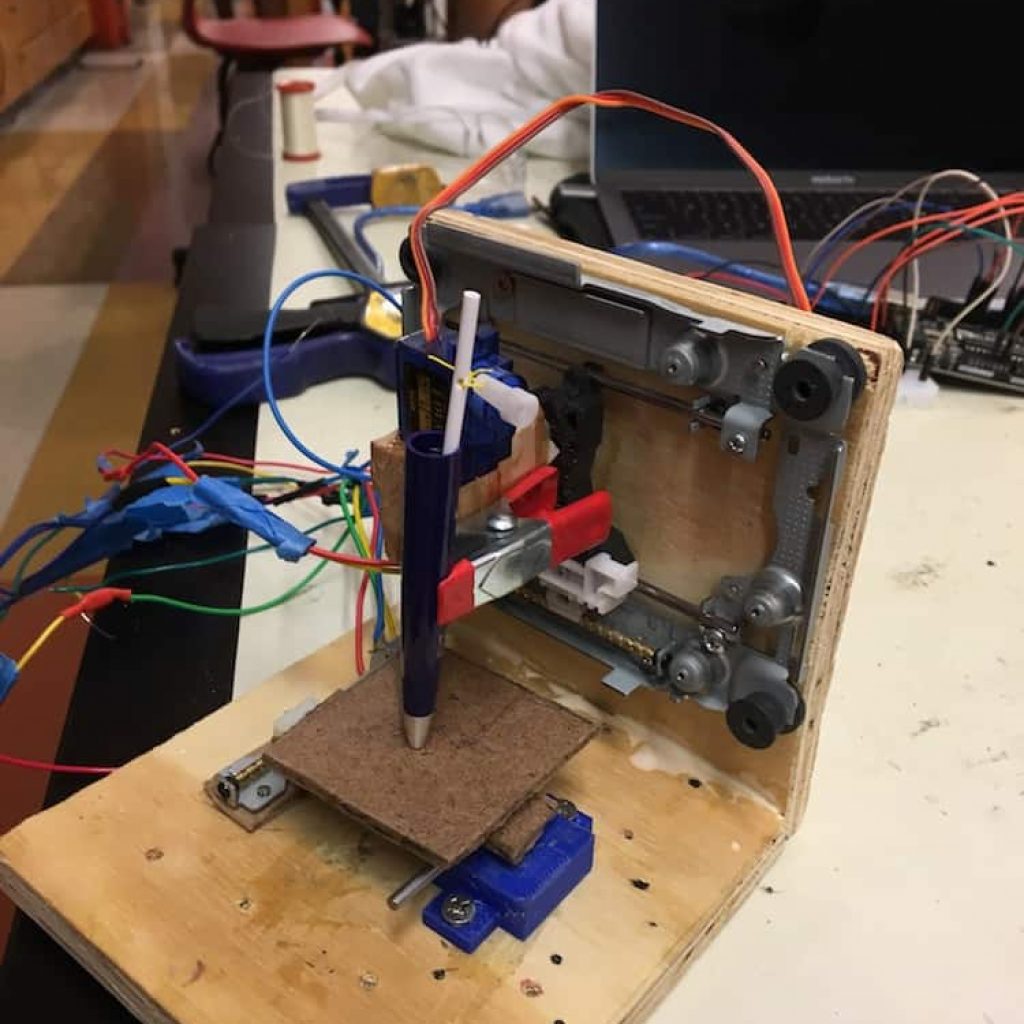
My third milestone was assembling the entire machine and getting it to draw, though the quality of the drawings can be greatly improved upon. It draws by using one stepper motor to move the pen side to side, another stepper motor to move the drawing platform forward and backward, and a servo to move the pen up and down.
I faced a lot of challenges in reaching this milestone, as I had to create the x axis stepper motor system without using the track from the dvd drives, as the track would not fit the motor. As a result, I had to go through several iterations of this track until I got to the most functional method. Also, the stepper motors I am using are very small and have very little torque, so I had to very finely adjust the tracks and the pen in order to ensure that nothing was getting stuck and preventing the motion of the motors.
Overall, I’m very happy with my progress so far, as it only took a few days to fully assemble my machine and make it functional. The next step is to get the machine to produce better and better drawings.
Second Milestone
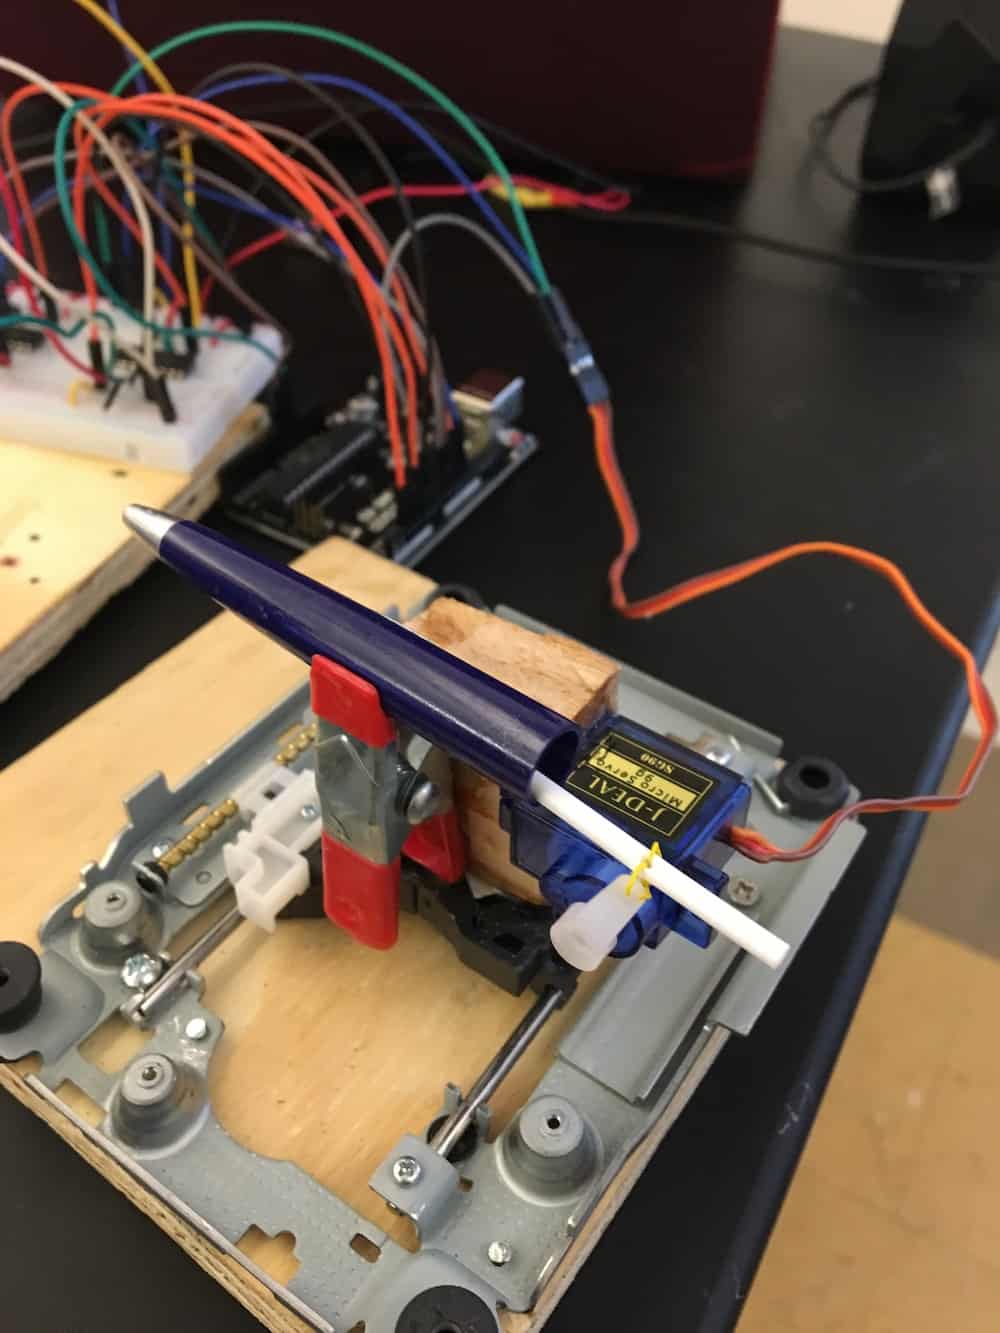
The second step for creating my project was the pen mechanism. What this mechanism does is use a servo to extend and retract a pen, allowing the CNC machine to lift up the pen and start drawing in a different place. It uses a sevo that is attached to the ink cartridge of the pen with fishing line to lift up the ink cartridge and retract the pen tip into the pen. It can then push the pen tip out of the pen, and start drawing again. The main challenge I faced in creating this mechanism was figuring out a way to keep it simple, thus making it more consistent, while still being effective. I was originally planning to design an attachment mechanism in Fusion 360, with a intricately designed attachment device between the servo and ink cartridge, allowing the joint to pivot and move smoothly back and forth. This would allow the rotational movement of the servo to be converted to linear movement of the pen.
However, I realized that this kind of design was really time consuming to create in Fusion 360, and unnecessarily complicated. Fortunately, in the process of trying to figure out a way to attach the pen without the movement mechanism (which I would add later), I realized simple fishing line would accomplish what the intricate 3D printed part was supposed to do. After that realization, it was fairly easy to glue the servo on and attach it to the ink cartridge. As a result, I think this mechanism is a quality one, as it’s very simple yet also very effective.
#include <Servo.h>
Servo pen;
void setup() {
// put your setup code here, to run once:
pen.attach(6);
}
void loop() {
// put your main code here, to run repeatedly:
pen.write(180);
delay(1000);
pen.write(145);
delay(1000);
}
First Milestone

As my first milestone, I was able to make my stepper motors work using dual h-bridge motor drivers and an Arduino Uno. Stepper motors work by using changing magnetic fields that “step” along teeth in gears inside the motor. Each time the magnetic field changes, it moves the magnetic field farther away and reverses polarity, pulling magnetized teeth on the gears closer along with it. It changes this magnetic field using electromagnetism, running electric current through coils of wire, inducing a magnetic field. The h-bridge motor drivers are key to reversing the polarity of the magnetic field, as they are used to reverse the direction of the current flowing into the motor.
I faced a large challenge in reaching this milestone, as the h-bridge I was using was dysfunctional, and the schematic I was following was not very good. In the process of troubleshooting, I was able to isolate the source of these problems and get my motor running, but it was difficult as there were two sources of the problem rather than just one. Overall, reaching this milestone took much longer than ideal, due to the issues I mentioned earlier. However, now that I have gotten that completed, I should be able to proceed smoothly with my process.
#include <Stepper.h>
int stepcount = 0;
int motorSpeed = 150;
const int stepsPerRev = 20;
Stepper stepper(stepsPerRev, 2, 3, 4, 5);
void setup() {
// put your setup code here, to run once:
stepper.setSpeed(motorSpeed);
}
void loop() {
// put your main code here, to run repeatedly:
stepper.step(100);
delay(5);
}
Starter Project
As a quick starter project to get settled and familiar with the Bluestamp program, I chose the Minty Boost AA Battery Cell Phone Charger. Using the power from two AA batteries, it can charge your cell phone when you most need it, all while being stored inside a compact and portable metal case. I soldered it together using the tutorial on the Adafruit website (found here: https://learn.adafruit.com/minty-boost/solder-it). It has a number of components (ceramic capacitors, electrolytic capacitors, a power inductor, a boost converter chip, and a schottky diode,) along with standard resistors. All of these components are used to optimize the electricity from the two AA batteries for charging a cell phone. For example, the ceramic and electrolytic capacitors are used to smooth the input and output voltages. The boost converter is used to step up the voltage of the input power from the batteries while stepping down current. The other components are used for regulatory, smaller tasks, such as making sure the power only flows one way, and helping to increase voltage.
I faced multiple challenges, as there were two components missing (a resistor and the diode). I managed to overcome these challenges by putting three resistors in series to create a roughly equivalent amount of resistance, and found another diode in the bin bluestamp provided. Overall, this project was a really good way to refresh my soldering skills, adapt to the Bluestamp environment, and create something functional and useful at the same time.