Edward O.
Hi, I’m Edward. I’m a rising sophomore at La Salle Academy. For my project, I decided to build the Voice-Controlled WiFi Robot based on this instructable. I chose this project because I wanted to do a mix of engineering and programming. Also, I thought it’d cool to build a robot of my own.
Engineer
Edward O.
Area of Interest
Electrical Engineering
School
Bronx Lighthouse College Prep Academy
Grade
Incoming Sophomore
Final Milestone
My second and final milestone was creating an app for voice control on my phone, and connecting it to my phone through WiFi. My first step was connecting the NodeMCU to WiFi which was fairly simple. I wrote code in Arduino that gave the NodeMCU the SSID (WiFi Name) and password, so that it could find and connect to the WiFi. In doing this, I obtained its IP address and used it in the next step. Connecting the NodeMCU to my phone was the next step, and it was fairly simple as well. I created an app using MIT App Inventor, that could take the input of the IP address obtained from the NodeMCU and use that to connect my phone to the NodeMCU. In connecting to the NodeMCU, my phone can send voice configured commands to the NodeMCU, which it can carryout.
The code for I used in programming the robot and the app I used to control it, along with the original instructable and my bill of materials, are linked below.

First Milestone
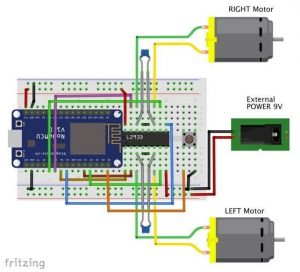
The main project that I chose was the Voice-controlled WiFi robot. My first milestone was getting it to move. The first and one of the most important pieces of the project is the H-Bridge. It’s a circuit that sends a current out across an area in either direction. In my project, I used this H-bridge to apply voltage to the left and right motors. This makes the wheels move in whichever direction it needs to. The NodeMCU is the next important part, because it contains the instructions for the robot to move forward, backwards, left, right, etc. I programmed it with Arduino IDE since they are compatible, and uploaded code telling it which direction to move and when. It also controls the H-Bridge which directs the motors. It took me a very long time to figure out how to get the motors moving, and I tried rewiring my circuit, replacing my NodeMCU and H-Bridge, and battery. I assembled and reassembled numerous times, and finally got it to work. Eventually, I want to connect my NodeMCU to WiFi, and connect my phone to it so that I can voice control it.
Starter Project
The MintyBoost is a portable charger made from an Altoids tin. In this project, we soldered resistors, diodes, and capacitors onto a circuit board, and used Double A batteries to complete the circuit. The resistors serve their purpose in reducing the current flow in the circuit, to prevent circuit overflow and eventual shorting. The diode only allows for the current to flow in one direction throughout the circuit, so that the phone (or other devices) doesn’t/don’t lose energy as it’s charging. The entire circuit board boost converter increases the voltage from the battery (power source, input) while decreasing the current (resistors), to the output.
Comments


Congratulations son!! Keep Up The Good Work.