Smart Mirror

Hello, my name is Sierra and I am currently a junior at Uncommon Charter High School. My intensive project is the Smart Mirror .I chose this project because I get to explore new topics of engineering whilst building a project that is of use to my family and I.

Engineer

Sierra S

Area of Intrest

Civil Engineering

School

Uncommon Charter High School

Grade

Incoming Junior

REFLECTION

Finishing my Smart Mirror was a significant part of becoming an engineer because it was the first time I had hands on experience with different power tools and software. Before starting these projects at BlueStamp, I did not have much experience in the digital engineering fields but after finishing this awesome project I now have a better understanding of computer science, programming and coding.Working on this project at BlueStamp has inspired me to look for and take advantage of opportunities to improve my skills and find my passion. Additionally, I met many outstanding instructors and students who share the same interest as me, as a result , have motivated me to continue to pursue my passions and excel at my passions in the engineering field.

My Time At BlueStamp

Final Milestone

For my third and final milestone, I added a non-default custom module to my Smart Mirror.

Specifically, I added daily quotes from authors, celebrities, and philosophers to appear on my Smart Mirror. Adding a daily quote to the Smart Mirror was a significant milestone because it taught me exactly how to add more features onto my mirror in the future.To reach this milestone, I requested an API token from https://quotesondesign.com/ and gained access to over a thousand random quotes.Next, on my Raspberry Pi, I opened my Python script in Thonny IDE which, similar to VIM in terminal, enables me to access the Smart Mirror script and edit it.Lastly, I used the quotesondesign URL and the previous code example from the news weather and location to write the code for the daily quotes.

Using this example, I better understood how to get the daily quotes to display on the Smart Mirror by simply changing the class and variables used on the quoteondesign website.

See link here: http://quotesondesign.com/api/3.0/api-3.0.json?callback=my_function

Through this project, I learned more about how to code in Python and, more specifically, different calls to get the quote to show up on the screen.Some examples of the calls I have used in my script were class def and (self).

See Figure 1:
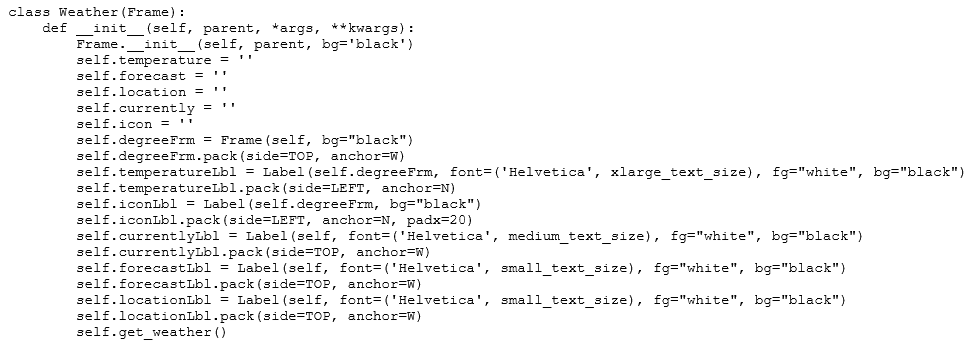
code-expample-of-weather

Second Milestone

SECOND MILESTONE

For my Second Milestone, I constructed a frame for the Smart Mirror.Building the frame is one of the fundamental parts of building the Smart Mirror because it gives it a more realistic, everyday mirror feel. Using HackerShacks Smart Mirror project tutorial, I reviewed the tools and materials I needed to build the frame such as wood planks, elastic straps, a wood saw, and an acrylic see-through mirror.

See link here: https://www.youtube.com/watch?v=fkVBAcvbrjU&t=497s

Using a wood saw, I cut wooden planks with angled ends to fit the size of the mirror for the frame. See Figure 1.

The see-through acrylic mirror allowed the contents of the mirror to show through while also being a reflective surface.Next, using a Dremel, a power tool used for its rotary power, I cut the semi-transparent acrylic to align with the monitor screen and frame. To reinforce the acrylic onto the mirror I hot glued it onto the inner workings of the frame. Lastly, after making the basic framework I measured and hot glued elastic straps to the top and bottom of the frame. This made placing the frame onto the monitor much easier and less time-consuming. Through completing this part of the project, I learned the importance of taking precise measurements before cutting materials. Originally when I cut the wood for the frame I didn’t measure each side to a 45 degree angle. This resulted in the corners of the mirror being slightly misaligned and not being exact 90 degree angles. This is important because without precise measurement you can waste more time cutting materials afresh and risk overcutting which will cause avoidable difficulties. I also learned how to function and the use of power tools such as the dremel and the wood saw.

See finished product
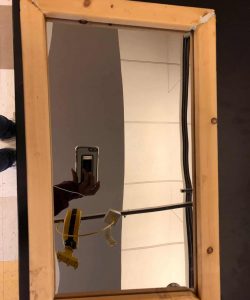
Figure 1
just-frame
Figure 2
frame-and-working-monitor

First Milestone

My intensive project is the Smart Mirror.

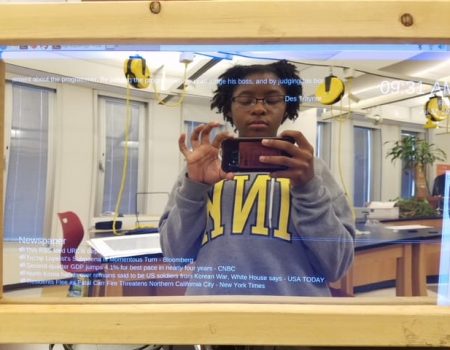
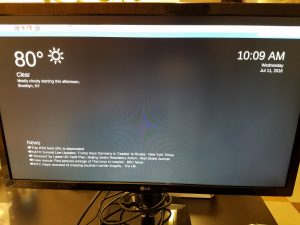
The Smart Mirror functions as your everyday mirror. Unlike normal mirrors, the smart mirror projects the weather, your location, and the news. See Figure 1.For my first milestone, I integrated multiple APIs into a Python script running on Raspberry Pi. I successfully downloaded necessary files and dependencies and registered the API tokens for weather news and location websites.An application programming interface, or API for short, is a set of protocols and tools used for programming.One example is the google maps API. Instead of recreating a map every time I wanted to show one on a website or other software, I can use the existing google maps software to do the same action more efficiently.

An API token is a unique identifier of an application requesting access to a service.A user can request an API token from a website that in return will give them information such as the user’s location and weather.Using Hackershack’s Github instructions, I used my Raspberry Pi 3 to display specific time weather and location on the monitor.

See link here:  https://github.com/HackerShackOfficial/Smart-Mirror

There were many steps to reach this milestone. First, I connected all wires (HDMI cables and Raspberry Pi) that would enable me to project the content onto the monitor.Raspberry Pi is a series of small single board computers often used to promote basic computer science skills. It is commonly used in projects such as these for ease of use and relative cheapness.Next, using the terminal and the Github instructions, I gained access to the smart mirror’s files that have space to insert API tokens for the mirror display.I used the command line Terminal in Raspberry Pi to navigate through files and edit code used for the mirror.For instance, I used Dir and Cd commands to both access files and change directories in addition to Vim to access the script.

Using Dir and Cd commands. Notice how after dir (standing for directory) all the folders are visible. After, cd (meaning change directory), I access the sub folder Smart-mirror- master of the main folder Desktop. Vim is a text editing program used to open and display a file to modify within the command line.Through Vim, I was able to view and edit the features on the display screen using the URLs and API tokens from websites like Dark sky and Freegeoip.Some topics I have learned whilst completing this project is terminal commands and simple code in Python.More specifically, I learned how to access and exit out of directories and edit code in Python.

  Some issues I have encountered was getting the correct IP addresses, links, and making sure there were not any errors in my code . Several websites that I initially requested API tokens from were shut down and I was not able to receive the specific information to display on the mirror. To solve this I searched for an alternative API for a similar feature.Another problem I encountered was making sure that there were no mistakes in my code.Due to little coding experience, it is easy to make minor mistakes that are essential to running the code properly. By having independence in trying to solve mistakes in my code and navigating around directories and files , I learned more about commands and functions of terminals.

FIGURES

Figure 1

Starter Project

For my starter project, I built the Gram Piano by Sparkfun, a miniature piano that enables the user to play and switch between three octaves. The Gram Piano was  very similar to a grand piano except rather than having physical keys to press down on, the Gram Piano only requires the user to place their finger on the keys displayed on PCB board.

See link here: https://learn.sparkfun.com/tutorials/gram-piano-assembly-guide.

Through this project, I learned more about soldering and  electronics.More specifically, to complete this project I was introduced to using a soldering iron , its uses and how to DE solder. Additionally, in this project I learned the functions of electrical components and how they contribute to the technology we use today. This piano had  many components such as a microcontroller, batteries, LED lights, a power switch, buttons, potentiometer, capacitors, and resistors. The batteries were the source of power for the gram piano. When the power switch was turned on, both LED lights lit up to indicate that the piano was ready to play. LED lights or Light Emitting Diodes are light sources that when a current flow is applied emits its designated light color. The microcontroller managed which sound came out of the keys of the octave. When the octave was changed, the sound of each key was altered. Additionally, the microcontroller came with a pre-installed program that can be utilized soon after the piano is constructed There is 34k of program space for  the user to design and modify the sounds from the keys. The capacitors are an electrical component that stores electrical energy to be released later. Resistors on the other hand regulate signal flows, reduce current flows and distribute voltages throughout the piano. The electrical components above are used in the keys to measure capacity because the human body has natural capacitance. Once a key is touched and the measurement is no longer 0, the microcontroller detects the key is pressed and a tone is played. This explains why you can play multiple keys same time. Each key plays simultaneously once its touched. When building this project both of my LED lights weren’t blinking so through the help of a staff member we came the solution of bending the battery holder so that there were no longer any gaps amid the AA batteries and the battery holders. This resulted in both of my LED lights working because the power source was able to be distributed.  Another problem I’ve encountered was making sure individual components resembled the polarity shown in the instructions. Through DE soldering and reading the instructions thoroughly I was capable of solving this problem and determine how to avoid this problem in the future.

Leave a Comment

Start typing and press Enter to search

Bluestamp Engineering