
Introduction
Hi my name is Sebastian. I go to the metropolitan High School and my starter project initially was a mini robotic bug but I finished it with the LED light organ.
Final Milestone
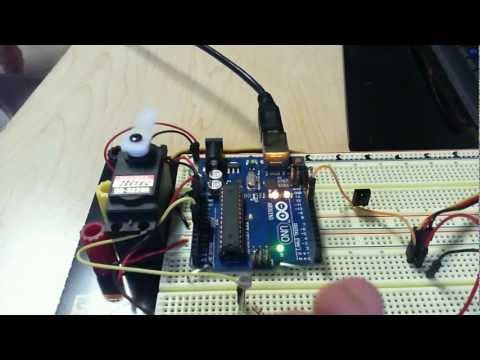
Overall, the project was very practical. There were some predicaments that I came across but they were not impossible to overcome. As you see when someone passes by, the photocell will read it and directly tell the arduino to move the servo motor. The servo motor will move and push the spring and this will launch the plank and throw the water balloon. My main project was based on building and coding. I am doing well with the building portion, but the coding is something I am getting better at. I have had help from my teachers when I did not know what to do with the coding. Another thing I did not understand in the beginning was how to move voltage and direct to places on the breadboard. After a while I learned where and how to do this.
Second Milestone
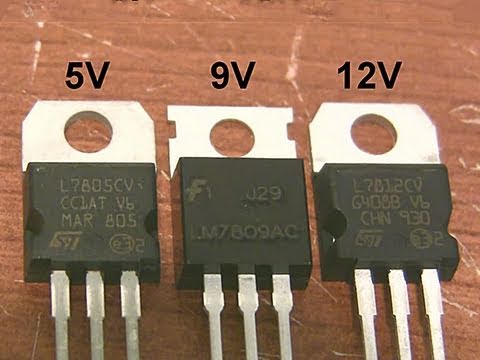
Hi guys this is my second milestone. What I did here was I build my catapult from scratch. Not only I did I do that but I also connected all my puzzles together. My last milestone was to make the arduino tell the servo motor to move when laser was trip. So when the motor moves, it triggers the catapult and pulls the spring which will make the catapult move quickly. I also made a mount and a voltage regulator for my laser. What the voltage regulator is used for is to divide the voltage from 9V to 5V. I also designed my project in Google sketch before I cut the parts from my catapult. When I started to cut the pieces out, there were some problems that I came across with. Such as cutting a little too short or it wasn’t straight enough. I glued the parts that were missing and I also screwed them in.
h
First Milestone
Hi guys this is my first milestone. So what I did here was I made a code that whenever the laser is disturb or the laser is not hitting on the photo cell it will indicate the arduino to move the motor servo. This part of my project will help me with the big picture. I will construct my catapult in a way that when a person comes by and disturbs the laser, the motor servo will move the string that will hold the catapult and launch it. The hardest part on this milestone is the coding. I am not comfortable using coding because it is my first time using it, so it was a bit tricky for me. I was able to overcome this dilemma by using the internet and I received help from teachers at Bluestamp. I have learned that you can use the 5V in the arduino and increase the usage in the breadboard. What that means is that I connected the voltage from the Arduino board to the breadboard and through that the whole row now has voltage current and did the same thing for ground. Now I was able to give power and ground to the photocell and the laser. I also learned that when I connect resistors in a series, the value of the resistors add up but when I connect them in parallel the resistance decreases. The way that all three are connected is the laser is always hitting on the photocell and the laser is power by an external power. When someone passes by and is not letting the laser pass by the the photocell will recognize it and will tell the arduino. The way the arduino is connected to the photocell is through a resistor and wires. That’s where the coding takes place and messages the arduino if the laser is not touching the photocell it will indicate the arduino which will turn on the motor servo.
Mini robotic bug
Hi guys my project was a mini robotic bug. This robotic bug crawls towards the light source Unfortunately, my starter project did not end well. What I did to try to make it work was replace all the transistors. I also replaced the resistors R9 and R10. I used a jumper wire on any trace that was open. I sometimes broke the hole on the P.C.B but I either used a jumper wire to the close the leg that was connected or soldered the traces, either one of them work perfectly fine. I knew that it was working because I tested it out with the multimeter. I used the continuity/diode checker to see if the wires that I jumped were working and they were. The only problem was that I was not able to fix was a short that was happening between a transistor and a resistor. When I check the continuity the multimeter made a noise which it shouldn’t because there was no trace between those two holes. That probably affected my project slightly but I am dubious about it because when my project was partially working I still had that minor predicament. The LDRs were working as they should because when I covered them with my hand the LD will turn off and not blink. There was a moment when my project was working partially but it wasn’t working as it should be. When I finished working with everything and checking all of the known issues it still did not turned on. Albeit it was not working, I did learn a lot from my own mistakes. I learned how transistors and capacitors work.
LED Light Organ
Hi there again so this is my second starter project. The name of this project is the star color organ kit. What this project does is when I talk, sing or put any music close to the organ kit, it lights up the LED’s. The sensitivity of the sound can be adjusted by the first potentiometer. The potentiometer works by controlling how much current I want to let it flow. The second potentiometer affects the lighting of the LEDs. When I vary the resistance in the potentiometer the LED will light up according the way I want it. The potentiometers are affecting the 555 timer. This goes hand and hand with the ic 417. The 555 timer tells the ic 417 when to light up the LED because it gives it a certain time. The way the ic 417 works is it gives out a certain code that will control which LED to turn on. The jumper wires are necessary because there is no passage to connect the LEDs to capacitors or the resistors to the capacitors. The jumper wire provides the connection so the current can flow.
Reflection
Through this whole experience, I learned what an arduino is and how it works. I can say that an arduino is the main center if someone is using an arduino because the arduino will tell whatever the person is using to do a certain a work. But before the person does that he or she has to write a code and that is where it gets tricky, because any mistake even if it is a little mistake will mess up the whole thing. I also learned what capacitors and resistors are and how they function. A capacitor holds a small amount of energy and is like a battery, only that it takes everything out quickly. From my mistakes and my starter project not functioning well it made me learn even more and understand why some things won’t work and why some things will work. I learned that if you make a mistake on P.C.B there are some ways to go around it and one way is by making connections that leads to another end. I never knew that anyone can do that or you can scratch some of it and add some solder in it. When I first came in the program I knew nothing about engineering and through it I learned from the guest speakers and my time being here that there is a whole world out there of engineering and there are so many things I can do in engineering. If I had more time I might have added a motion sensor for the laser so like that it won’t wast er the energy to quickly and whenever it hears a noise the laser will turn on.
References--
http://www.youtube.com/watch?v=cv7fw2lHkMQ
http://www.instructables.com/id/Arduino-Controlled-Catapult/
Parts of the project:
photocell
-
The cost of it is around from $0.69 or $2.00
-
quantity one
-
It creates a voltage and with this I can combine it with arduino and make it read the trigger
arduino
-
The cost of it is $29.95
-
http://www.jameco.com/webapp/wcs/stores/servlet/Product_10001_10001_2151486_-1
-
Jameco Part no. 215148
-
When connecting the arduino to the photocell the arduino will help me control the heavy duty servo and make me control the project
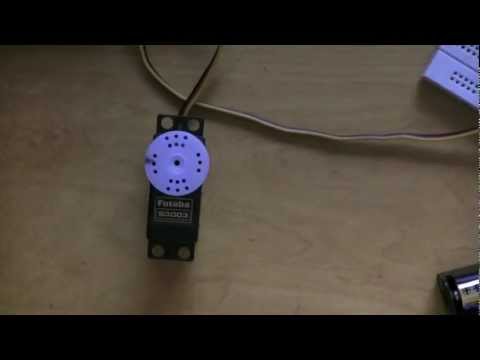
Heavy duty servo
-
The cost of it is $14.95
-
http://www.jameco.com/webapp/wcs/stores/servlet/Product_10001_10001_395760_-1
-
Jameco Part no. 395760
-
This part will make me move around the project
Laser pointer
-
$44.95
-
http://www.jameco.com/webapp/wcs/stores/servlet/Product_10001_10001_310519_-1
-
Just one laser
-
This is the sensor and when someone trips on it it will tell the receiver which will quickly send a voltage to the arduino
Hinge
-
$2.49
-
http://www.jameco.com/webapp/wcs/stores/servlet/Product_10001_10001_159581_-1
-
One hinge
-
This equipment will help me launch my water balloon and it will work with my motor
Spring
-
http://www.jameco.com/webapp/wcs/stores/servlet/Product_10001_10001_2131506_-1
-
$0.09
-
I need it to push my catapult
Plain Steel Threaded Rod, 3/8″-16 Thread, 3′ Length
-
McMaster-carr
-
This will hold both of the wood that are the fundamental for the catapult
-
$2.07
Light Duty Eyebolt with Nut-Not for Lifting, Zinc-Plated, 1/4″-20 Thread, 1-1/2″ Shank, 1-1/4″ L Thread, packs of 10
-
McMaster-Carr
-
It will hold the cardboard together
-
$3.14
Steel Extension Spring, Zinc-Plated, 4.0″ Length, .641″ OD, .080″ Wire, packs of 3
-
McMaser-Carr
-
It will hold back the launcher but it will also launch it when the motor throws away the spring
-
$6.82
Plain Steel Type A USS Flat Washer, 3/8″ Screw Size, 1″ OD, .06″-.11″ Thick, packs of 100
-
MsMaser-Carr
-
$5.43
First Step: Make the code for the arduino.
-
What is necessary for the code is to have both the motor servo and the photocell in it. Make it in the way that whenever the laser is not hitting the photocell the motor servo should move.
-
Also research every little parts and see how they function. Google it or youtube it because either one of them will make whatever confusion someone has a bit more clear
Second step:Google sketch it!
-
This is very important although it might take long to sketch your catapult is very useful because whenever I did not know what to do or what was left or how long the sides are.
-
It took me this step a bit long because it was the first time using google sketch and fortunately I had friends who help me out sketching simple things that were hard for me. For example moving a 3D square moving it in closer to the catapult
-
Use dimensions for your sketch because you want to know what size it is the launcher the base or whatever it is you want to know each size and how much to cut
Third step: Start to create your catapult
-
The google sketch will help the person immensely because the only thing to do in here is just cutting the parts.
-
For my catapult cutting i the first step to making the catapult but you also need the some screws. glue( wood glue from gorilla), the threading rod and the a hook. The hook what I did here was to cut the eye hook a bit that it can hold on the threading rod that was in the back and was able to hold on to it just barely.
-
Also what I did was to make some nails where I was going to place the motor servo and it will hold the motor servo tightly.
-
Make three holes. Two of the holes is for the spring. And the last one will be for the eye hook. What I did was to a bold and some washer and then another bolt. That will make the eye hook be there without falling off
Fourth step: Make a a mount for the laser
- In the first thing I did is to make a voltage regulator that will be a 5 voltage
- After having the energy for the laser try to make something that will hold on the laser and make it stable
Fifth Step: Put it all together
-
Make sure that you connect everything and it works. Test out the motor servo and the photocell work together. Before I forget soter the motor servo the photocell the resistor and the jumper wires in a perforated holes. The resistors has to be 470 ohms.
-
Put the laser on the photocell and move it that it won’t touch the photocell. If it moves and is able to push the motor servo then it is a success
-
Put two springers if you want to make it a strong launch