The “Third” Eye For The Blind
Using ultrasonic sensors, the “Third” Eye For The Blind uses buzzers and motor vibrators to allow the users who are visually impaired to sense where they are going.
Engineer
Samantha S.
Areas Of Interest
Biotechnology
Biomedical Engineering
Aerospace Engineering
Reflection
These past 6 weeks spent at BlueStamp have been fulfilling and have expanded the range of my interests within the engineering field. For a long time engineering and making wearables was always on my mind, it just was never made clear to me what exactly these specifics entailed. I received an email from my guidance counselor which caught my attention as an opportunity to try out a board range of fields in engineering before I went off to college. The independence, growth and freedom of creativity that previous students have talked about was the nail on the head of my decision of how I wanted to spend my summer.
At the beginning of the program, I dreaded the documentation part and filming as I was never fond of presenting or public speaking. The confidence I gained after I finished each video was rewarding and I am grateful for this experience. Having no previous experience with engineering, the “no help from the instructors” answer was always the response to my endless stream of questions. The research to answer my questions shone light on all my problems and allowed me to better understand my project for myself, but also explain it to an audience. I have become more knowledgeable in technical skills such as soldering, wiring, coding and even sewing! By the end I have found a love for designing and making my project aesthetically pleasing by combining fashion and engineering to make my project stylish and with a useful twist. This program has shown me a path that has engineering in my future and I know that I will continue to build and improve upon my current work.
Final Milestone
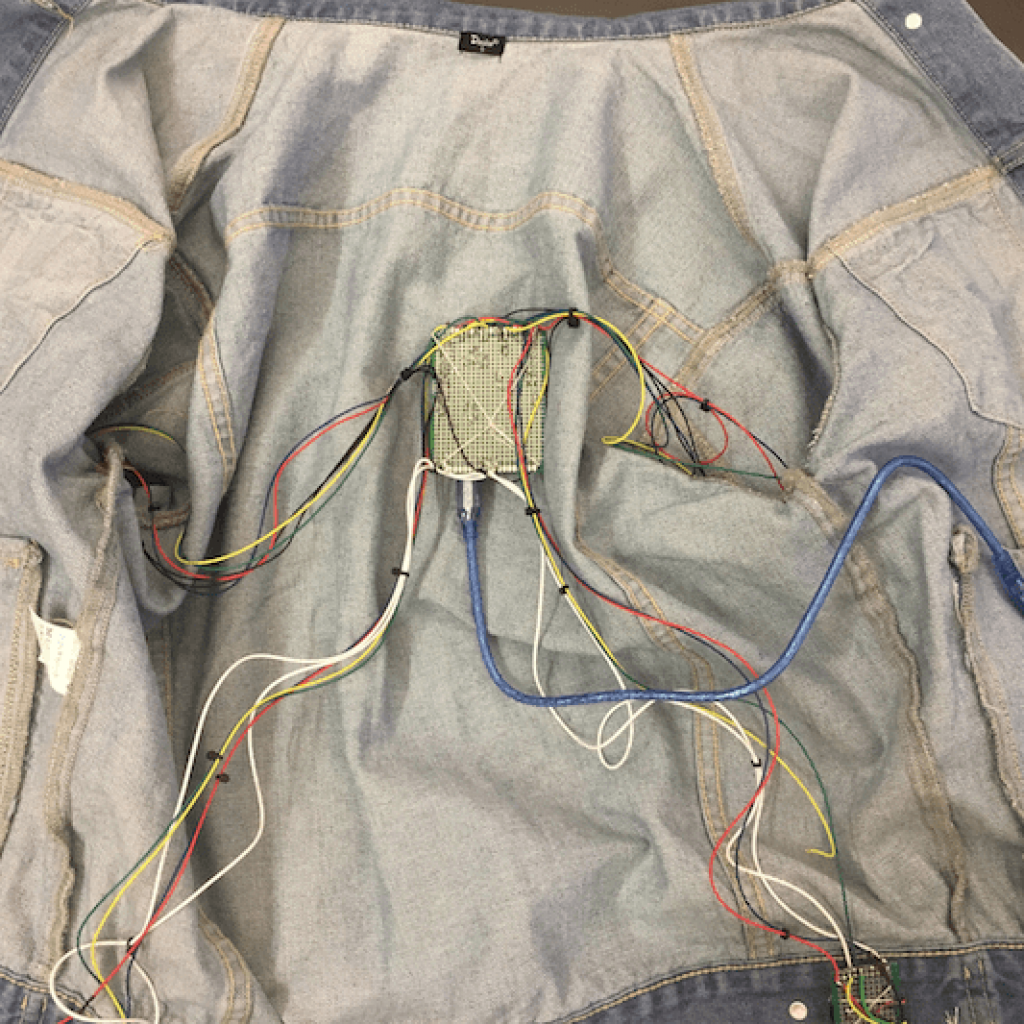
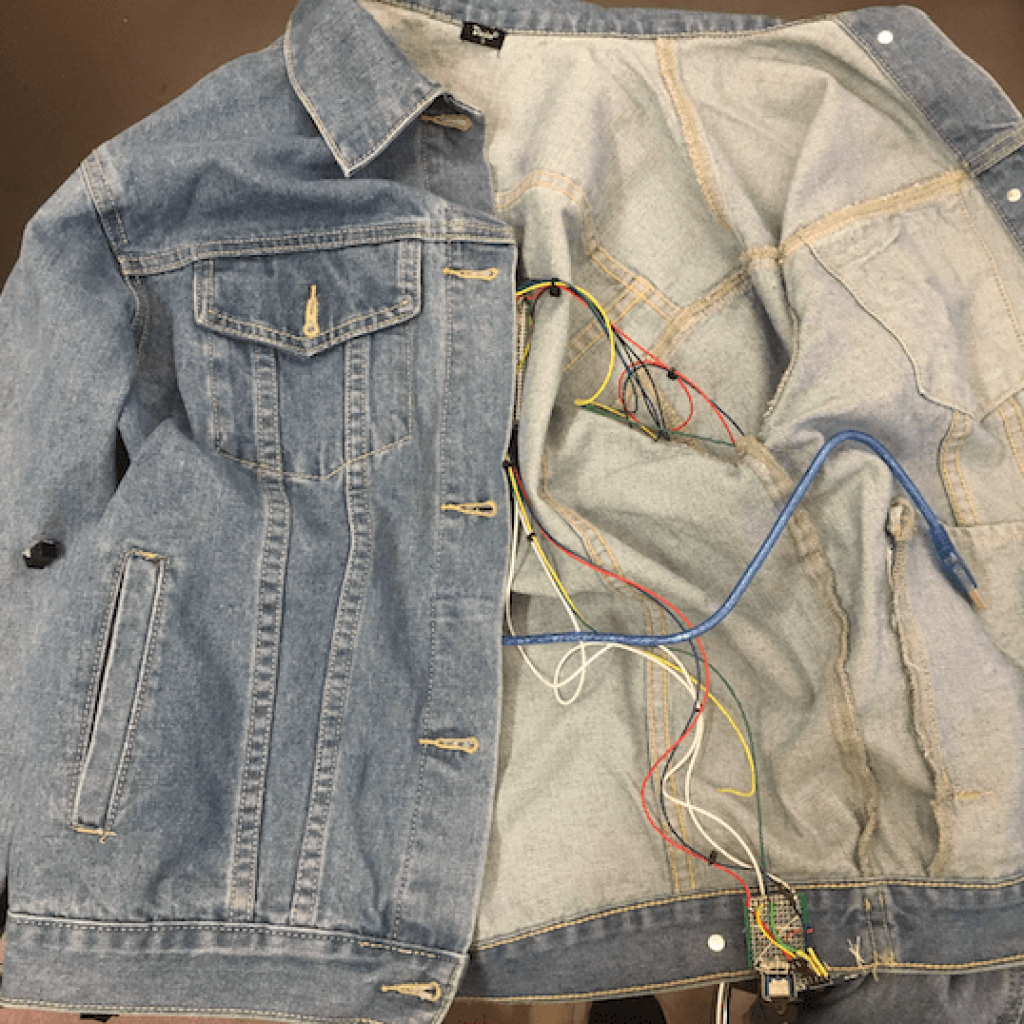
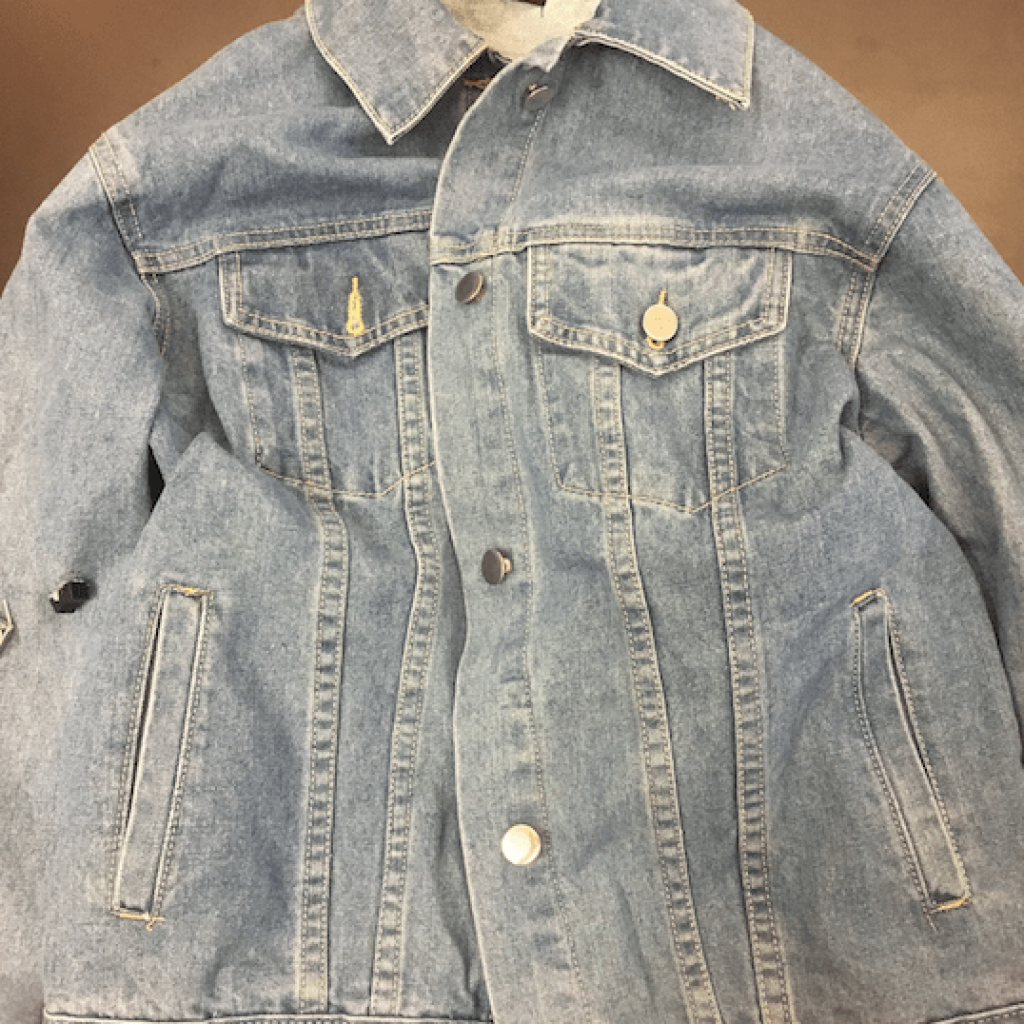
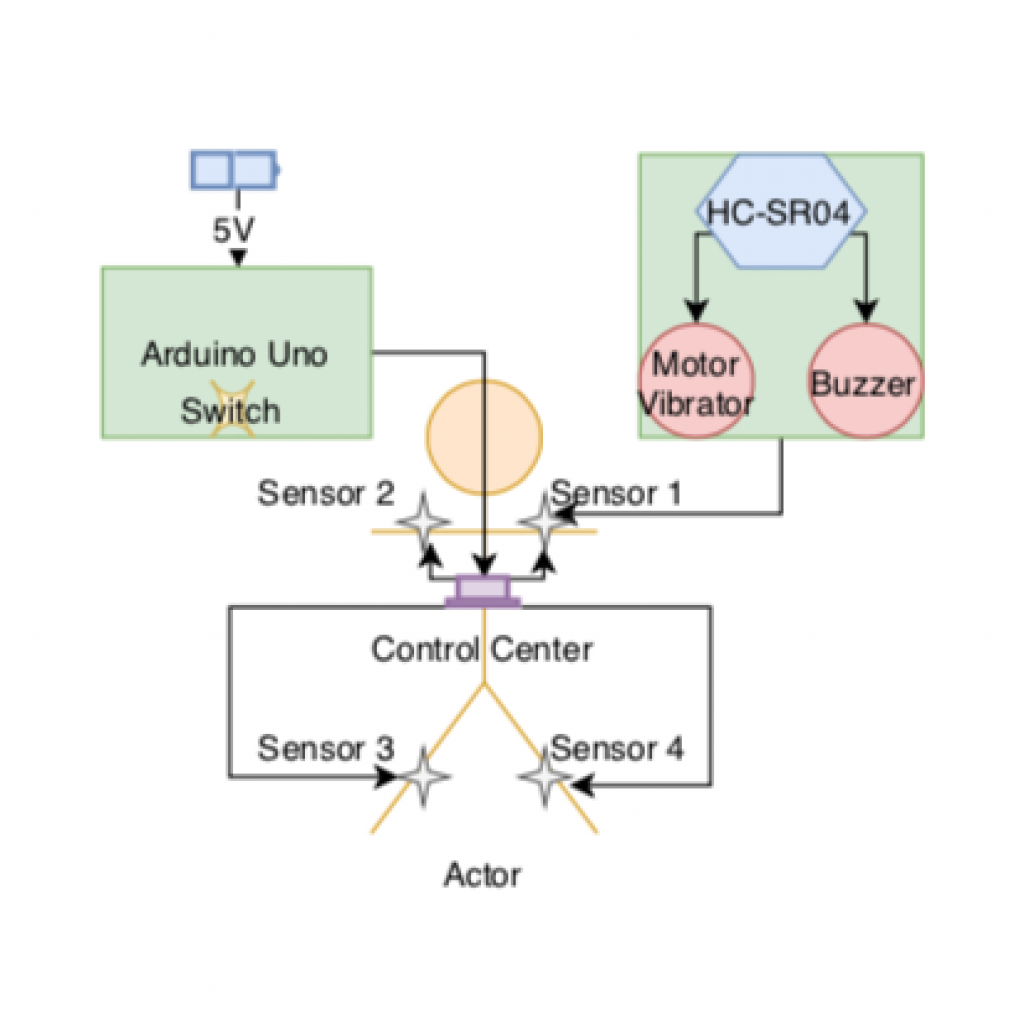
The the final modifications for my main project the Third Eye for the Blind is complete. It uses ultrasonic sensors to alert the user, who is visually impaired of their surroundings through vibrating of beeping. There are four sensors, one on each arm and one on each side. Just like the single module, the ultrasonic sensor detects distance and beeps faster when an object is closer and slower as an object moves further away or is not in the way at all. Each module has an ultrasonic sensor and a switch to switch between the motor vibrator and the beeper. These modules are all connected to an Arduino board via wires. This board has a code uploaded to it which allows all the sensors to run simultaneously. And everything is powered by a 5V battery pack which is rechargeable for the convenience of the user.
I love the design and aesthetic aspect to this project as I have enjoyed combining engineering and fashion to make wearables. One of the challenges I had was getting all the sensors to work at the same time. But, with a lot research and many trials and errors, I was able to make it work. My next modifications will include a more comfortable feel as the wires inside the jacket’s sleeves make it scratchy and a little uncomfortable for the user to put on and wear. My solution to that is to use conductive thread to make the circuit seamless and workable.
CODE FOR MULTIPLE SENSORS
#include

#define SONAR_NUM 4

#define MAX_DISTANCE 200

NewPing sonar[SONAR_NUM] = {

NewPing(5, 6, MAX_DISTANCE),

NewPing(7, 8, MAX_DISTANCE),

NewPing(9, 10, MAX_DISTANCE),

NewPing(11, 12, MAX_DISTANCE)

};

int buzmotorV1 = 13;

int buzmotorV2 = 2;

int buzmotorV3 = 3;

int buzmotorV4 = 4;

void setup() {

pinMode(buzmotorV1, OUTPUT);

pinMode(buzmotorV2, OUTPUT);

pinMode(buzmotorV3, OUTPUT);

pinMode(buzmotorV4, OUTPUT);

Serial.begin(115200);

}

void loop() {

for (uint8_t i = 0; i < SONAR_NUM; i++) {

delay(29);

Serial.print(i);

Serial.print("=");

Serial.print(sonar[i].ping_cm());

Serial.print("cm ");

}

Serial.println();

if ( sonar[0].ping_cm() <= 61 ) {

digitalWrite(buzmotorV1, HIGH);

delay(100);

digitalWrite(buzmotorV1, LOW);

delay(250);

Serial.print("tooclose ");

}

else if ( 62 <= sonar[0].ping_cm() && sonar[0].ping_cm() <= 105 ) {

digitalWrite(buzmotorV1, HIGH);

delay(100);

digitalWrite(buzmotorV1, LOW);

delay(1000);

Serial.print("close ");

}

else if (106 <= sonar[0].ping_cm() && sonar[0].ping_cm() <= 160 ) {

digitalWrite(buzmotorV1, HIGH);

delay(100);

digitalWrite(buzmotorV1, LOW);

delay(2000);

Serial.print("moderate ");

}

else if ( 161 <= sonar[0].ping_cm() && sonar[0].ping_cm() <= 2187 ) {

digitalWrite(buzmotorV1, LOW);

Serial.print("far ");

}

if ( sonar[1].ping_cm() <= 61 ) {

digitalWrite(buzmotorV2, HIGH);

delay(100);

digitalWrite(buzmotorV2, LOW);

delay(250);

Serial.print("tooclose ");

}

else if ( 62 <= sonar[1].ping_cm() && sonar[1].ping_cm() <= 105 ) {

digitalWrite(buzmotorV2, HIGH);

delay(100);

digitalWrite(buzmotorV2, LOW);

delay(1000);

Serial.print("close ");

}

else if (106 <= sonar[1].ping_cm() && sonar[1].ping_cm() <= 160 ) {

digitalWrite(buzmotorV2, HIGH);

delay(100);

digitalWrite(buzmotorV2, LOW);

delay(2000);

Serial.print("moderate ");

}

else if ( 161 <= sonar[1].ping_cm() && sonar[1].ping_cm() <= 2187 ) {

digitalWrite(buzmotorV2, LOW);

Serial.print("far ");

}

if ( sonar[2].ping_cm() <= 61 ) {

digitalWrite(buzmotorV3, HIGH);

delay(100);

digitalWrite(buzmotorV3, LOW);

delay(250);

Serial.print("tooclose ");

}

else if ( 62 <= sonar[2].ping_cm() && sonar[2].ping_cm() <= 105 ) {

digitalWrite(buzmotorV3, HIGH);

delay(100);

digitalWrite(buzmotorV3, LOW);

delay(1000);

Serial.print("close ");

}

else if (106 <= sonar[2].ping_cm() && sonar[2].ping_cm() <= 160 ) {

digitalWrite(buzmotorV3, HIGH);

delay(100);

digitalWrite(buzmotorV3, LOW);

delay(2000);

Serial.print("moderate ");

}

else if ( 161 <= sonar[2].ping_cm() && sonar[2].ping_cm() <= 2187 ) {

digitalWrite(buzmotorV3, LOW);

Serial.print("far ");

}

if ( sonar[3].ping_cm() <= 61 ) {

digitalWrite(buzmotorV4, HIGH);

delay(100);

digitalWrite(buzmotorV4, LOW);

delay(250);

Serial.print("tooclose ");

}

else if ( 62 <= sonar[3].ping_cm() && sonar[3].ping_cm() <= 105 ) {

digitalWrite(buzmotorV4, HIGH);

delay(100);

digitalWrite(buzmotorV4, LOW);

delay(1000);

Serial.print("close ");

}

else if (106 <= sonar[3].ping_cm() && sonar[3].ping_cm() <= 160 ) {

digitalWrite(buzmotorV4, HIGH);

delay(100);

digitalWrite(buzmotorV4, LOW);

delay(2000);

Serial.print("moderate ");

}

else if ( 161 <= sonar[3].ping_cm() && sonar[3].ping_cm() <= 2187 ) {

digitalWrite(buzmotorV4, LOW);

Serial.print("far ");

}

Serial.println();

}
Third Milestone
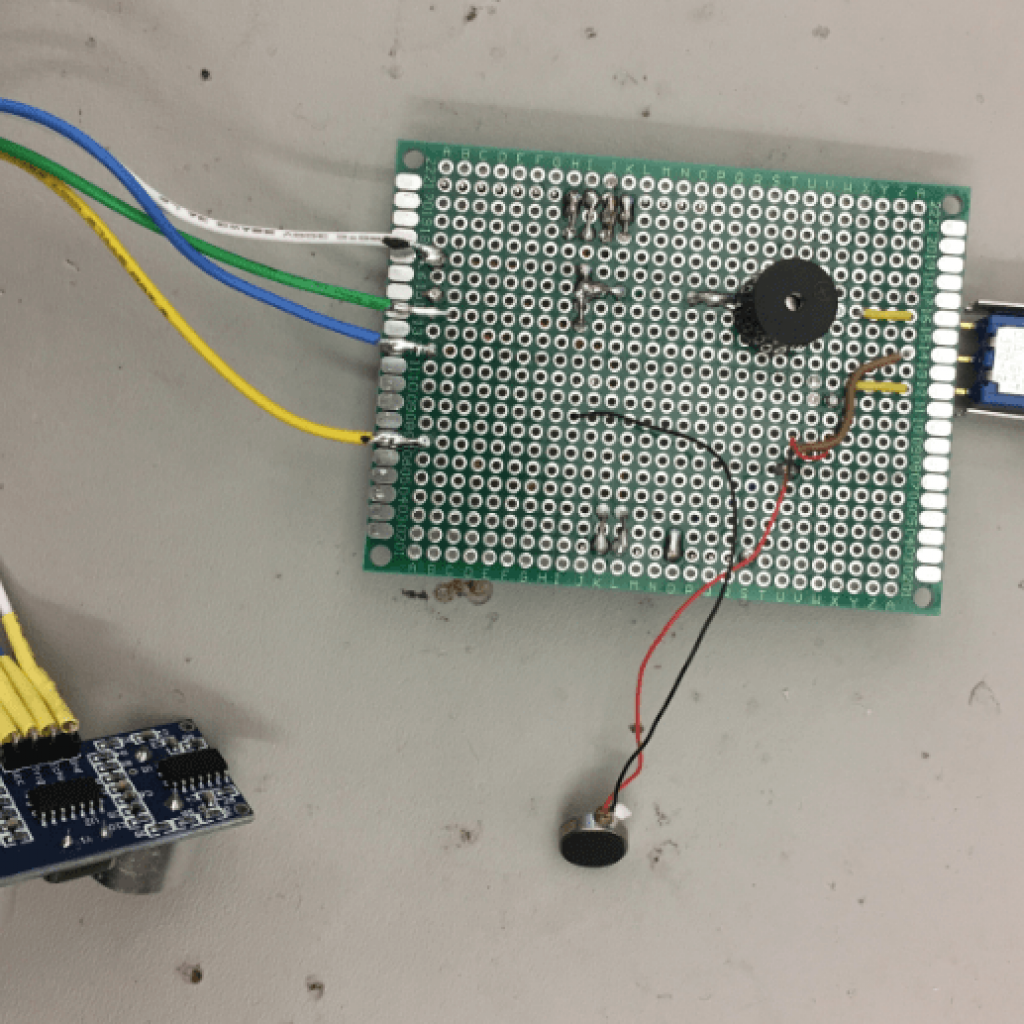
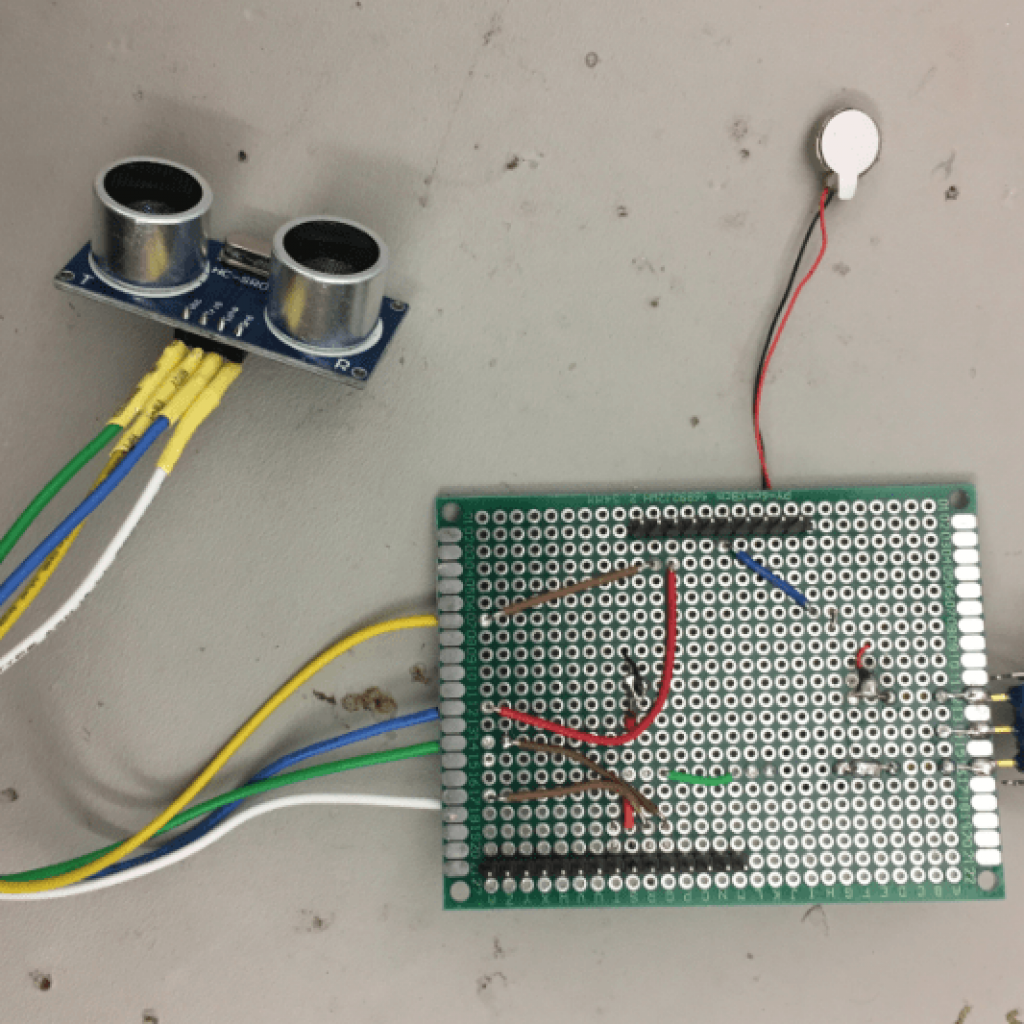
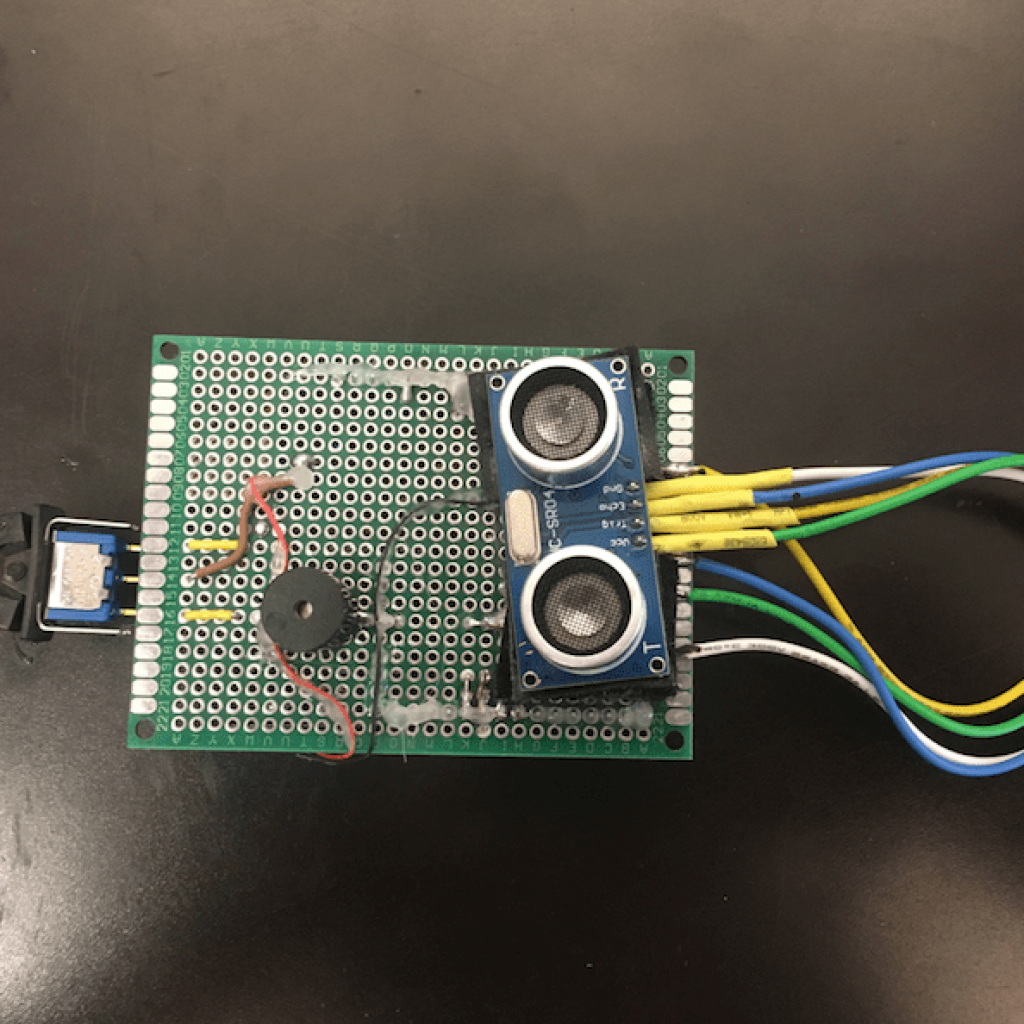
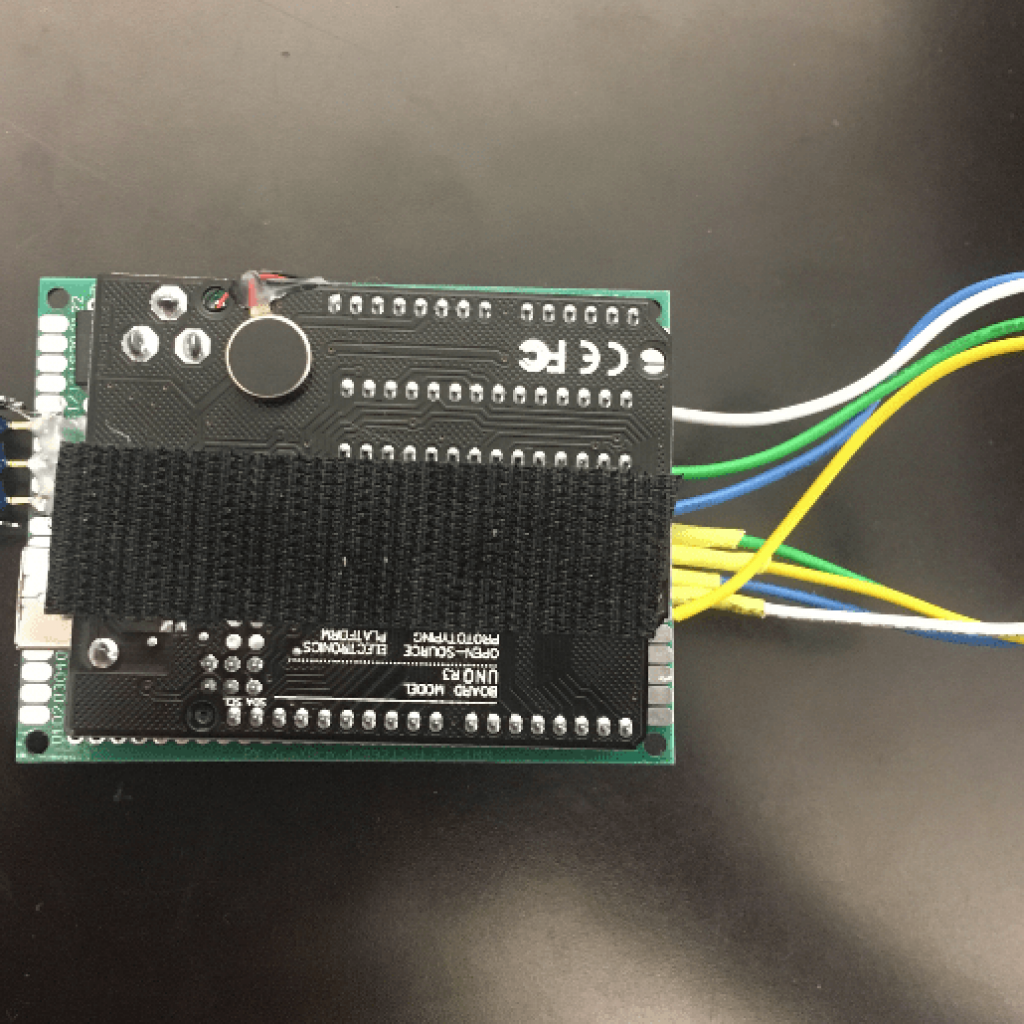
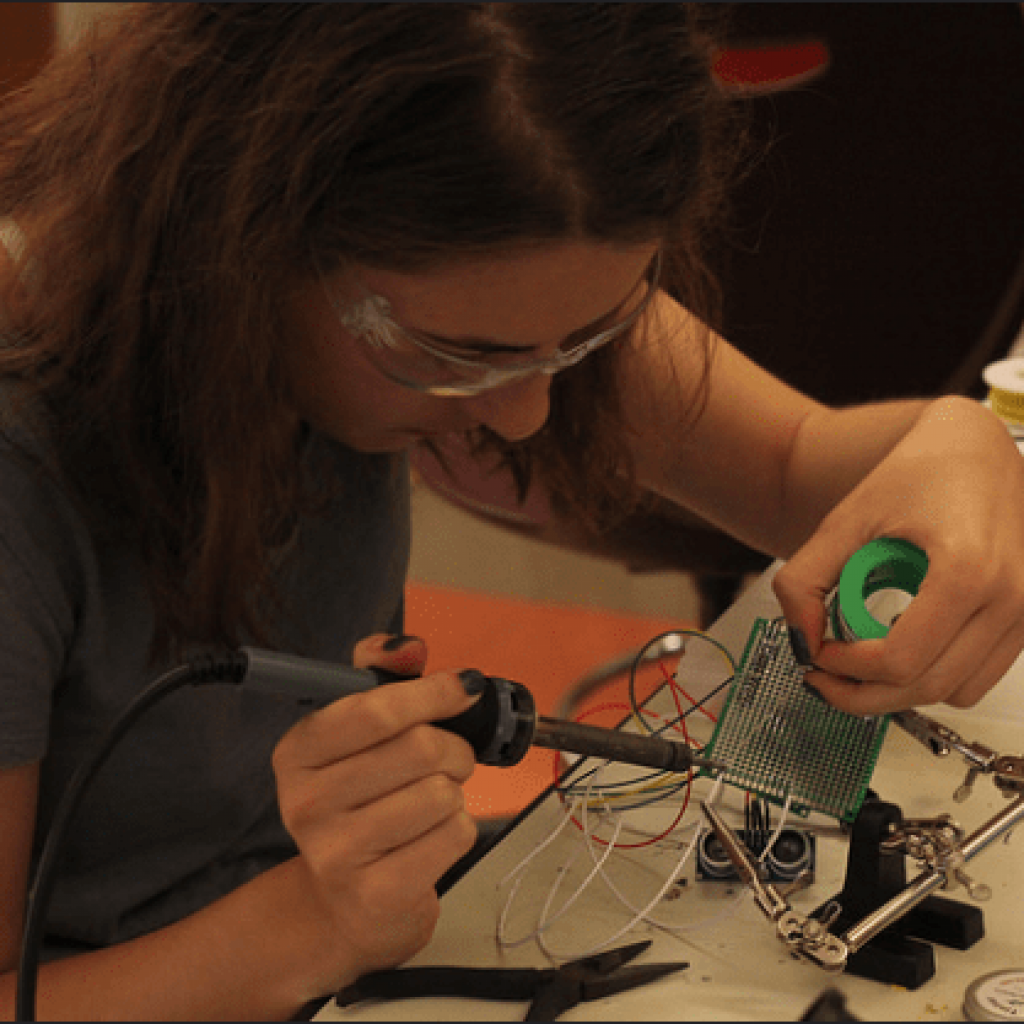
I have just finished my third milestone for my main project, “The Third Eye For The Blind,” which made the module wearable. Moving on from a breadboard, I used a perfboard to connect all of my wires together. I attached a toggle switch to switch between off, the motor vibrator and the buzzer. After I have soldered everything, I placed hot glue over the wires and switch to secure them and over any open pins to smooth them down. Then using the hot glue, I placed strips of velcro onto the perfboard, Arduino board, and the ultrasonic sensor. This was to make the module adjustable and movable. There is also a strap that goes around the user’s waist with velcro on it for the module and 5V power bank to attach to. This will allow the board to be placed anywhere on the body for the users’ convenience.
I really enjoyed the design portion of this project and how creative I could be with it. One challenge I had was adjusting the distance and delay of the buzzer or motor vibrator. Another one was desoldering after I misplaced a wire. For my modifications I will make the three other modules and attach them to clothing to make them stylish and discreet in addition to being wearable.
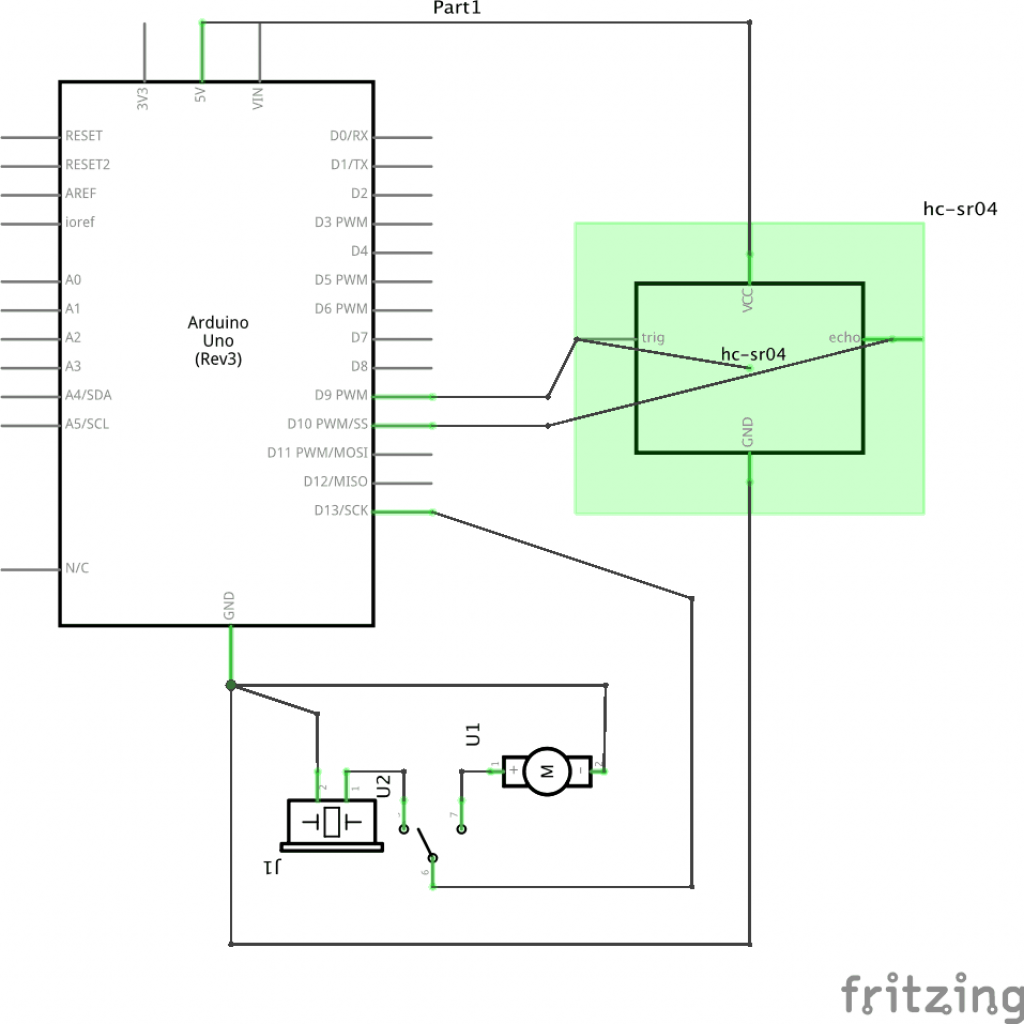
SCHEMATICS & SYSTEMS DIAGRAM
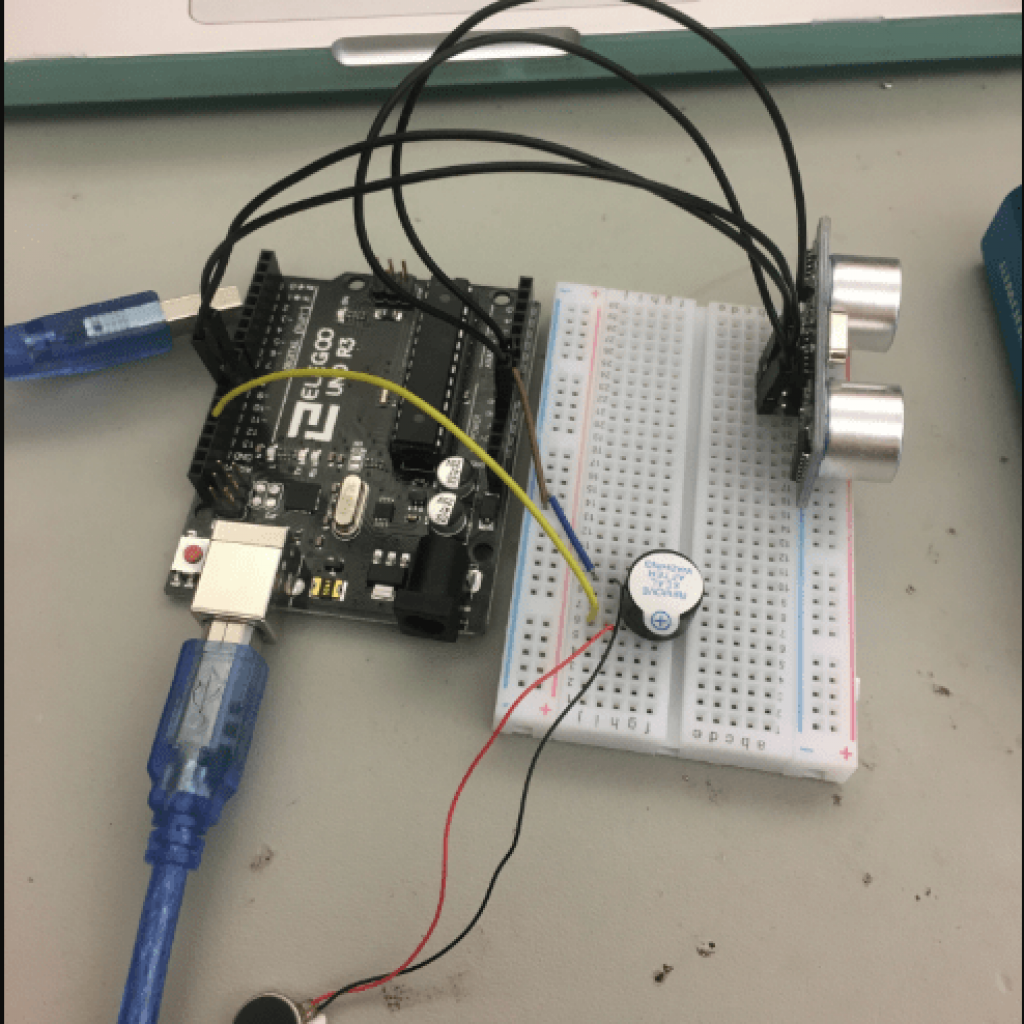
Second Milestone
In my second milestone for my main project, the “Third” Eye For The Blind, I have created the code to use the ultrasonic sensor to beep and vibrate faster as the sensors approach an object and slow as it moves further away from the object. It is connected to a 5V power bank. First, I used void setup to start the serial communication in order to read the distance seen on the sensors. Then, I used void loop to emit an ultrasound from the sensor’s transmitter which travels through the air and bounces off an object and is received by the sensor’s receiver. The number is evaluated in a series of “if…else” statements to place the distance into four categories: too close, close, moderate and far. These categories generate delay times for how long the buzzer and motor vibrator are turned off so that the user is able to tell how close they are to an object.
Some challenges I had were getting the “if…else” statements to work, but with a little research, I was able to fix it. Another one was adjusting the code of the distance into the four appropriate categories for when the person is walking around. In my next milestone, I will create the three other modules and make them wearable.
Code For Arduino Uno
const int trigPin = 9;

const int echoPin = 10;

long duration;

int distance;

void setup() {

pinMode(trigPin, OUTPUT);

pinMode(echoPin, INPUT);

Serial.begin(9600);

pinMode(LED_BUILTIN, OUTPUT);

}

void loop() {

digitalWrite(trigPin, LOW);

delayMicroseconds(2);

digitalWrite(trigPin, HIGH);

delayMicroseconds(5);

digitalWrite(trigPin, LOW);

duration = pulseIn(echoPin, HIGH);

distance= duration*0.034/2;

Serial.print("Distance: ");

Serial.println(distance);

if ( distance <= 61) {

digitalWrite(LED_BUILTIN, HIGH);

delay(100);

digitalWrite(LED_BUILTIN, LOW);

delay(250);

Serial.print(F(" tooclose "));

}

else if ( 62 <= distance && distance <= 105) {

digitalWrite(LED_BUILTIN, HIGH);

delay(100);

digitalWrite(LED_BUILTIN, LOW);

delay(1000);

Serial.print(F(" close "));

}

else if ( 106 <= distance && distance <= 160 ) {

digitalWrite(LED_BUILTIN, HIGH);

delay(100);

digitalWrite(LED_BUILTIN, LOW);

delay(2000);

Serial.print(F(" moderate "));

}

else if ( 161 <= distance && distance <= 2187 ) {

digitalWrite(LED_BUILTIN, LOW);

Serial.print(F(" far "));

}

}
First Milestone
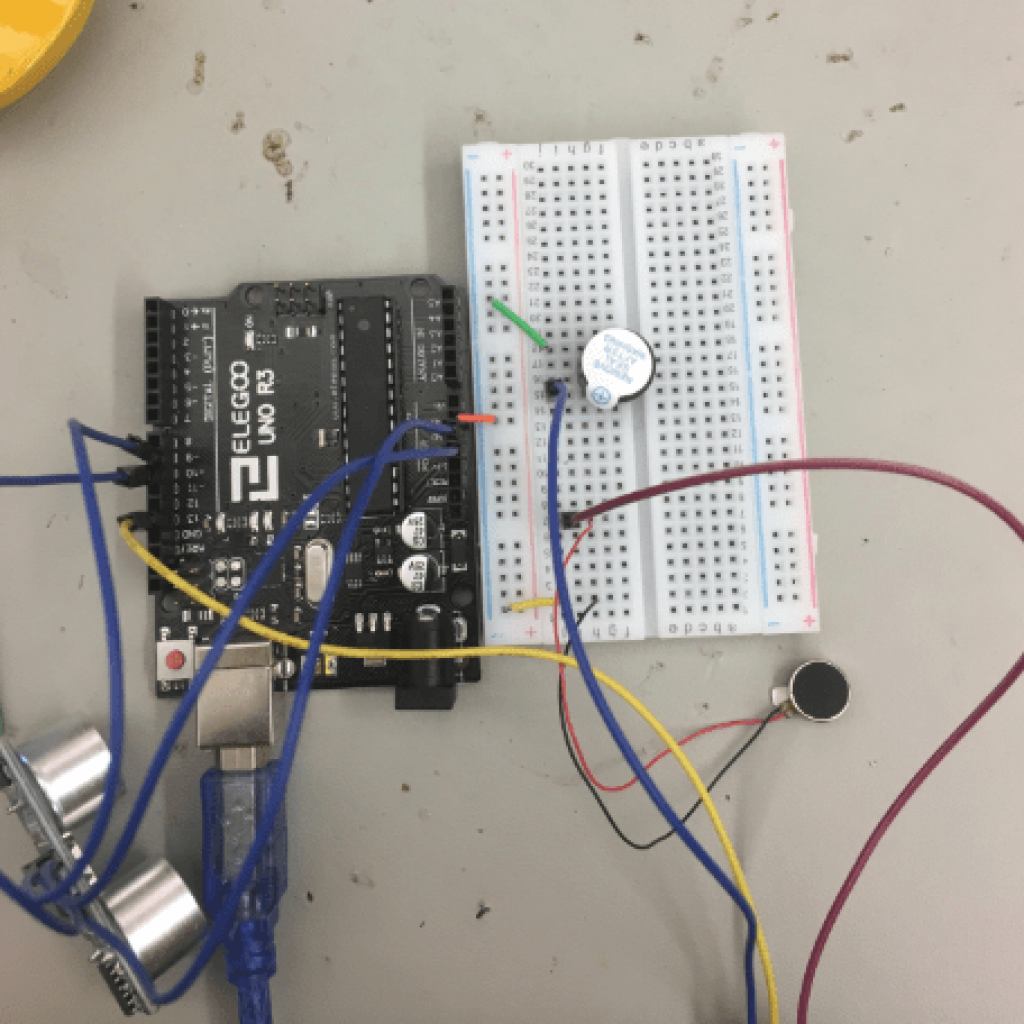
My main project, “The Third Eye For The Blind” uses an ultrasonic sensor to beep or vibrate as the sensors approach an object. I split my project into three parts: setting up the first module, creating the code and then creating the three other module and making them wearable. This is my first milestone, so I have coded the buzzer and motor vibrator to turn on every other second. I spent the first couple of days researching breadboards and how to use Arduino. My project is powered by a 5V portable battery. I connected a wire from the Arduino board to the breadboard, which also runs on the same circuit of the positive sides of the motor vibrator and the buzzer. Then, both negative ends of the motor vibrator and buzzer are connected to the negative rail on the breadboard which connects to the the GND pin on the Arduino board, completing the circuit. The code for the ultrasonic sensor to read distance and then make the buzzer or motor vibrator respond accordingly has not been set up yet because that is my second milestone.
Some challenges I had was setting up the circuit and making all the components work at once. I did research on how the parallel circuits are set up on the terminal strips and reconnected the parts.
Starter Project
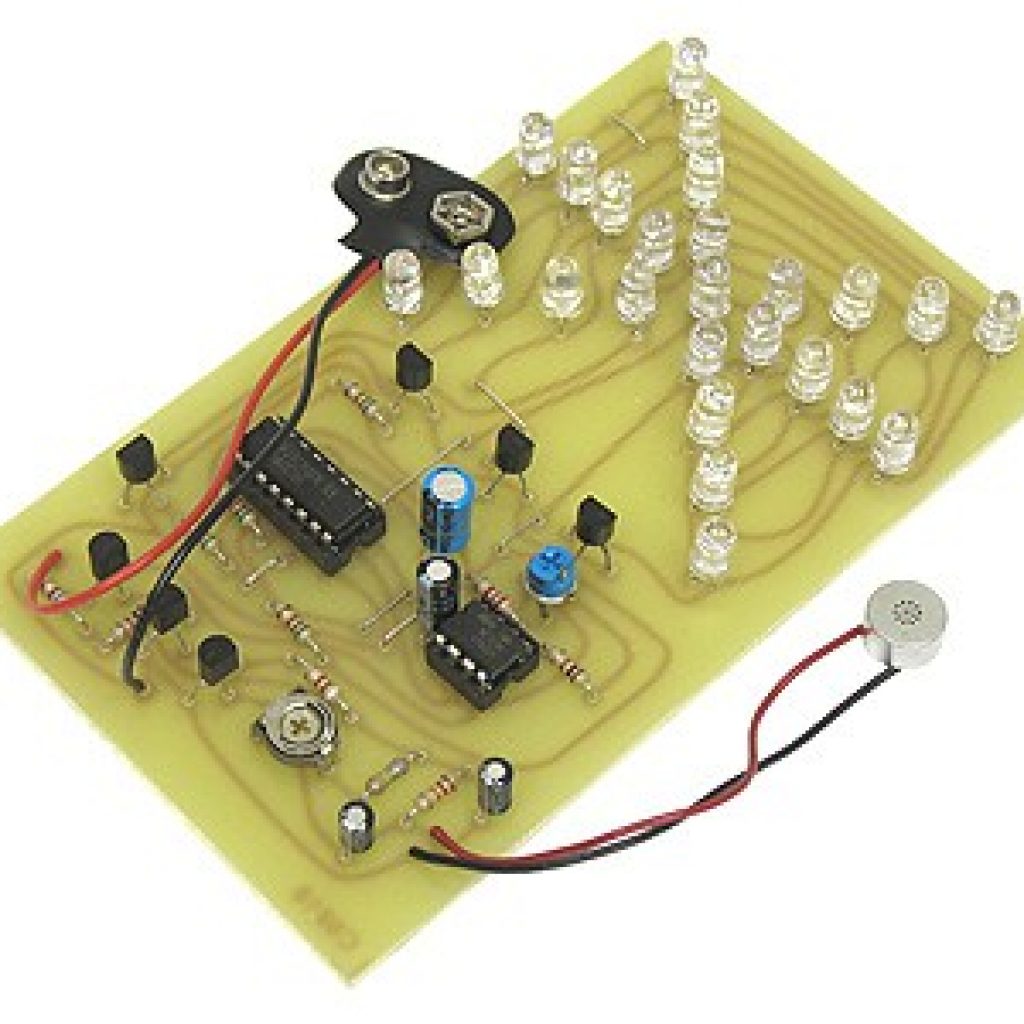
I made the Exploding Star Color Organ Kit which responds to sound by lighting up the LED lights. It powered by a 9V battery. Once powered, the microphone connected to the PC board receives audio. Those electrical signals are filtered by the electrolytic capacitors who store the large amount of energy on the board. The resistors on the board provide resistance to the electrical current to lower voltage levels within the circuit and also reduce current flow. The signals move to the transistors to amplify the signals and send them to the IC chips. The 555 IC chip provides time delays to the 4017 IC chip where the timed sequence are sent to 3 transistors connected to the LED lights who light up. There is also two trimmer potentiometers to control the sensitivity and speed of the LED lights.
During the project, I had some trouble with soldering the LED lights onto the circuit board because I placed them in the wrong position. It was a little time consuming because I needed to re-solder some of the LED lights.