Safe w/ Fingerprint ID and Keypad
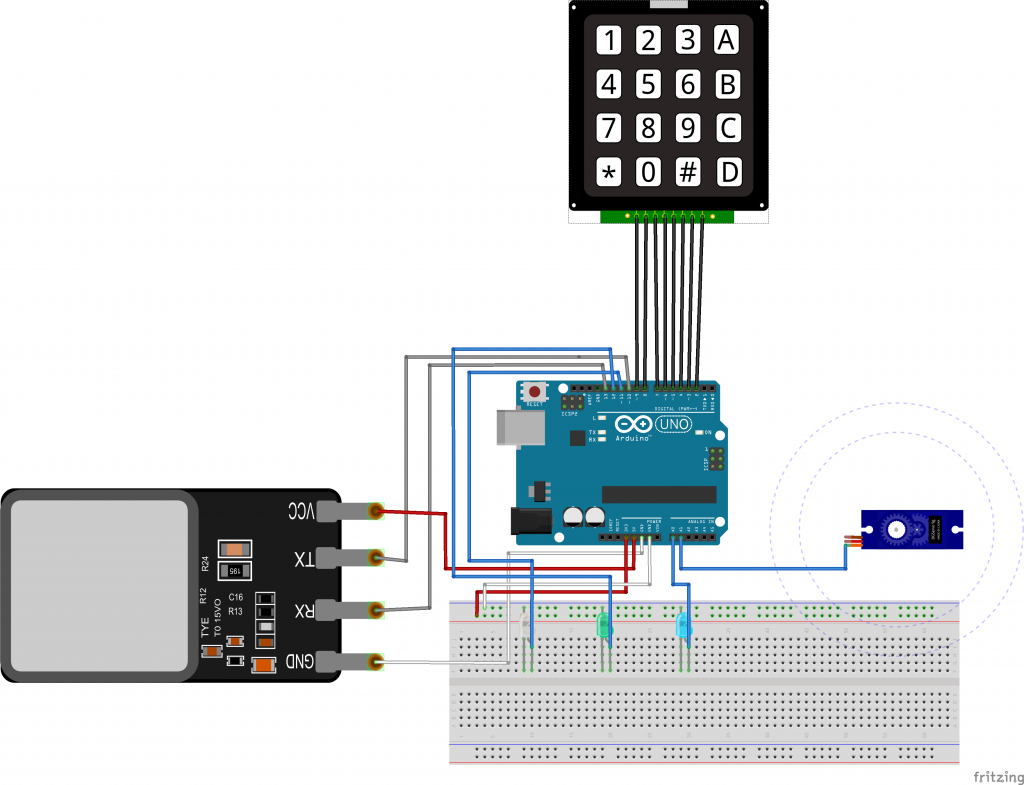
There are 3 components to the fingerprint ID and keypad-locked safe; the safe itself, the fingerprint sensor module, and the 4×4 keypad. They are all controlled by an arduino and powered by a set of batteries. The arduino will only send the unlocking signal when it receives signals of verification from the two sensors.
Unemployed
Thomas Chang
Area of Interest
Robotic/Biomedical Engineering
School
Gateway High
Grade
Incoming Senior
Final Milestone
My final milestone is now complete! I built a platform for the servo to rest on out of wooden dowels and glue, have connected it to the latch with a longer dowel, and have have wired the servo to it’s own power source and the rest of the circuitry. The box now operates exactly how I want it to: by scanning my fingerprint and entering in the code, I can open the box and by pressing the pound key on the keypad I can lock the box back up again.
Third Milestone
My third milestone, and probably the most difficult one, was to combine both sketches of code into one final sketch. There was no guide or tutorial for how to do this, I had to try things over and over until I thought I found a result that I thought would be worth pursuing. At first I tried to use an if statement within an if statement, but the overhead statement was already inside of a function. I then learned that I could use boolean statements to register whether a character had two values, true, or false. I used boolean statements to register whether a statement was correct or incorrect. Using these statements, I was able to compile a proper sketch. I then wrote a bit of code that allowed for a blue LED to turn on when both boolean statements were true.
Second Milestone
For my second milestone, I compiled a successful sketch of code used to control the keypad sensor. My plan was to compile a keypad sketch and a fingerprint ID sketch and to combine them later into a final sketch; this would be my third milestone. I had some trouble finding the code to use, but eventually I found some code that would become the foundation of my sketch. After programming a new passcode, flipping the keys, and writing a bit of code to use LEDs to recognize a correct and incorrect password, my keypad sketch was incomplete.
First Milestone
My first milestone was getting the fingerprint ID sensor to correctly function and also give me an output to differentiate recognized fingerprints from intruders. I wouldn’t say I had the best of starts; I couldn’t find a good enough diagram that matched the fingerprint sensor model I had so I had to play around a bit with the wires to figure out which ones were meant for inputs, ground, and power. I also had a lot of trouble wiring my LEDs and figuring out how to code them to work. With little prior knowledge to coding, it took a large chunk of time but eventually I figured it out. My final product works exactly as intended; A green LED shines when an enrolled fingerprint is recognized, and a red LED will blink when an unrecognized finger is tried.
How to customize the modules
My project was done using an arduino uno and the code for my project can be found here. You’ll have to download a few libraries, namely the password and keypad libraries created by Alexander Brevig found here and here, the fingerprint sensor library designed by Adafruit, and the public servo library. My project wouldn’t have been possible without the contributions of these people.
My circuitry is shown under in a fritzing diagram and uses no irregular components save for the fingerprint scanner and the 4×4 keypad matrix. The rest of the circuitry is comprised of an arduino interface, some LEDs and resistors, some connectors, and some wires. One thing that is NOT included in the diagram is a 4 AAA battery pack powering the servo exclusively and 5 capacitors, all on the opposite side of the breadboard that everything else is on. The grounds on the opposing sides of the breadboard are connected. to prevent floating grounds.
I have no blueprint for my locking mechanism so if you want to try this project out yourself you’ll have to create your own locking mechanism. You can do it!