Smartphone-Controlled Robot Arm
Project description goes here ish ig
Engineer
Robert V
Area of Interest
Mathematics/Physics
School
Birch Wathen Lenox
Grade
Rising Senior
Modifications

To take my project even further, I chose to mount my claw onto a movable chassis. The first step for this was to, of course, build the chassis. Once I had done that, I needed to fit all of the claw components, plus new ones to manage the motors, all onto the tiny chassis I had. In order to do this, and to make my project more professional and permanent. I knew I needed to learn to solder. Learning was simple enough, but there were a lot of really tight solder jobs I had to do throughout the project. Because I needed a power source for the motors, the servos, the Arduino, and the Bluetooth module, I needed two different power sources, which would take up a lot of combined space. I soon realized I needed to add additional layers to the chassis. I drafted a couple ‘shelves’ with screw holes to mount directly to the chassis.
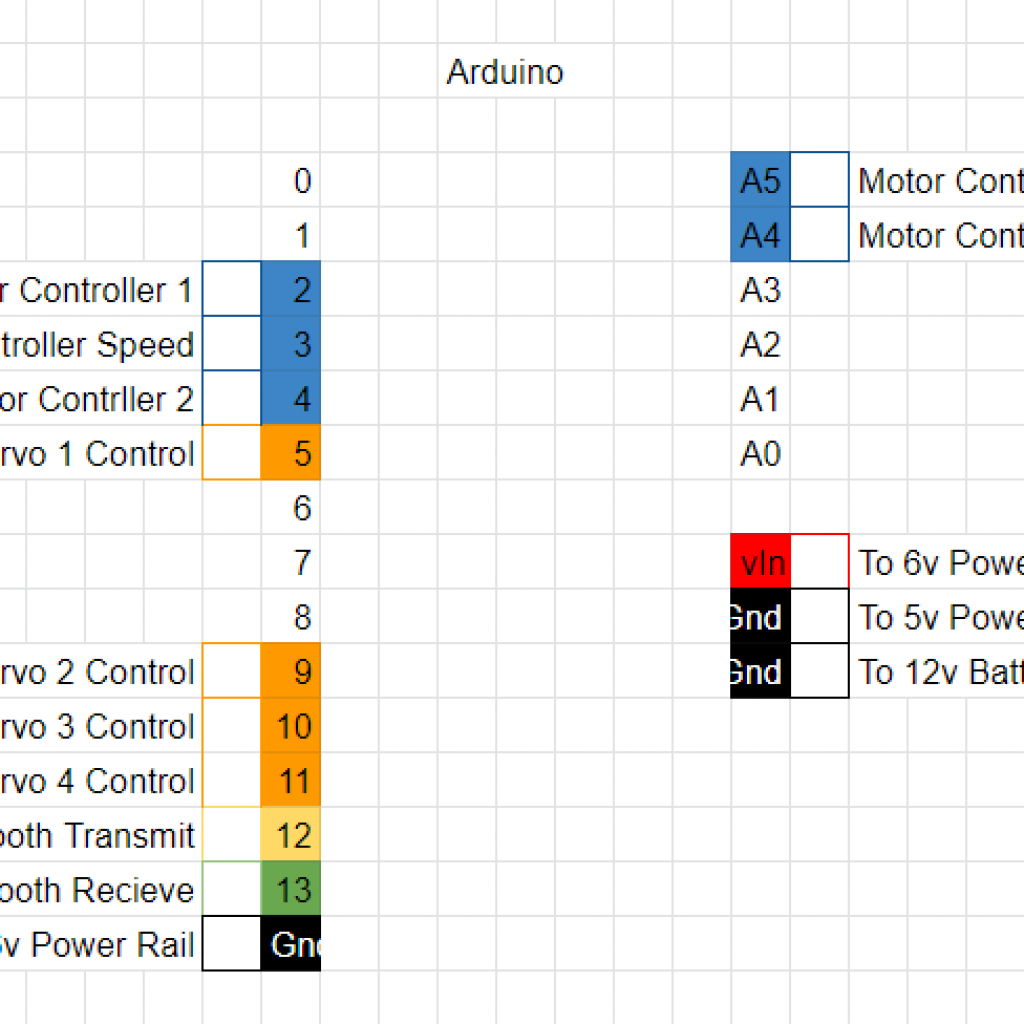
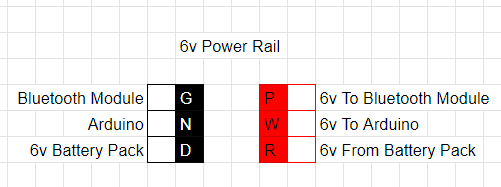
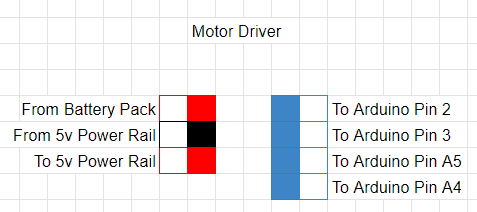


The Arduino is placed on the lowest level, with the 9V battery pack for the motors and servos on the next one up. Finally, the Bluetooth module is mounted on top, next to the 6V battery pack to power it alongside the Arduino. There are two power rails, one on the top and one on the bottom, which manage the power for all of the components. I threw together some wiring diagrams on the left.
// include the servo and softwareserial libraries:
#include <Servo.h>
#include <SoftwareSerial.h>

// declare the 4 servos used on the arm:
Servo arm1Servo;
Servo arm2Servo;
Servo swivelServo;
Servo clawServo;

// declare the pin numbers where the bluetooth module is plugged into on the board:
const int BTTXPin = 12;
const int BTRXPin = 13;

const int enablePin = 3;
const int in1 = 2;
const int in2 = 4;
const int in3 = A5;
const int in4 = A4;

// create a serial communication using the Bluetooth pins defined in the above constants:
SoftwareSerial Bluetooth(BTRXPin, BTTXPin);

// variables for the servo speed and for Bluetooth data recieved
int servoDelay = 25;
String dataIn = "";

// create a data structure for servo data:
// each variable of type servoUnit has these variables associated:
struct ServoUnit
{
  int pin;
  Servo servo;
  int actualPos;
  int desiredPos;
  // default values for an undefined structure variable
  ServoUnit()
  {
    pin = 0;
    servo = servo;
    actualPos = 90;
    desiredPos = 90;
  }
  // this function allows the creation of servoUnit objects using the arguments listed:
  ServoUnit(int pin_, Servo servo_, int actualPos_, int desiredPos_)
  {
    pin = pin_;
    servo = servo_;
    actualPos = actualPos_;
    desiredPos = desiredPos_;
  }
};

// create ServoUnit objects for each servo, each with values...
// ...for pin number, servo name, and actual and desired positions:
ServoUnit arm1 (9, arm1Servo, 100, 100);
ServoUnit arm2(10, arm2Servo, 110, 110);
ServoUnit swivel(11, swivelServo, 95, 95);
ServoUnit claw(6, clawServo, 70, 70);


void setup() {
  // Setup code that runs once:

  // Tell the Arduino where each hardware item is connected to the board:
  arm1Servo.attach(arm1.pin);
  arm2Servo.attach(arm2.pin);
  swivelServo.attach(swivel.pin);
  clawServo.attach(claw.pin);
  pinMode(BTRXPin, INPUT);
  pinMode(BTTXPin, OUTPUT);
  pinMode(enablePin, OUTPUT);
  pinMode(in1, OUTPUT);
  pinMode(in2, OUTPUT);
  pinMode(in3, OUTPUT);
  pinMode(in4, OUTPUT);

  // move the servos to their starting positions:
  arm1Servo.write(arm1.actualPos);
  arm2Servo.write(arm2.actualPos);
  swivelServo.write(swivel.actualPos);
  clawServo.write(claw.actualPos);

  // begin Bluetooth communication:
  Bluetooth.begin(9600);
}

// define a function used to move a servo to a position at a set speed.
void moveServo (ServoUnit& servoUnit)
{
  if (servoUnit.actualPos > servoUnit.desiredPos)
  {
    for (; servoUnit.actualPos >= servoUnit.desiredPos; servoUnit.actualPos = servoUnit.actualPos - 1)
    {
      servoUnit.servo.write(servoUnit.actualPos);
      delay(servoDelay);
    }
  }
  if (servoUnit.actualPos < servoUnit.desiredPos)
  {
    for (; servoUnit.actualPos <= servoUnit.desiredPos; servoUnit.actualPos = servoUnit.actualPos + 1)
    {
      servoUnit.servo.write(servoUnit.actualPos);
      delay(servoDelay);
    }
  }
}


// A function that tells the motors what speed/direction...
// ... to run until it recieves a stop request:
void motorMove(String buttonPressed, int speedPercent)
{
  int speedBytes;
  if (buttonPressed == "F")
  {
    // The values of each in pin determine the directions of each motor.
    digitalWrite(in1, 0);
    digitalWrite(in2, 1);
    digitalWrite(in3, 1);
    digitalWrite(in4, 0);
    // Line 124 maps the value given by the app in % to a value from 0 to 255
    speedBytes = map(speedPercent, 0, 100, 0, 255);
    // the enable pin sets the speed, from 0 to 255:
    analogWrite(enablePin, speedBytes);
  }
  if (buttonPressed == "B")
  {
    digitalWrite(in1, 1);
    digitalWrite(in2, 0);
    digitalWrite(in3, 1);
    digitalWrite(in4, 0);
    speedBytes = map(speedPercent, 0, 100, 0, 255);
    analogWrite(enablePin, speedBytes);
  }
  if (buttonPressed == "L")
  {
    digitalWrite(in1, 0);
    digitalWrite(in2, 1);
    digitalWrite(in3, 0);
    digitalWrite(in4, 1);
    speedBytes = map(speedPercent, 0, 100, 0, 255);
    analogWrite(enablePin, speedBytes);
  }
  if (buttonPressed == "R")
  {
    digitalWrite(in1, 1);
    digitalWrite(in2, 0);
    digitalWrite(in3, 0);
    digitalWrite(in4, 1);
    speedBytes = map(speedPercent, 0, 100, 0, 255);
    analogWrite(enablePin, speedBytes);
  }
}
// A function to stop all of the motors:
void motorStop()
{
  digitalWrite(in1, LOW);
  digitalWrite(in2, LOW);
  digitalWrite(in3, LOW);
  digitalWrite(in4, LOW);
  analogWrite(enablePin, 0);
}


void loop()
{
  // Main code that runs on loop:

  // Check if the Bluetooth module has recieved any data:
  if (Bluetooth.available() > 0)
  {
    // read the Bluetooth input until it finds the character 'X', then write that to the string dataIn.
    // Before this, Bluetooth data would look something like
    // "arm1120Xarm1121Xarm1124X..."
    dataIn = Bluetooth.readStringUntil('X');
    // After this, the dataIn variable would look like
    // "arm1120"
    // Depending on what the dataIn starts with, the correct arm will respond:
    if (dataIn.startsWith("arm1"))
    {
      // cut off the "arm1" prefix and turn the string into an integer:
      String dataInParsed = dataIn.substring(4);
      // set the desired position of the arm to the value refined from Bluetooth input:
      arm1.desiredPos = dataInParsed.toInt();
      moveServo(arm1);
    }

    else if (dataIn.startsWith("arm2"))
    {
      // this code (and that for the remaining servo movement) is nearly identical to the code for Arm 1:
      String dataInSub = dataIn.substring(4);
      arm2.desiredPos = dataInSub.toInt();
      moveServo(arm2);
    }

    else if (dataIn.startsWith("claw"))
    {
      String dataInParsed = dataIn.substring(4);
      claw.desiredPos = dataInParsed.toInt();
      moveServo(claw);
    }

    else if (dataIn.startsWith("swivel"))
    {
//      String dataInParsed = dataIn.substring(6);
//      swivel.desiredPos = dataInParsed.toInt();
      swivel.desiredPos = dataIn.substring(6).toInt();
      moveServo(swivel);
    }
    // if the app tells the robot to do motor stuff...
    else if (dataIn.startsWith("motor"))
    {
      // ...then check which button was pressed on the app:
      String buttonPressed = dataIn.substring(5,6);
      delay(10);
      // grab the speed value from the command sent from the app:
      int sliderSpeed = (dataIn.substring(6).toInt());
      delay(10);
      // set the motor values based on what the app said to do:
      motorMove(buttonPressed, sliderSpeed);
      delay(10);
    }
    // if the stop command is recieved from the app...
    else if (dataIn.equals("gaming"))
    {
      // ...stop the motors:
      motorStop();
    }
  }
}
Third Milestone
For Milestone 3, I had to control the robot arm via Bluetooth. This consisted of wiring the Bluetooth module to the Arduino board and writing code to allow the Arduino to receive and parse data from the phone. The first step for this was to learn how to use MIT App Inventor, a program developed by MIT to build simple android apps. It uses the same “block-coding” system as Scratch, another MIT creation, so it was simple enough to learn. The app I made consists of Connect and Disconnect buttons, and four labelled sliders to control each servo on the arm between 1 and 180 degrees.
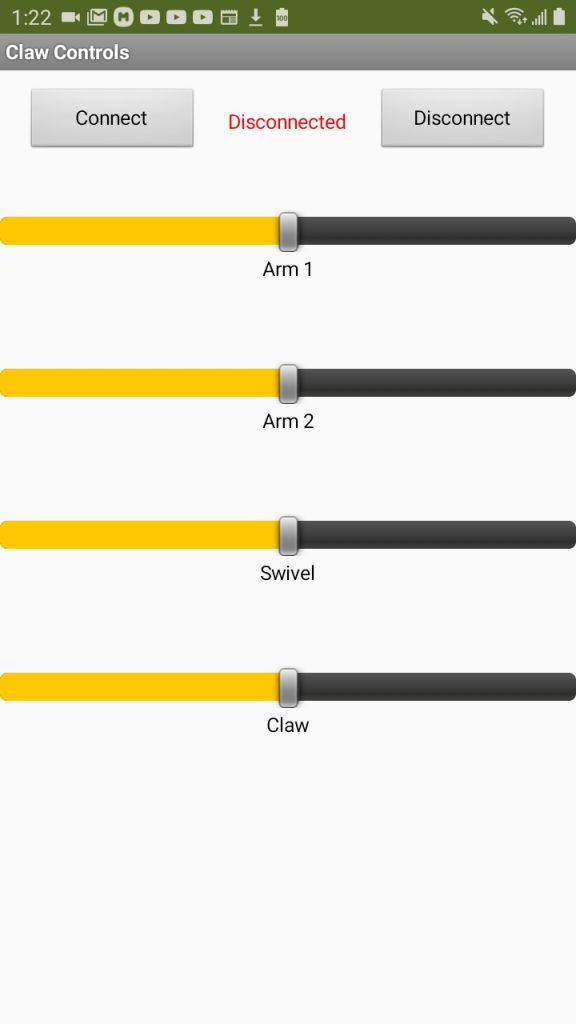
Next, the code for the app. When the connect button is pressed, a list of all Bluetooth devices the phone can see pops up. Once the Bluetooth module is selected and connection is successful, the status label between the buttons will change to say “Connected”, and the sliders will now control the arm.
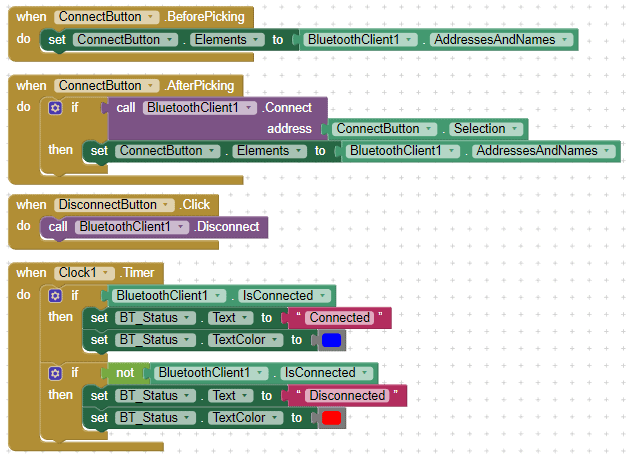
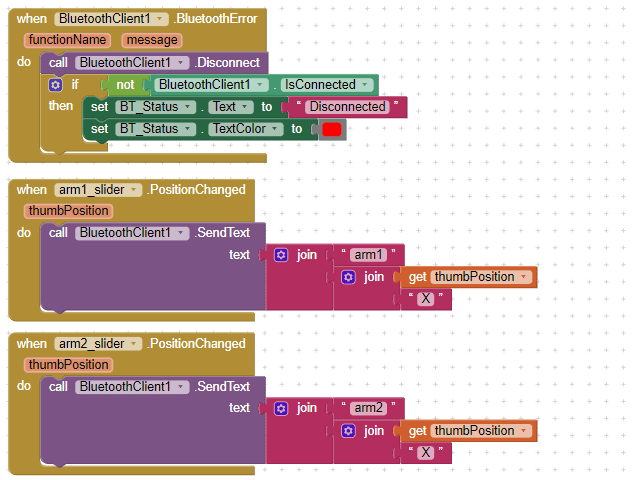
Whenever the Bluetooth module has an error, or the Disconnect button is pressed, the phone will disconnect from the Bluetooth module and change the label to say “Disconnected”. Whenever a slider is moved, a prefix relating to the slider is added (in this case “arm1”), followed by the slider’s position, and finally the character “X”. This is so that when the Arduino receives the line of text, it knows what slider to move, and where the commands start and end.
// include the servo and softwareserial libraries:
#include <Servo.h>
#include <SoftwareSerial.h>

// declare the 4 servos used on the arm:
Servo arm1Servo;
Servo arm2Servo;
Servo swivelServo;
Servo clawServo;

// declare the pin numbers where the bluetooth module is plugged into on the board:
const int BTTXPin = 7;
const int BTRXPin = 13;

// create a serial communication using the Bluetooth pins defined in the above constants:
SoftwareSerial Bluetooth(BTRXPin, BTTXPin);

// variables for the servo speed and for Bluetooth data recieved
int servoDelay = 25;
String dataIn = "";

// create a data structure for servo data:
// each variable of type servoUnit has these variables associated:
struct ServoUnit
{
  int pin;
  Servo servo;
  int actualPos;
  int desiredPos;
  // default values for an undefined structure variable
  ServoUnit()
  {
    pin = 0;
    servo = servo;
    actualPos = 90;
    desiredPos = 90;
  }
  // this function allows the creation of servoUnit objects using the arguments listed:
  ServoUnit(int pin_, Servo servo_, int actualPos_, int desiredPos_)
  {
    pin = pin_;
    servo = servo_;
    actualPos = actualPos_;
    desiredPos = desiredPos_;
  }
};

// create ServoUnit objects for each servo, each with values...
// ...for pin number, servo name, and actual and desired positions:
ServoUnit arm1 (9, arm1Servo, 100, 100);
ServoUnit arm2(10, arm2Servo, 110, 110);
ServoUnit swivel(11, swivelServo, 95, 95);
ServoUnit claw(5, clawServo, 70, 70);


void setup() {
  // Setup code that runs once:

  // wait for 5 seconds before telling the Arduino...
  // ...where each hardware item is connected to the board:
  delay(5000);

  arm1Servo.attach(arm1.pin);
  arm2Servo.attach(arm2.pin);
  swivelServo.attach(swivel.pin);
  clawServo.attach(claw.pin);
  pinMode(BTRXPin, INPUT);
  pinMode(BTTXPin, OUTPUT);

  // move the servos to their starting positions:
  arm1Servo.write(arm1.actualPos);
  arm2Servo.write(arm2.actualPos);
  swivelServo.write(swivel.actualPos);
  clawServo.write(claw.actualPos);

  // begin Bluetooth communication:
  Bluetooth.begin(9600);
}

// define a function used to move a servo to a position at a set speed.
void moveServo (ServoUnit& servoUnit)
{
  if (servoUnit.actualPos > servoUnit.desiredPos)
  {
    for (; servoUnit.actualPos >= servoUnit.desiredPos; servoUnit.actualPos = servoUnit.actualPos - 1)
    {
      servoUnit.servo.write(servoUnit.actualPos);
      delay(servoDelay);
    }
  }
  if (servoUnit.actualPos < servoUnit.desiredPos)
  {
    for (; servoUnit.actualPos <= servoUnit.desiredPos; servoUnit.actualPos = servoUnit.actualPos + 1)
    {
      servoUnit.servo.write(servoUnit.actualPos);
      delay(servoDelay);
    }
  }
}

void loop()
{
  // Main code that runs on loop:

  // Check if the Bluetooth module has recieved any data:
  if (Bluetooth.available() > 0)
  {
    // read the Bluetooth input until it finds...
    // ...the character 'X', then write that to the string dataIn.
    // Before this, Bluetooth data would look something like
    // "arm1120Xarm1121Xarm1124X..."
    dataIn = Bluetooth.readStringUntil('X');
    // After this, the dataIn variable would look like
    // "arm1120"

    // Depending on what the dataIn starts with, the correct arm will respond:

    if (dataIn.startsWith("arm1"))
    {
      // cut off the "arm1" prefix and turn the string into an integer:
      String dataInParsed = dataIn.substring(4);
      // set the desired position of the arm to the value refined from Bluetooth input:
      arm1.desiredPos = dataInParsed.toInt();
      moveServo(arm1);
    }

    else if (dataIn.startsWith("arm2"))
    {
      // this code (and that for the remaining servo movement) is nearly identical to the code for Arm 1:
      String dataInSub = dataIn.substring(4);
      arm2.desiredPos = dataInSub.toInt();
      moveServo(arm2);
    }

    else if (dataIn.startsWith("claw"))
    {
      String dataInParsed = dataIn.substring(4);
      claw.desiredPos = dataInParsed.toInt();
      moveServo(claw);
    }

    else if (dataIn.startsWith("swivel"))
    {
      String dataInParsed = dataIn.substring(6);
      swivel.desiredPos = dataInParsed.toInt();
      moveServo(swivel);
    }
  }
}
Second Milestone
For my second milestone, I wanted to properly wire each servo and get them to move with Arduino code. The first challenge was simply wiring each servo, connecting its power, ground, and control cables to the appropriate ports on the Arduino. I had to utilize a breadboard. Breadboards extend the signal coming from a single pin to multiple pins.
With each servo connected to power and ground, the next step was control wires. I connected each servo to a PWM-capable digital pin on the board. PWM stands for pulse width modulation. Because the pins are digital, they can only send two states: on and off. However, the pin can send alternating 5V and 0V signals extremely quickly to simulate analog output, which the servos need in order to be controlled.
Power Breadboard

The Wiring

Top-Down View

Wiring Close-Up

// include the library of servo-related functions that come pre-packed with the Arduino IDE
#include <Servo.h>

// declare the 4 servos used on the arm:
Servo arm1Servo;
Servo arm2Servo;
Servo swivelServo;
Servo clawServo;

// pin number where each hardware item is plugged into on the board:
const int arm1Pin = 9;
const int arm2Pin = 10;
const int swivelPin = 11;
const int clawPin = 5;
const int upButtonPin = 12;
const int downButtonPin = 8;

// the state (HIGH or LOW) of each button:
int upButtonState;
int downButtonState;

// position variables for each servo:
int arm1Pos;
int arm2Pos;
int swivelPos;
int clawPos = 80;

// time in milliseconds the servo waits before...
// ...moving another degree in any direction:
int servoDelay = 15;

void setup() {
// Setup code that runs once:

// wait for 5 seconds before telling the Arduino...
// ...where each hardware item is connected to the board:
delay(5000);
clawServo.attach(clawPin);
arm1Servo.attach(arm1Pin);
arm2Servo.attach(arm2Pin);
swivelServo.attach(swivelPin);
pinMode(upButtonPin, INPUT);
pinMode(downButtonPin, INPUT);

}

void loop() {
// This code runs repeatedly until the Arduino is turned off or reset:

// Set the values stored in the button state variables to what the Arduino detects:
upButtonState = digitalRead(upButtonPin);
downButtonState = digitalRead(downButtonPin);

// If the Up button is pressed,
while (upButtonState == HIGH){
// add 1 to the claw position variable
clawPos += 1;
// Move the claw servo to the position stored in clawPos:
clawServo.write(clawPos);
// wait for servoDelay milliseconds:
delay(servoDelay);
// Check the state of the button again and write it to the variable for it:
upButtonState = digitalRead(upButtonPin);
// After this, the code checks again the condition in the parentheses of the while loop.
// That's why it checks the button state one more time: If it didnt...
// ...the upButtonState variable would never change, and the loop would repeat indefinitely.
}

// This code is identical to the above while loop except that it sends...
// ...the servo in the other direction by decreasing clawPos by 1.
while (downButtonState == HIGH){
clawPos -= 1;
clawServo.write(clawPos);
delay(servoDelay);
downButtonState = digitalRead(downButtonPin);
}
}
// include the library of servo-related functions that come pre-packed with the Arduino IDE
#include <Servo.h>

//declare the 4 servos used on the arm:
Servo arm1Servo;
Servo arm2Servo;
Servo swivelServo;
Servo clawServo;

// variables to represent actual positions of the servos that control each element of the arm:
int arm1Pos;
int arm2Pos;
int swivelPos;
int clawPos;

// relevant positions (in degrees) used in the code for each servo:
int arm1StartPos = 65;
int arm1EndPos = 120;

int arm2StartPos = 80;
int arm2EndPos = 140;

int swivelStartPos = 60;
int swivelMidPos = 95;
int swivelEndPos = 130;

int clawStartPos = 45;
int clawEndPos = 120;

// the delay (in ms) between each time the servo moves 1 degree:
int servoDelay = 25;

// – -----------------------------------------------------------------------------------------
void setup() {
// Setup code that runs once:

// wait for 5 seconds before telling the Arduino where each servo is connected to the board:
delay(5000);
clawServo.attach(5);
arm1Servo.attach(9);
arm2Servo.attach(10);
swivelServo.attach(11);

// Tell each servo to go to its start position:
arm1Servo.write(arm1StartPos);
arm2Servo.write(arm2StartPos);
clawServo.write(clawStartPos);
// the swivel goes to its midpoint since it has a special oscillation setup:
swivelServo.write(swivelMidPos);
}
// – -----------------------------------------------------------------------------------------
void loop() {
// This code runs repeatedly until the Arduino is turned off or reset:

// This is the oscillate code for Arm 1.
// set arm1 to its start position, then check if the arm's position is less than its end position.
// if it is, then move the servo to the degree value stored in the variable arm1Pos,
// then wait for the time defined in the variable servoDelay,
// then add 1 to the value stored in the variable arm1Pos.
// This repeats until the condition is false, after which the code moves on.
// By using this method, the speed of the servo can be set to 1 degree every servoDelay milliseconds.
for (arm1Pos = arm1StartPos; arm1Pos <= arm1EndPos; arm1Pos += 1){
arm1Servo.write(arm1Pos);
delay(servoDelay);
}

// set arm2 to its end position, then check if the arm's position is greater than its start position.
// if it is, then move the servo to the degree value stored in the variable arm2Pos.
// then wait for the time defined in the variable servoDelay
// then subtract 1 from the value stored in the variable arm2Pos
// this repeats until the condition is false, after which the code moves on.
for (arm1Pos = arm1EndPos; arm1Pos >= arm1StartPos; arm1Pos -= 1){
arm1Servo.write(arm1Pos);
delay(servoDelay);
}

// this is the oscillate code for arm 2. It's identical to Arm 1 except for the start and end points.
for (arm2Pos = arm2StartPos; arm2Pos <= arm2EndPos; arm2Pos += 1){
arm2Servo.write(arm2Pos);
delay(servoDelay);
}
for (arm2Pos = arm2EndPos; arm2Pos >= arm2StartPos; arm2Pos -= 1){
arm2Servo.write(arm2Pos);
delay(servoDelay);
}

// this is the oscillate code for the claw. It's identical to Arm 1 except for the start and end points.
for (clawPos = clawStartPos; clawPos <= clawEndPos; clawPos += 1){
clawServo.write(clawPos);
delay(servoDelay);
}
for (clawPos = clawEndPos; clawPos >= clawStartPos; clawPos -= 1){
clawServo.write(clawPos);
delay(servoDelay);
}

// this is the oscillate code for the swivel. The basic code (i.e. for loops) is almost the same,
// but the positions it uses are different.

// First, it moves at 1 degree every servoDelay milliseconds from the midpoint to the end point.
for (swivelPos = swivelMidPos; swivelPos <= swivelEndPos; swivelPos += 1){
swivelServo.write(swivelPos);
delay(servoDelay);
}
// Then, it goes from the end point all the way to the start point.
for (swivelPos = swivelEndPos; swivelPos >= swivelStartPos; swivelPos -= 1){
swivelServo.write(swivelPos);
delay(servoDelay);
}
// Finally, it returns to the midpoint from the start point.
for (swivelPos = swivelStartPos; swivelPos <= swivelMidPos; swivelPos += 1){
swivelServo.write(swivelPos);
delay(servoDelay);
}
}
First Milestone
My first milestone was to assemble the claw according to the video instructions that the kit provided. The arm as a whole consists of 4 servos that control different degrees of freedom: the arm can rotate, move both of its two joints independently, and grab things with the claw. The servo that controls the second half of the arm does so indirectly: additional arms and rotation points give it the leverage it needs to articulate the second ‘leg’ of the arm from back at the base. The claw is fitted with foam grippers to allow for a softer grip than hard laser-cut wood.


