
Me: Hey there! My name is Patrick and I am a rising freshman at Lafayette College. I’ve always had an interest in technology and tinkering with objects. My older brother went on to be a Systems Engineer. As I grew up I was surrounded wave after wave with tech and names of components that my brother handled. It was foreign to me but I absolutely loved it. Every once in a while he would ask me to help him with some small project because he needed an extra hand. It was there I had much first experience with soldering, electrical wiring and hardware tools. I was not completely inexperienced with what I would encounter at BlueStamp. When I started six weeks ago I was undecided with the engineering type that would appeal to me. As my time here comes to a close I have learned much about the tedious and at times frustrating work that comes with engineering. But that’s what I loved about it while building my robot and now I intend to pursue a major in Electrical Engineering.
Intensive Project:
Omni-Directional Robot w/GoPro Hero4

My intensive project is the Omni-Directional Robot. The body structure is not set in stone, and there is no clear body schematic. I was able to construct whatever body shape I desired. Wheel placement would still have to be correctly placed so the robot would keep true to its name and move any direction. After some time I finished the construction of the acrylic body by hand and bolted it to hangers on the motors. It was cool as is but it’d be even cooler if I didn’t have to keep my eyes on it. The idea of a live stream came to mind and I put to use my GoPro. I added an additional servo controlled by the D-Pad to give me a 180 degree view when I would mount the camera. It’s not perfect, but it’s pretty rad.
Bill of Materials
Item |
Vendor |
Part # |
Qt |
Price |
Link |
| Arduino Uno R3 | Sparkfun | DEV-11021 | 1 | $24.95 | Link |
| Venom 7.4v 3200mah Battery | Amazon | 1553 | 1 | $26.99 | Link |
| USB Cable | Amazon | F3U133-03 | 1 | $4.25 | Link |
| HiTECH 311 Servo | Amazon | -- | 1 | $9.98 | Link |
| 2-Wire Motor 393 | VEX Robotics | 276-2177 | 3 | $14.99 ea. | Link |
| Motor Controller 29 | VEX Robotics | 276-2193 | 1 | $9.99 ea. | Link |
| Drive Shaft 2″ & 3″ | VEX Robotics | 276-2011 | 1 | $5.49 | Link |
| Shaft Collars 16-Pk | VEX Robotics | 276-2010 | 1 | $7.99 | Link |
| Neewer B3 AC LiPo Charger | Amazon | 400615171 | 1 | $7.95 | Link |
| 2.75″ Omni-Wheels(2-Pk) | VEX Robotics | 276-1902 | 2 | $19.99 ea. | Link |
| Sony PS2 Wireless Controller 2.4 G | Amazon | -- | 1 | $13.99 | Link |
| Bar 1x25 (8-Pk) | VEX Robotics | 274-1141 | 1 | $12.99 | Link |
| (5 Pcs) 1″ x 1″ Right Angle Brackets | SparkFun | 11864 | 1 | $5.97 | Link |
| GoPro Hero 4 Black Edition | Amazon | -- | 1 | $449.94 | Link |
| Samsung MicroSD Card 64gb | Amazon | MB-MG64DA/AM | 1 | $48.99 | Link |
Schematic

2nd Milestone: Main Project Completed
Body Constructed and Attached
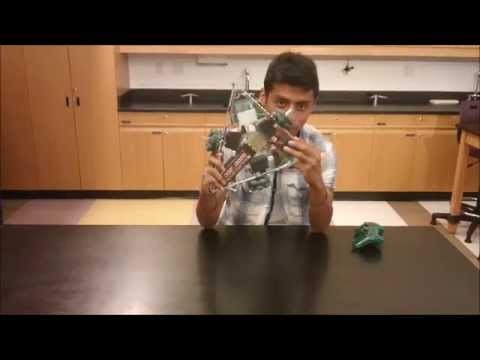
Next step was building the body. Initially I wanted a star-shaped body to coincide with all the puns on my name. I didn’t want the hassle of making multiple cuts on the acrylic plastic so I decided on a triangle. The shape and overall design was conceived when I originally wanted a preview of how the wheels would stand and such. I applied zip ties to all three corners making it sturdy and I decided to keep it that way. Each corner was 60 degrees wide making it simple to cut off the acrylic. Accounting for human error the piece came out a bit wider on one end. However, it would still fit overall.
I attached the acrylic through bolts that also sustained the motors in place with a small make-shift arc. The body was complete. My breadboard connections worked like a charm but it wasn’t a permanent solution. I was indecisive whether to solder it down with a perfboard or keep the breadboard layout. My plan to fit a top cover to protect the pieces would have to be modified because the cables stuck too high making it impossible to make it a snug fit without bending cables. It was worrying that I could potentially damage connections so I worked with it and began making the wire setup and location on the acrylic floor much more organized. Not only would it look more aesthetically appealing but it would offer some protection. I’m the only individual building the robot in my room. There was no piggy backing from others, however on the other side where six omni’s were being built I could clearly hear robot wars going on. I wanted mine to have speed but not be too light that it could easily flip.
The acrylic offers a transparent look but the 1/4 inch thick I use is still pretty heavy.

First Milestone
All 3 Motors Respond to Controller/CODE
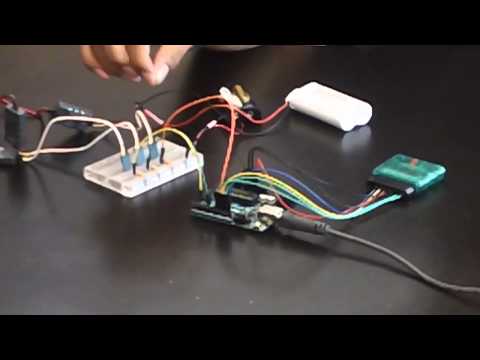
The first two weeks were filled with frustration, fear and absolute fun. I had begun working on my main project, the Omni-Directional Robot. I was given the box with my components and I was thrilled to begin. Then it dawned on me, I didn’t know where to start and there was no schematic I could follow. That left room for creativity and independence, I could go where I wanted with it, I wasn’t constrained. I started with the Arduino, reading up on basic examples, meanings and such. It was all new to me and after 30 min, I had uploaded the Blink example to control the LED. I was in awe. Next, I modified the code to make it blink at the rate I wanted (simple change in time (ms)). Still not a big thing but it was progress for me.
Controlling the motors was the next step. Now I had a bit of a struggle because I lacked a breadboard.
Even then I had no idea how to make the connections although I did have an idea of how wiring works. I finally found one setup that was meant for one servo connection but I ultimately configured for all 3. As time went by I realized I had many unnecessary connections and I could simplify the overall wiring. I modified the sweep code to control the servos I had. However, I built upon the values another BSE alumni had (Rain). The values I refer to are the ones that the analog stick uses. The PS2X library is REQUIRED for the controller to even work with the Arduino. All the interfacing is already done for me and all I had to do was modify the code to make specific buttons perform the tasks I wanted (ex. GoPro mounted servo and the wheels themselves). So SHOUT OUT TO BILL PORTER FOR BUILDING THE LIBRARY.
Bill Porter Site(Scroll Down A Bit For PS2X Library Download)Link

Starter Project
Minty Boost
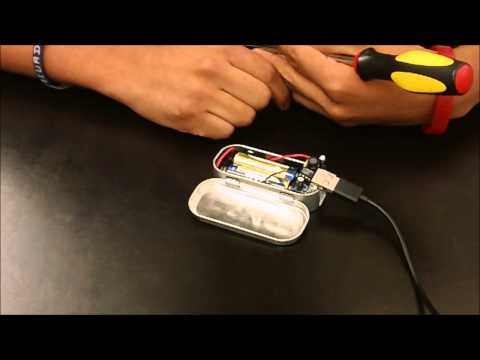
Hi, my name is Patrick and for my starter project I built a Minty Boost.
Essentially, it is a small compact USB charger. It’s fitted into a small tin box with the port exposed. Within it, the PCB contains multiple components. A 3.3K resistor improves the high current capability of the boost converter chip while a set of 75K 1% and 49.9 K resistors are placed so Apple products can determine what kind of charger is being used. The circuit is kept going in one direction by a diode while ceramic capacitors smooth out the 5V output from the batteries. This ensures it goes from once source to the other. A safety IC socket protects the chip and allows for easy replacement if damaged. The commonly used type A connector allows the charge to pass through your cable that is powered by the 2xAA battery source. All the components are soldered in their proper places and once the batteries are placed the circuit becomes live, charging the device it is connected to.
Schematic:
