Alexa Home Automation
Control lights and ask for the humidity or temperature through Amazon’s Alexa! Or, use it as a door intercom system and have a conversation with someone outside your door from inside!
Engineer
Neeharika Vogety
Area of Interest
Computer Science
School
Dougherty Valley High School
Grade
Incoming Senior
Reflection
Before coming into BlueStamp, I knew I wanted to do something with engineering later on, but I didn’t really know what specifically. Over the course of six weeks, I listened to a bunch of talks from people in the industry and learned so much about the different types of engineering. I now have a clearer picture of what I want to pursue later on in college. BlueStamp also gave me the confidence to build something on my own, even if it’s something totally new. I’m super proud of what I was able to complete in only a couple of weeks, and I’m excited to try building new things in the future!
Final Milestone
How It All Works
I’m using a multitude of Amazon Web Services in order to complete this goal. I have used AWS Lambda, AWS IoT (Internet of Things), and DynamoDatabase along with IBM Watson’s language processing services. The whole system looks like this.
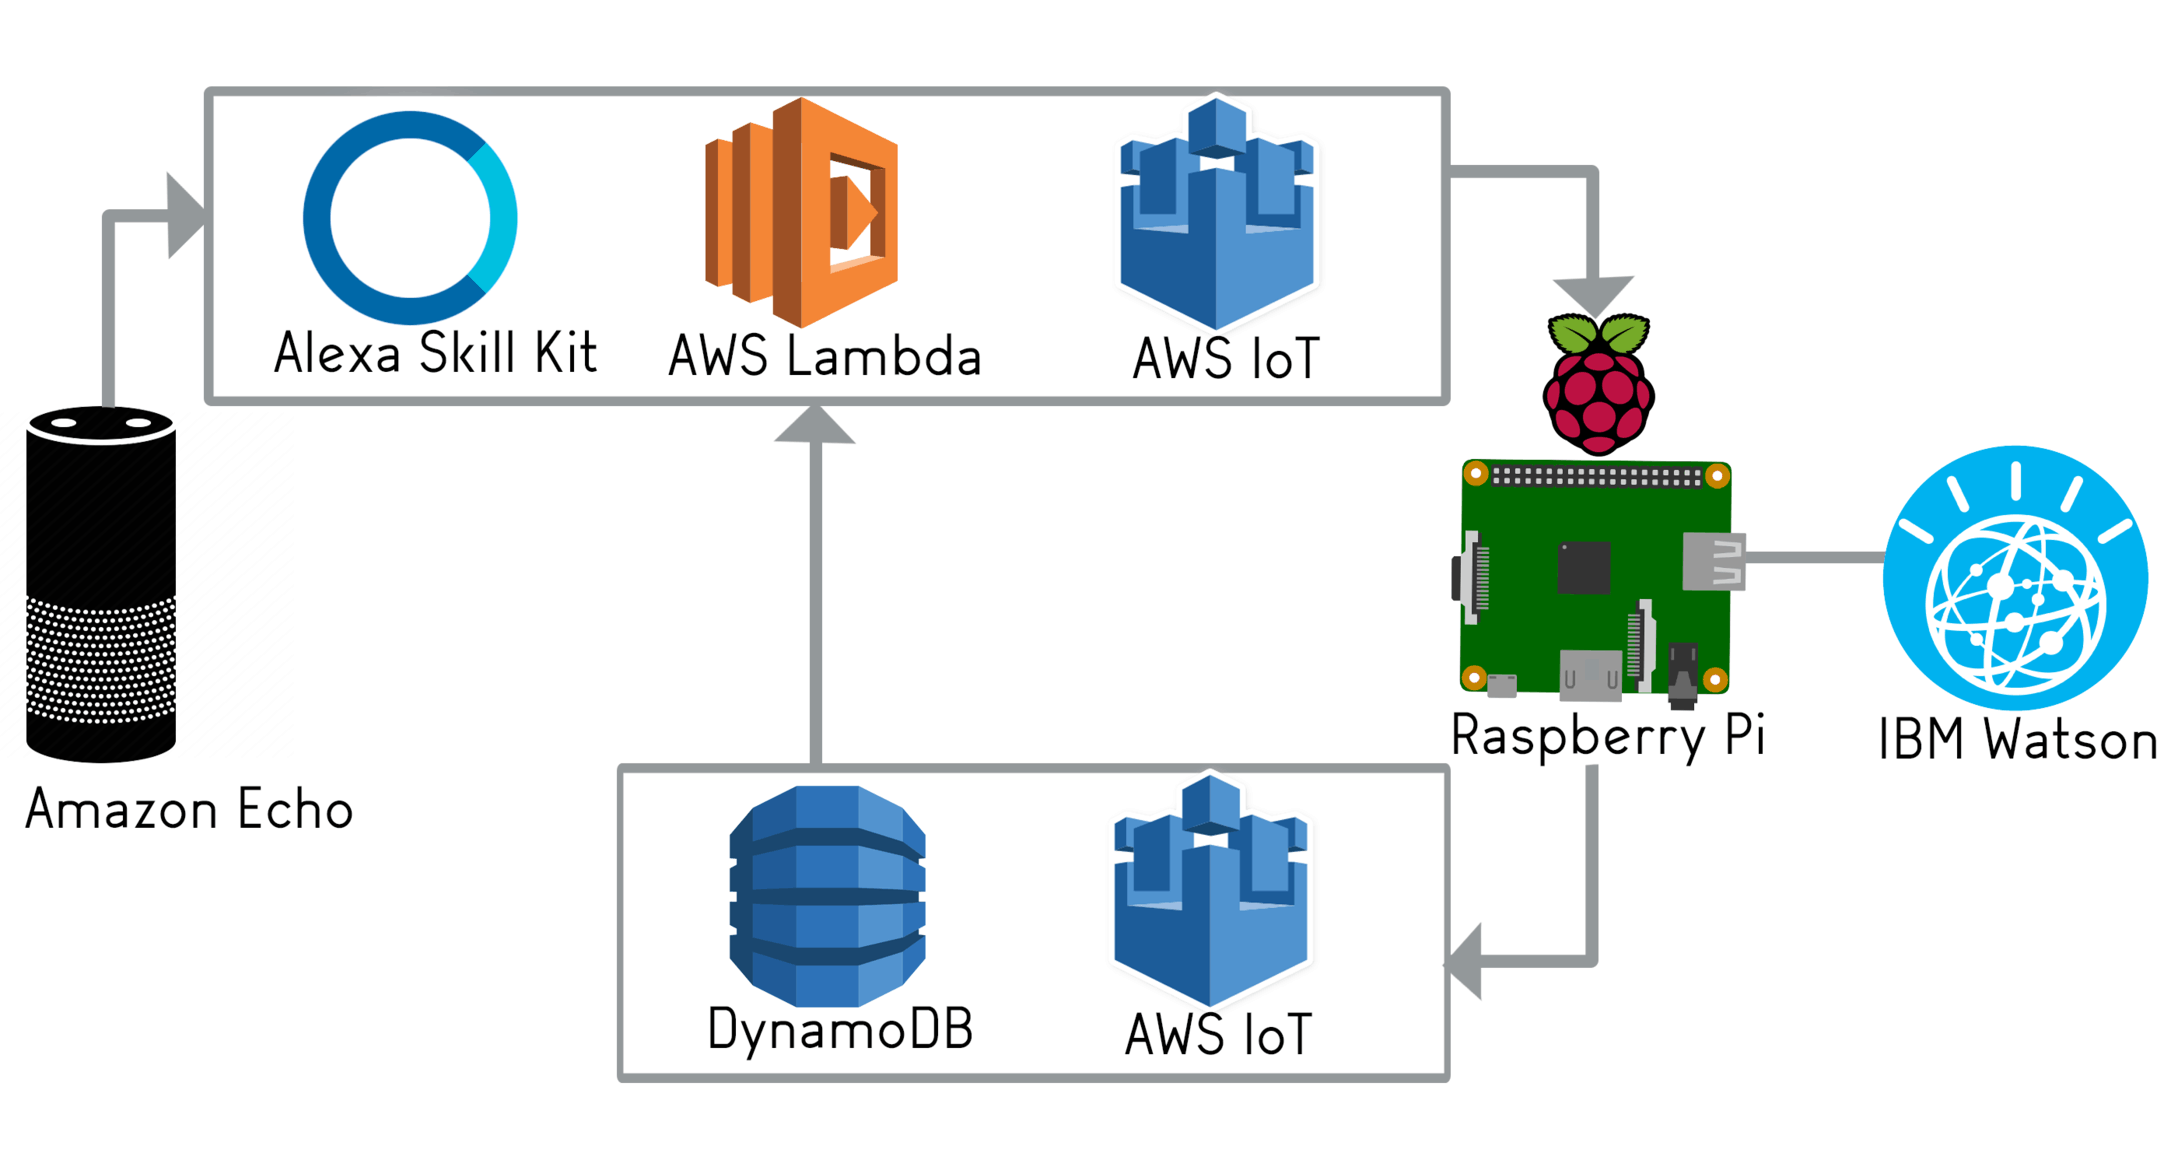
When you say something to Alexa, you invoke a skill. That skill has different utterances that it is able to understand and different slots inside those utterances. For example, for an app that reads horoscopes, you can have an utterance that is like, “Tell me about {Astrology Sign}”. You can replace the ‘Astrology Signs’ with whatever sign you want. In my case, I have “Say {Message}” as an utterance. I can substitute ‘Message’ for whatever I want to relay to my visitor. All of this I planned out in the Alexa Custom Skills Kit.
No actually processing gets done inside the Echo device. It doesn’t automatically know what you want to do. That is where AWS Lambda comes in. It is basically a way to run your code on Amazon’s servers only when you invoke it. This means that it isn’t running constantly, waiting for data; it’s only called when you want to call it. All the Alexa code is written in a Lambda function. There, I extracted the ‘message’ part of my utterance and sent it to AWS IoT.
AWS IoT (or the Internet of Things) is a way for devices to communicate to each other. This sounds fantastical, but all it really does is make devices publish data to a topic stream, and other devices can subscribe to that stream and get the data. In my case, I have AWS Lambda publishing on a specific stream that my Raspberry Pi is subscribing to. In a parallel fashion, the Pi can publish to another stream that my Lambda function is reading off of. This is a great way to send messages back and forth. However, it only takes in written data, like strings, characters, and numbers, not an audio file. Lambda anyway parses what you say to Alexa as a string, so I decided to send back and forth strings on these topic streams.
Consider a message that I want to send to my Pi from Alexa. I’ll ask Alexa to send my message. My Lambda function extracts my message out of whatever else I said to Alexa. It sends that message to my Raspberry Pi via an AWS IoT topic stream. It is still a string at this point, but on receiving this message from Alexa, the Pi uses IBM’s text-to-speech service to convert the string into an .wav audio file. It plays this message on two external speakers. A separate USB microphone also hooked up to Pi starts recording, waiting for the visitor to say something back. That recording is also saved as a file, which is passed through IBM’s speech to text service, and outputs a string. I’m publishing that string, the visitor’s message, to a separate topic stream that the Dynamo database is keeping track of.
Everything sent to that particular topic stream is saved into a database. The Lambda function is constantly checking if there are any updates to this database, and if there is, it tells Alexa to read it out. This is how the visitor’s message comes back safe and sound. I took the extra precaution to delete the message after it was relayed back to Alexa, to make sure the database isn’t clogged up with a bunch of old messages. However, taking out the delete function will let you look at past messages in the database if you want.
While there is definitely a lot more services used than necessary, I’m glad I went through and learned how all these services worked. Plus, having this complex architecture behind my project allows me to alter the project to whatever I want. I can easily make it a voice-mail system, where visitors can leave messages to the user inside. Or I can make a garage door opener from Alexa with AWS IoT. All the pieces are there, i just need to alter a bit of code.
Challenges
My biggest challenge in this project was getting things to run on time. Node JS and Javascript are inherently asynchronous. This basically just means that different events take time, and each events are put in separate threads and run at the same time. Synchronous programming is more event based, and waits for each event to be done before executing the next one. But in Javascript, that’s not the case. Say you want to save an audio file and then play it, like I did. Intuitively, we would think that the computer would execute the playing function after it is done saving. However, it would actually save it and attempt to play it even if it isn’t done saving. I seriously thought that nothing was working, but I realized I needed to give it time. Javascript, unlike other languages, also doesn’t have an inherent sleep or delay function that takes in milliseconds or seconds and just pauses for that time. I went ahead and made my own that has a while loop that keeps checking whether a certain number of seconds had passed. Unfortunately, a while loop cuts off all threads running, meaning in our example, it would stop the saving process too. There was another similar function called setTimeout that worked, but it honestly made the code ugly and pyramidal. I used it occasionally, but I found a way to simulate synchronous callbacks with something called execSync, so I used that for the majority of my project.
All Code+Materials
Future Improvements
To tie this whole door communication system together, I was thinking I could also include something that could open your door, too. Maybe not open, but definitely unlock your door. Then the whole system comes together! You can have your conversation with anyone outside, and then you can just ask Alexa to unlock the door for you. This would require a lot more hardware than I have in my current project, but I think it would be fun to explore that idea.
Resources Used
Second Milestone
Recording and Playing Sound on a Raspberry Pi
I did want some kind of system to notify you if someone is at the door. This would be useful in a situation in which you aren’t in your house and someone rings the doorbell. You would get a notification on your phone letting you know that someone came to your door. To do this, I set up an IR break-beam sensor that maintain two states, broken and unbroken, with a Particle Photon, as used in the previous milestone. I published these states to the Particle console. The next step was to receive a notification when the state of the sensor changes to broken (like when someone comes to your door and breaks the beam). I achieved this through IFTTT, a neat application that lets user set up their own conditional statements for an array of web-services. In my case, I set up an applet that will send an SMS message if the console ever receives a broken state.
The next step was to start on this back and forth communication system, which was was the bulk of my modification. I decided to start with seeing if a separate microphone and speaker system would even work. I went with using a Raspberry Pi for this, because it has many ports and I can write all my code on there too, meaning it could operate separately away from my computer. I didn’t have a separate monitor or keyboard as is usually recommended with using a Raspberry Pi. I only had my laptop, so I set up ssh and vnc on my Pi so I could headlessly use it from my laptop’s terminal. I found out that if you have a USB Microphone or a sound card set-up with your Pi you can use commands from the command line to record and play sound files, because Pi has an ALSA soundcard driver built in(‘arecord’ and ‘aplay’). I decided to go with a USB Microphone and a set of USB speakers because I knew that they could record and play respectively. I did toy around with a separate sound card, but that didn’t work as I thought it would. So now the problem became that I could start recording and playing a file from the Pi command line, but I needed it as a program written in Node JS (as the rest of the project is written like that too). I found out that you can call a specific command from your js file, like so…….
const exec = require(‘child_process’).exec;
exec(‘<command goes here>’, function(err, stdout, stderr){
if (err) {
console.log(“ERROR !! “+err);
console.log(“stderr:”, stderr);
// node couldn’t execute the command
return;
}
// the *entire* stdout and stderr (buffered)
console.log(“stdout:”, stdout);
console.log(“stderr:”, stderr);
});
From there it was simple to start recording/playing from a file!
I then began thinking how I would transmit information from Alexa to the Pi. I knew that Alexa was parsing whatever you tell it as a String, so I should probably be sending back and forth strings instead of audio files. This meant that the audio files I have just saved with my program won’t work. I needed to convert whatever was said into the microphone to text. For this speech- to-text and text-to-speech functionality, I used an IBM BlueMix API which is skilled in language processing. For speech-to-text, it converts .wav file into a JSON file. For text-to-speech, it converts a string into a .wav file. Very clearly, these are opposite processes. I used this to my advantage.
My final program for this milestone did the following: start recording through the usb microphone and save this recording as a .wav file. Play this recording on the USB speakers to make sure that it saved. Use the IBM API to convert what was said to text and print this to the console. And that’s it! I will be using these same functions to aid me in communicating with Alexa in the next part of my project.
Resources Used
First Milestone
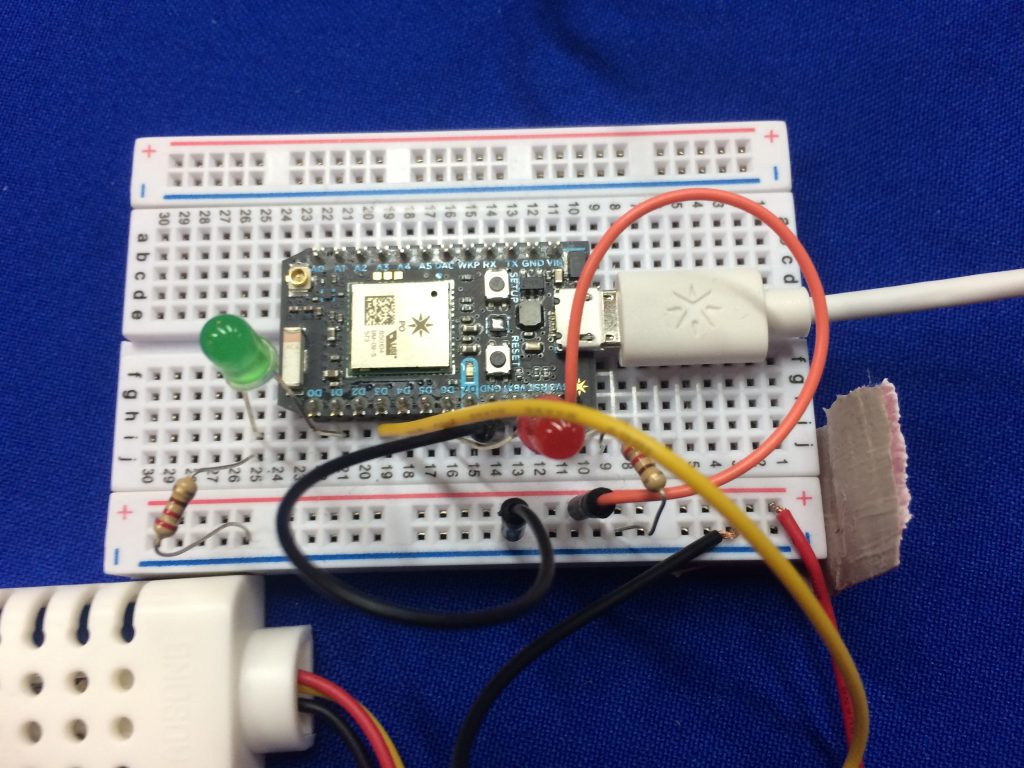
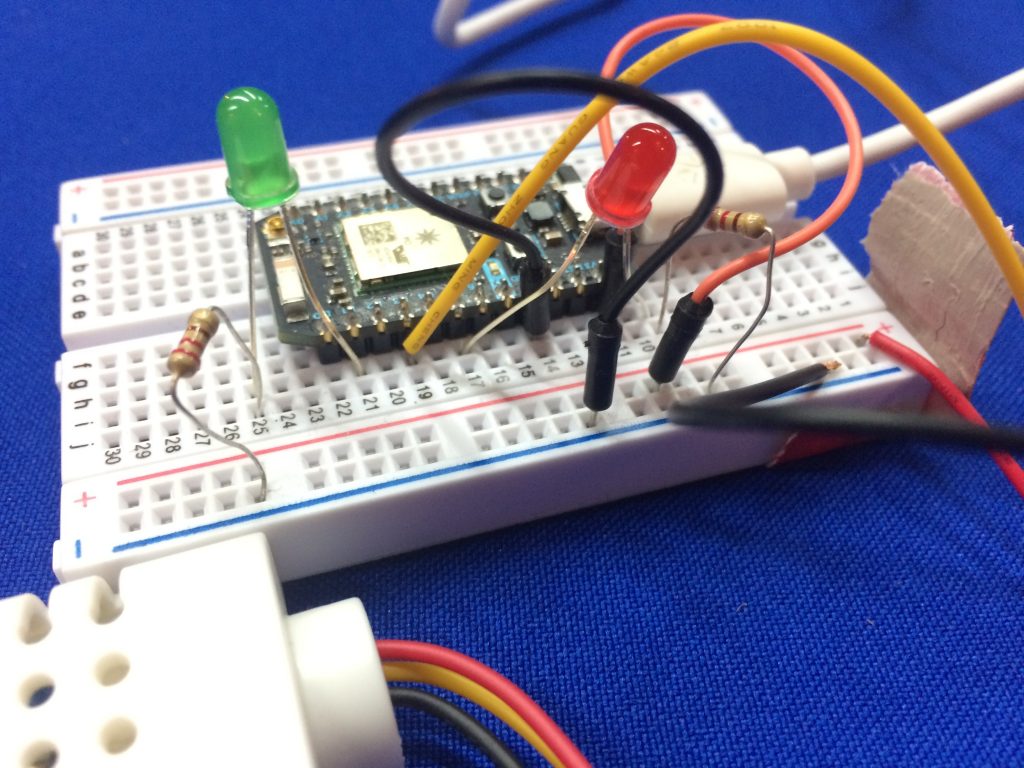
Circuit
The first part was building the circuit. The materials used were a Particle Photon, 2 LEDs, 2 220 ohm resistors, the DHT22 sensor, and a couple of jumper wires to connect everything together. I first ran a program that would blink the LEDs and read the data from the sensor. Then, I printed out the humidity and temperature in Celsius to the serial monitor. This point was supposed to be my first milestone, given that the sensor might give me a bit of trouble, but it actually turned out to be a pretty smooth process. An accurate temperature and humidity was printed and the LEDs blinked fine. I took the code that read the data and toggled the LEDs and put them into individual Particle Functions. A Particle Function is a function stored in the cloud that can be called with POST. I will be calling this function in the Alexa skillset later on.
VUI
The next part was writing the commands that I wanted the Echo to hear and respond to. This requires creating a custom Alexa Skillset. A “skill” is a specific capability that the Echo is capable of. For example, downloading a Jeopardy skill will let you play jeopardy with the device, or a news skill will make Alexa read out the daily news to you. I wanted to be able to ask Alexa to read the data off of the sensor and toggle the LEDs. The custom skill has a couple of key parts:
- Invocation Name: The name to call to start your skill. In my case, it is “Particle”
- Inent: The command you want to say to Alexa
- Slots: The changes in each specific command that will call a separate action
For example, you might say
Alexa, ask [Invocation Name] to [Inent]
This is a sample call for my project specifically(includes a slot),
Alexa, ask Particle what is the [temperature/humidity] here?
To let your skill know what calls you might say, you need to upload an Intent Schema, a JSON file that will outline your inents and your slots with their types (strings, numerics, literals, etc….) . You wouldn’t write actual sentences out in JSON, so you would also upload a Sample Utterance that would show the commands you want to say word for word. All of this encapsulates the Voice User Interface.
Lambda Function
Finally, we need a service to process our utterances and perform some action. AWS Lambda provides a free way to house your code, so I used that. The code is written in Node JS (basically javascript), and there are two main files. The index file will read what you say, store the slots of your commands into some variables, and called the desired Particle Functions depending on those slot variables. The second file outlines a series of handlers, like request, event, intent, etc.
Photos
Resources Used
Starter Project – Mini POV
Key Components
There are a couple of key components in this project. The first is the battery (3 triple A’s) which provide voltage to the POV. Next are the LED’s which correspond to pixels on the image. The image itself is 8px tall, so each LED actually represents a row of pixels. The microcontroller is what stores the image and the exact times of the flashing LED’s. You can upload your own photos by running a Processing program and uploading your image to the Java applet that is created by the program. The 2.2 K ohm Resistors (red red red) control the amount of current so that the microcontroller isn’t overloaded. The 47 ohm resistors(yellow violet black) both set the brightness of the leds and ensure that the leds don’t burn out. The two zener diodes are used to keep the voltage stable for the usb, and only let current flow one direction. There are two kinds of capacitors, both of which stabilize the voltage. The ceramic one is used for higher frequencies and the polarized ones (electrolytic) are used for lower frequencies. The three transistors are used to amplify the signal by 100 times in order to power all 8 LEDs. Potentiometer converts rotation into resistance, and sets how fast the LED’s will blink. There is also 12 megahertz crystal which is the main time keeper component of the whole system. It vibrates at a certain frequency that can be used to keep time because it is very consistent in nature.
Problems I Encountered
The major problem I had with this project was that I accidently put one of the capacitors in the wrong spot. With the help of some of the TA’s, we heated the solder that was surrounding the capacitor, yanked it out, and put it in the right spot. This left a bunch of solder still remaining in the slot that another component needed to go into. When heating the remaining solder to remove it, the actual path of the circuit got lifted up as well. After putting the correct components into the corrects spots, I placed a small dot of solder on the path that got lifted up to keep it down. Looking over it, it really wasn’t that much work to fix, but it took over an hour to remedy and really slowed me down.
I also wanted to upload my own image to display. I already had Processing on my laptop, because I used it for a different project, so I merely plugged in the code and attempted to run it. But it was giving some errors and wouldn’t compile. It turns out that I had a really old version, and I needed to download a more recent one for the code to work. After downloading the latest version, it worked perfectly fine and I was able to upload a custom image.