
Fingerprint ID Safe with Keypad
There are various major components to this safe. First, there is a fingerprint scanner that will make sure the person entering the safe is the right person. The fingerprint scanner has IDs that correlate to specific fingerprints. Using a windows program, the IDs are locked and anyone who tries to enter the safe without the right print is not given access. There is also a keypad that is required to enter the safe so this is highly secured.
Engineer
Mohammed I.
Area of Interest
Aerospace Engineering and Law
School
The Bronx Highschool of Science
Grade
Incoming Sophomore
Reflection
Overall this project was a great introduction to the engineering field. I was able to learn a lot in terms of software as well as hardware. I learned the basics of Arduino code and how currents flow through wires. I was able to learn tools such as the drill and dremel. I can use these skills that I learned from doing these projects to future projects that also may require these skills. On the personal level, this program helped me a lot in terms of working. I was given a lot of freedom to work on my project and peservered through the project on my own. I felt more confidence because in the beginning I did not think I will be able to complete such a project. The program supported me throughout the whole thing and it drived me even more to work harder. However, because I kept working on my own and perservered, I completed the project and felt more confident. Because of this project, I can feel more confident finishing future projects.
Final Milestone

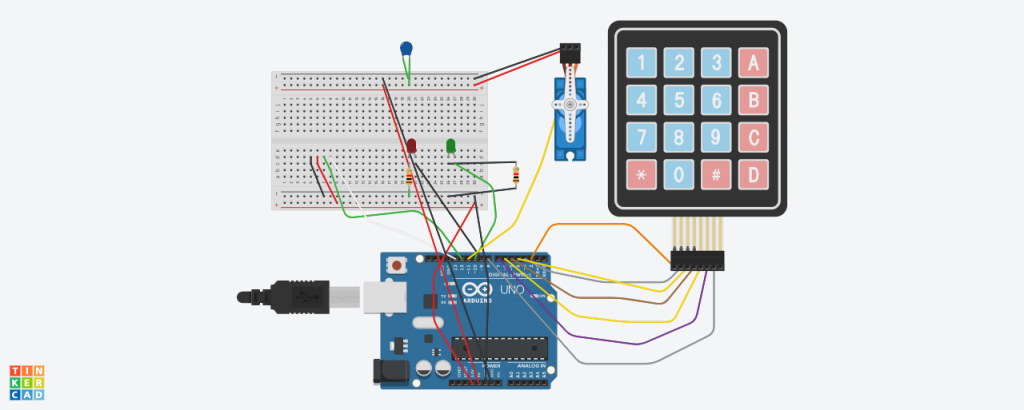
The green LED indicates that the right fingerprint is being used and that you are given acess to the keypad. When you put the right code in the keypad, the L bracket, which is connected to another L bracket, turns 90 degrees and unlocks itself
What the Milestone Is:
For my final milestone, I put my fingerprint scanner, LED, keypad, buzzer, and servo all in the safe. The goal was for the scanner and keypad to work together to turn the servo 90 degrees towould unlock the safe. On the keypad, there is now a piezo buzzer connected. This buzzer is an extra line of security to indicate intruders trying to enter the safe. There is an L bracket that is attached to the top of the safe and there is an L bracket attached to the servo.
-
Fingerprint Scanner
The finger is scanned and read
-
LED Lights Up
The LED lights up whenever the fingerprint scanner reads a right fingerprint
-
Type in the right Keycode
Reads each key pressed
-
Servo turns and unlocks safe
When the keypad code is correct, the servo turns 90 degrees unlocking the safe
Tools I Used
Dremel – A tool I used to cut open the holes for both the fingerprint scanner as well as the keypad. There are many attachments for the dremel which could apply to the speicifc type of material you are cutting. In this case, I was cutting mostly wood and a little bit of metal.
Drill – I tool I used to cut open the space for the LED and the buzzer. It was simple cutting the spacing for the LED since it was just one hole. However, the buzzer was more complicated since I did not have a massive attachment for my drill. I could not use the dremel because it would take long and be unstable. I drilled different holes into the space of where the buzeer would go and then filed everything else.
File – The easiest and most important tool in my opinion. I used this tool for every single application. Because the holes made for the scanner and keypad were not smooth enough, they were not able to fit in their respective places. I was able to use the file to make the edges smooth and get rid of access wood. The file came in really good use when making the place for the buzzer because I used a drill and nothing else.
How it Works:
On the fingerprint scanner, you must place the right finger in order to go to the next step which is to enter the keypad code. If the finger is right, the LED will turn green. If the finger is wrong, nothing will happen. After the right finger is used, you need to enter the right keycode in order to unlock the safe. If the right keycode is entered, the servo, which has an L bracket that is attached to it, turns 90 degrees and unlocks the safe. In the beginning, the L bracket that is on the servo is locked to the L bracket to the top of the safe. Until you enter the right fingerprint and keycode, the servo will remain locked with L bracket on top of the safe. If the wrong key is entered, the buzzer will make a noise indicating an intruder. In order to reset the safe, you need to press the # button.
Second Milestone

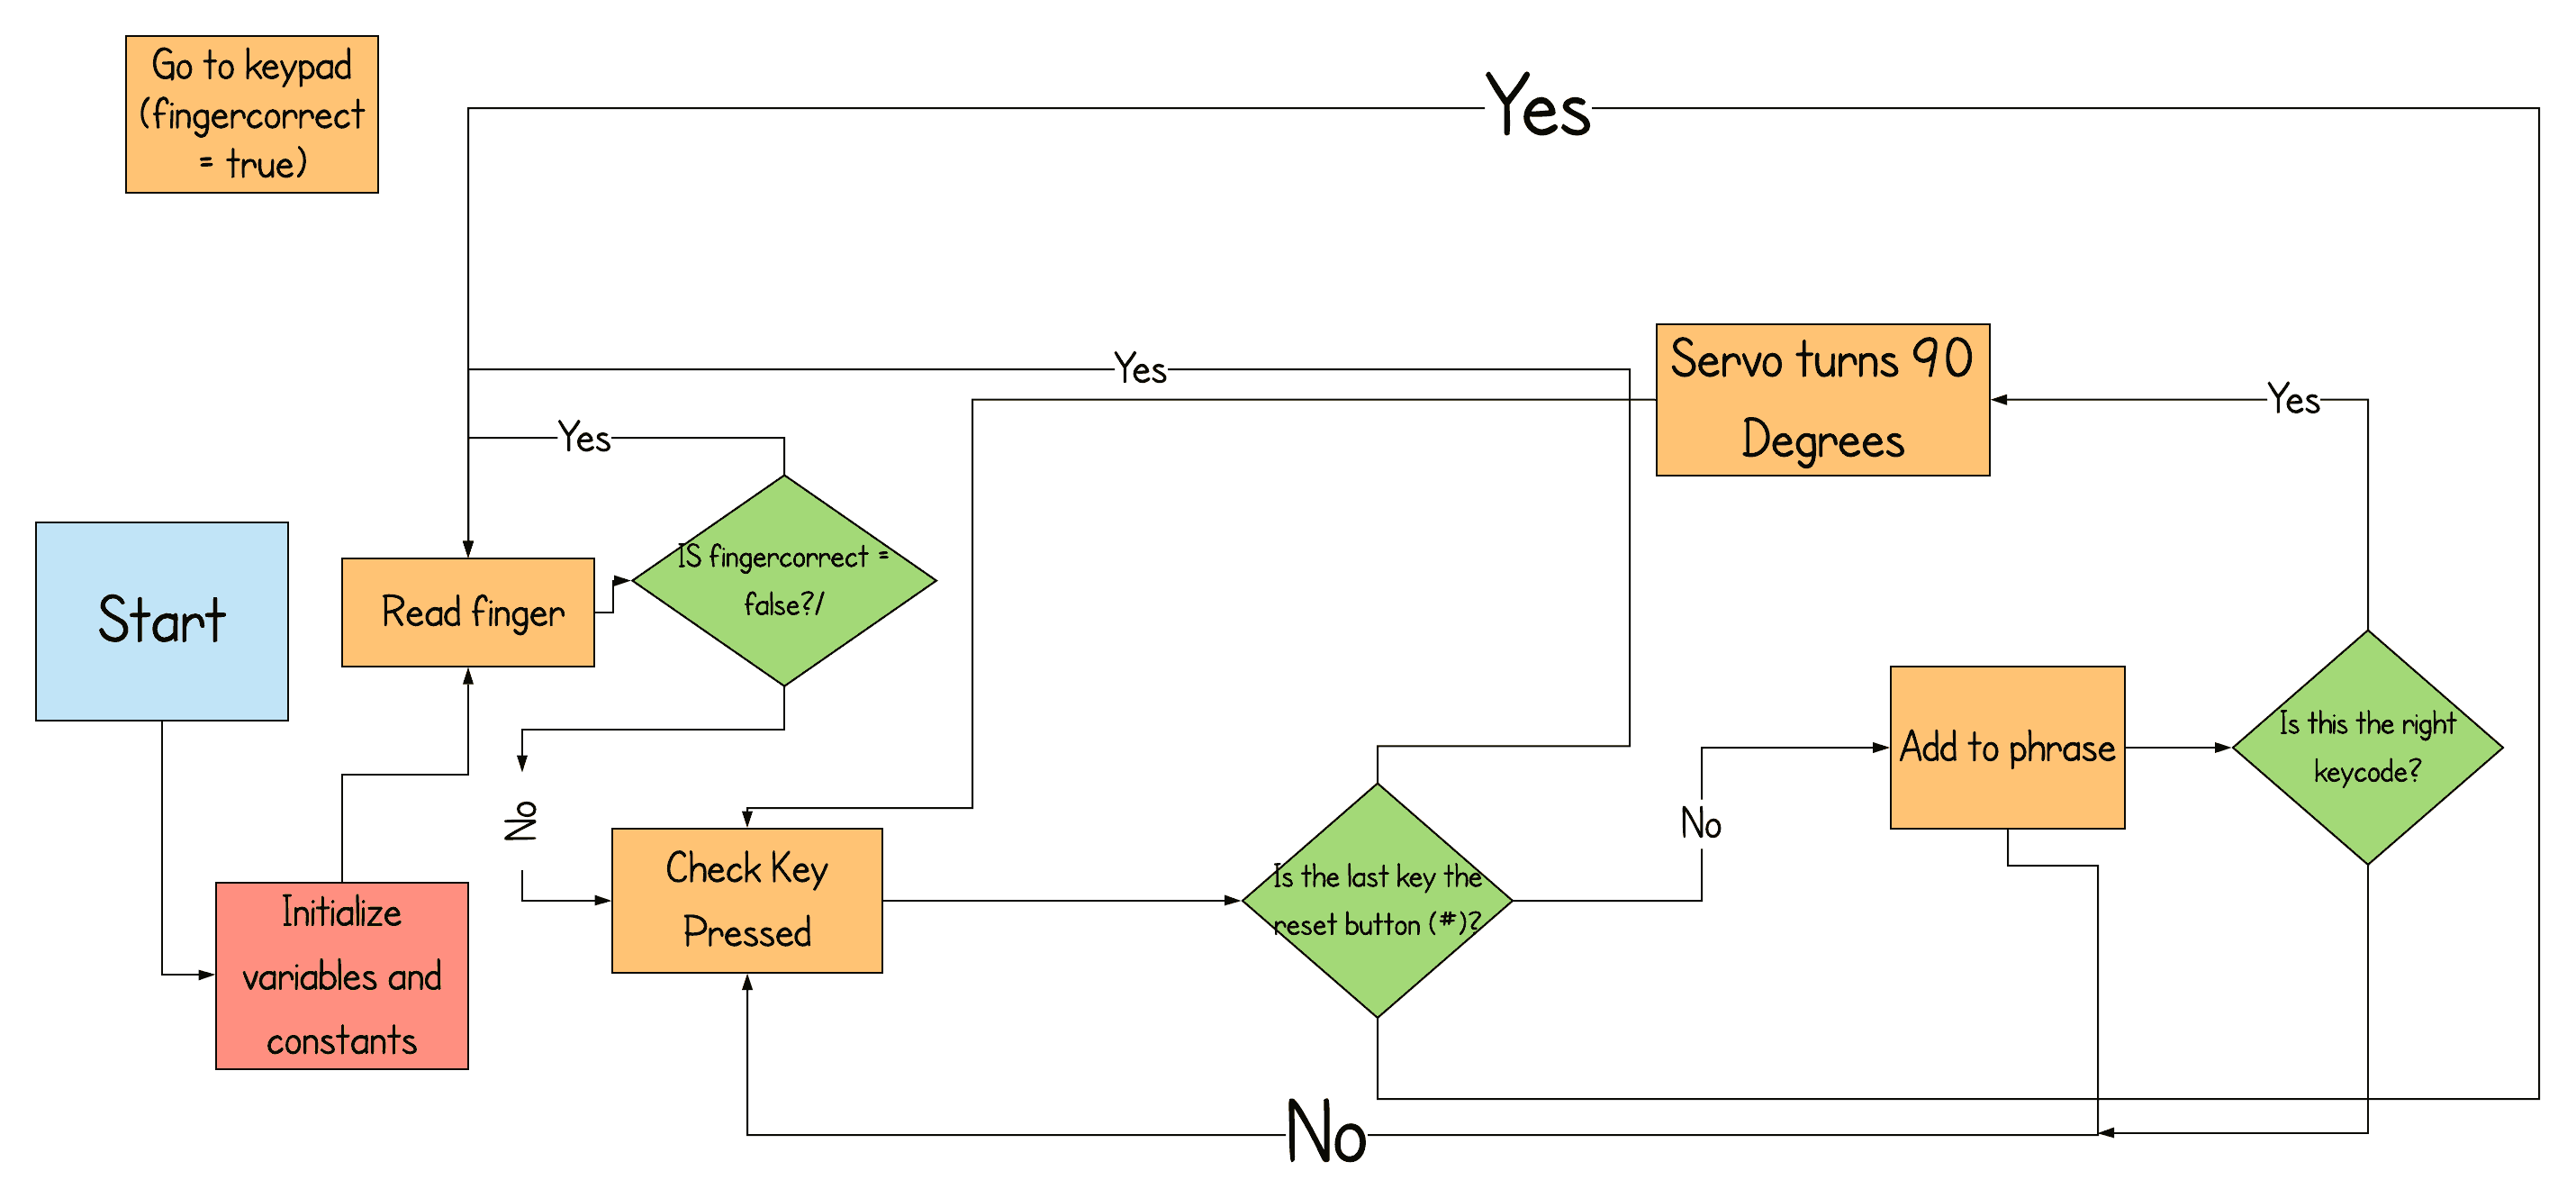
This shows the steps that are required in order for the servo to turn 90 degrees. A fingerprint is required first to light up the LED. After that, you put the code into the keypad and the servo turns 90 degrees. The last picture shows the reset button to undo the whole process
What the Milestone Is
The second milestone is furthering the security system that is implemented in my safe. In addition to the fingerprint scanner, there is a keypad with a specific key that is required in order to obtain access to the safe. There is also a reset button on the keypad and when this reset button is pressed the fingerprint scanner requires the fingerprint and keypad to get back access. There is also a servo that is connected to the keypad. The fingerprint scanner and the keypad work together so that the servo turns in the end. These are two levels of security that are used in modern times that are almost impossible to breach since no one has my fingerprint. As a result, it will be difficult to go into the safe without myself actually opening it.
How it Works:
There is a specific order that the security measures go through in order for the servo to turn 90 degrees. First, the right fingerprint needs to be placed onto the fingerprint scanner. If the right fingerprint is used, the green LED will turn green, indicating access to the keypad. However, if the wrong finger is used, the LED will remain red. Next, the right keypad code will need to be used in order for the servo to turn. Assuming the right keypad code is used, the servo will turn 90 degrees indicating the safe has been unlocked. There is a reset button that locks everything back so if someone desires to enter the safe, they will need to go through the security measures first.
#include <Adafruit_Fingerprint.h>
#include <Servo.h>
#include <Keypad.h>

// On Leonardo/Micro or others with hardware serial, use those! #0 is green wire, #1 is white
// uncomment this line:
// #define mySerial Serial1

// For UNO and others without hardware serial, we must use software serial...
// pin #2 is IN from sensor (GREEN wire)
// pin #3 is OUT from arduino  (WHITE wire)
// comment these two lines if using hardware serial
SoftwareSerial mySerial(12, 13);

Adafruit_Fingerprint finger = Adafruit_Fingerprint(&mySerial);

Servo ServoMotor;
char* password = "753"; // change the password here, just pick any 3 numbers
int position = 0;
const byte ROWS = 4;
const byte COLS = 3;
char keys[ROWS][COLS] = {
  {'1', '2', '3'},
  {'4', '5', '6'},
  {'7', '8', '9'},
  {'*', '0', '#'}
};
byte rowPins[ROWS] = { 5, 6, 7, 8};
byte colPins[COLS] = { 2, 3, 4, };
Keypad keypad = Keypad( makeKeymap(keys), rowPins, colPins, ROWS, COLS );


bool fingercorrect = false;
bool keypadcorrect = false;
const int buzzer = 1;

void setup()
{
  Serial.begin(9600);
  Serial.println("fingertest");
  pinMode(10, OUTPUT); // The pin on the Arduino the green LED is connected to
  pinMode (9, OUTPUT); // The pin on the Arduino the red LED is connected to
  while (!Serial);  // For Yun/Leo/Micro/Zero/...
  delay(100);
  Serial.println("\n\nAdafruit finger detect test");

  // set the data rate for the sensor serial port
  finger.begin(57600);

  if (finger.verifyPassword()) {
    Serial.println("Found fingerprint sensor!"); // If the finger matches the ID, the serial will print that it found the finger
  } else {
    Serial.println("Did not find fingerprint sensor :("); // If they did not find the ID, the serial will print that it did not find the finger
    while (1) {
      delay(1);
    }
  }

  finger.getTemplateCount();
  Serial.print("Sensor contains "); Serial.print(finger.templateCount); Serial.println(" templates");
  Serial.println("Waiting for valid finger...");

  ServoMotor.attach(11);
  LockedPosition(true);
  pinMode(buzzer, OUTPUT);


}

void loop()                     // run over and over again
{

  if (fingercorrect == false) {
    getFingerprintIDez();
    Serial.println("Checking fingerprint");
  }

  else if (fingercorrect == true) {
    //keypad.getKey ();
    Serial.println("Fingerprint good");

    // getFingerprintIDez();
    digitalWrite(9, HIGH); // Referring to keeping the red LED on
    //delay(10);            //don't ned to run this at full speed.

    char key = keypad.getKey();
    if (key == '*' || key == '#')
    {
      position = 0;
      fingercorrect = false;
      LockedPosition(true);
      return;
    }

    if (key == password[position])
    {
      position ++;
    }
    if (position == 3)
    {
      LockedPosition(false);
    }
    //delay(10);

    key = keypad.getKey();
    if (key == '*' || key == '#')
    {
      position = 0;
      LockedPosition(true);
      fingercorrect = false;
      return;

    }
    if (key == password[position])
    {
      position ++;
    }
    if (position == 3)
    {
      LockedPosition(false);
    }
    //delay(10);


    key = keypad.getKey();
    if (key == '*' || key == '#')
    {
      position = 0;
      LockedPosition(true);
      fingercorrect = false;
      return;
    }
    if (key == password[position])
    {
      position ++;
    }
    if (position == 3)
    {
      LockedPosition(false);
    }
    //delay(10);

  }


}
void LockedPosition(int locked)
{

  if (locked)
  {
    ServoMotor.write(0);
  }
  else
  {
    ServoMotor.write(90);
  }
}

uint8_t getFingerprintID() {
  uint8_t p = finger.getImage();
  switch (p) {
    case FINGERPRINT_OK:
      Serial.println("Image taken"); // The finger is placed on
      break;
    case FINGERPRINT_NOFINGER:
      Serial.println("No finger detected"); // No detection of finger
      return p;
    case FINGERPRINT_PACKETRECIEVEERR:
      Serial.println("Communication error");
      return p;
    case FINGERPRINT_IMAGEFAIL:
      Serial.println("Imaging error");
      return p;
    default:
      Serial.println("Unknown error");
      return p;
  }

  // OK success!

  p = finger.image2Tz();
  switch (p) {
    case FINGERPRINT_OK:
      Serial.println("Image converted");
      break;
    case FINGERPRINT_IMAGEMESS:
      Serial.println("Image too messy");
      return p;
    case FINGERPRINT_PACKETRECIEVEERR:
      Serial.println("Communication error");
      return p;
    case FINGERPRINT_FEATUREFAIL:
      Serial.println("Could not find fingerprint features");
      return p;
    case FINGERPRINT_INVALIDIMAGE:
      Serial.println("Could not find fingerprint features");
      return p;
    default:
      Serial.println("Unknown error");
      return p;
  }

  // OK converted!
  p = finger.fingerFastSearch();
  if (p == FINGERPRINT_OK) {
    Serial.println("Found a print match!");
  } else if (p == FINGERPRINT_PACKETRECIEVEERR) {
    Serial.println("Communication error");
    return p;
  } else if (p == FINGERPRINT_NOTFOUND) {
    Serial.println("Did not find a match");
    return p;
  } else {
    Serial.println("Unknown error");
    return p;
  }

  // found a match!
  Serial.print("Found ID #"); Serial.print(finger.fingerID); // Referring to the fingerprint that corresponds with the ID it is set to
  Serial.print(" with confidence of "); Serial.println(finger.confidence); // confidence level

  return finger.fingerID;
}

// returns -1 if failed, otherwise returns ID #
int getFingerprintIDez() {
  uint8_t p = finger.getImage();
  if (p != FINGERPRINT_OK)  return -1;

  p = finger.image2Tz();
  if (p != FINGERPRINT_OK)  return -1;

  p = finger.fingerFastSearch();
  if (p != FINGERPRINT_OK)  return -1;


  // found a match!
  digitalWrite(9, LOW); // SET THE RED LED OFF
  digitalWrite(10, HIGH); // SET THE GREEN LED ON
  fingercorrect = true;
  delay(3000);
  digitalWrite(10, LOW); // SET THE GREEN LED OFF
  delay(500);
  digitalWrite(9, HIGH); //SET THE RED LED ON
  Serial.print("Found ID #"); Serial.print(finger.fingerID);
  Serial.print(" with confidence of "); Serial.println(finger.confidence);
  return finger.fingerID;
}
First Milestone
This first milestone is the first part of the safe security system which ensures that the right fingerprint is being used and that no intruders can go through the safe. There is 2 light emitting diodes (LEDs) that light up corresponding to the fingerprint that is used. The colors of these LEDs are red and green. Green means the right finger was used and red meant that the wrong fingerprint is used. If no fingerprint is used, the LED will remain red.
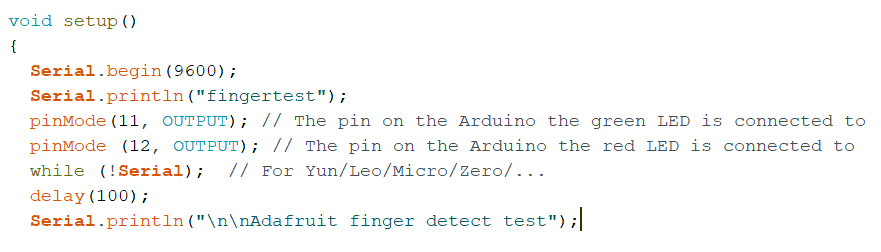
This is the code showing the pins on the Arduino I utilized. As you can see, I used pins 11 and 12
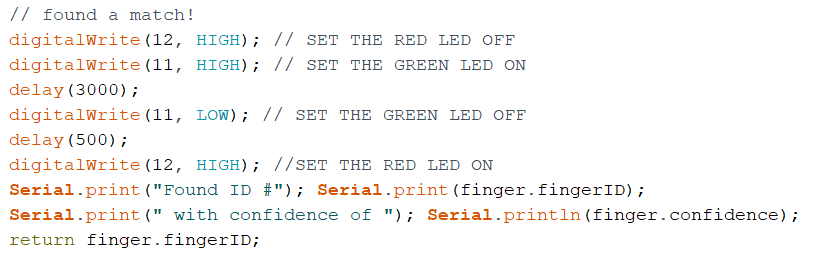
This is the code that is used to control the lights of the LEDs. Specifically, this is the code that is used whenever a match is found. The red LED is turned off and the green LED is turned on
SoftwareSerial mySerial(12, 13);

Adafruit_Fingerprint finger = Adafruit_Fingerprint(&mySerial);

void setup()
{
  Serial.begin(9600);
  Serial.println("fingertest");
  pinMode(10, OUTPUT); // The pin on the Arduino the green LED is connected to
  pinMode (9, OUTPUT); // The pin on the Arduino the red LED is connected to
  while (!Serial);  // For Yun/Leo/Micro/Zero/...
  delay(100);
  Serial.println("\n\nAdafruit finger detect test");

  // set the data rate for the sensor serial port
  finger.begin(57600);

  if (finger.verifyPassword()) {
    Serial.println("Found fingerprint sensor!"); // If the finger matches the ID, the serial will print that it found the finger
  } else {
    Serial.println("Did not find fingerprint sensor :("); // If they did not find the ID, the serial will print that it did not find the finger
    while (1) { delay(1); }
  }

  finger.getTemplateCount();
  Serial.print("Sensor contains "); Serial.print(finger.templateCount); Serial.println(" templates");
  Serial.println("Waiting for valid finger...");
}

void loop()                     // run over and over again
{
  getFingerprintIDez();
  digitalWrite(9, HIGH); // Referring to keeping the red LED on
  delay(50);            //don't ned to run this at full speed.
}

uint8_t getFingerprintID() {
  uint8_t p = finger.getImage();
  switch (p) {
    case FINGERPRINT_OK:
      Serial.println("Image taken"); // The finger is placed on
      break;
    case FINGERPRINT_NOFINGER:
      Serial.println("No finger detected"); // No detection of finger
      return p;
    case FINGERPRINT_PACKETRECIEVEERR:
      Serial.println("Communication error");
      return p;
    case FINGERPRINT_IMAGEFAIL:
      Serial.println("Imaging error");
      return p;
    default:
      Serial.println("Unknown error");
      return p;
  }

  // OK success!

  p = finger.image2Tz();
  switch (p) {
    case FINGERPRINT_OK:
      Serial.println("Image converted");
      break;
    case FINGERPRINT_IMAGEMESS:
      Serial.println("Image too messy");
      return p;
    case FINGERPRINT_PACKETRECIEVEERR:
      Serial.println("Communication error");
      return p;
    case FINGERPRINT_FEATUREFAIL:
      Serial.println("Could not find fingerprint features");
      return p;
    case FINGERPRINT_INVALIDIMAGE:
      Serial.println("Could not find fingerprint features");
      return p;
    default:
      Serial.println("Unknown error");
      return p;
  }

  // OK converted!
  p = finger.fingerFastSearch();
  if (p == FINGERPRINT_OK) {
    Serial.println("Found a print match!");
  } else if (p == FINGERPRINT_PACKETRECIEVEERR) {
    Serial.println("Communication error");
    return p;
  } else if (p == FINGERPRINT_NOTFOUND) {
    Serial.println("Did not find a match");
    return p;
  } else {
    Serial.println("Unknown error");
    return p;
  }

  // found a match!
  Serial.print("Found ID #"); Serial.print(finger.fingerID); // Referring to the fingerprint that corresponds with the ID it is set to
  Serial.print(" with confidence of "); Serial.println(finger.confidence); // confidence level

  return finger.fingerID;
}

// returns -1 if failed, otherwise returns ID #
int getFingerprintIDez() {
  uint8_t p = finger.getImage();
  if (p != FINGERPRINT_OK)  return -1;

  p = finger.image2Tz();
  if (p != FINGERPRINT_OK)  return -1;

  p = finger.fingerFastSearch();
  if (p != FINGERPRINT_OK)  return -1;

  // found a match!
  digitalWrite(9, LOW); // SET THE RED LED OFF
  digitalWrite(10, HIGH); // SET THE GREEN LED ON
  delay(3000);
  digitalWrite(10, LOW); // SET THE GREEN LED OFF
  delay(500);
  digitalWrite(9, HIGH); //SET THE RED LED ON
  Serial.print("Found ID #"); Serial.print(finger.fingerID);
  Serial.print(" with confidence of "); Serial.println(finger.confidence);
  return finger.fingerID;
}
How It Works
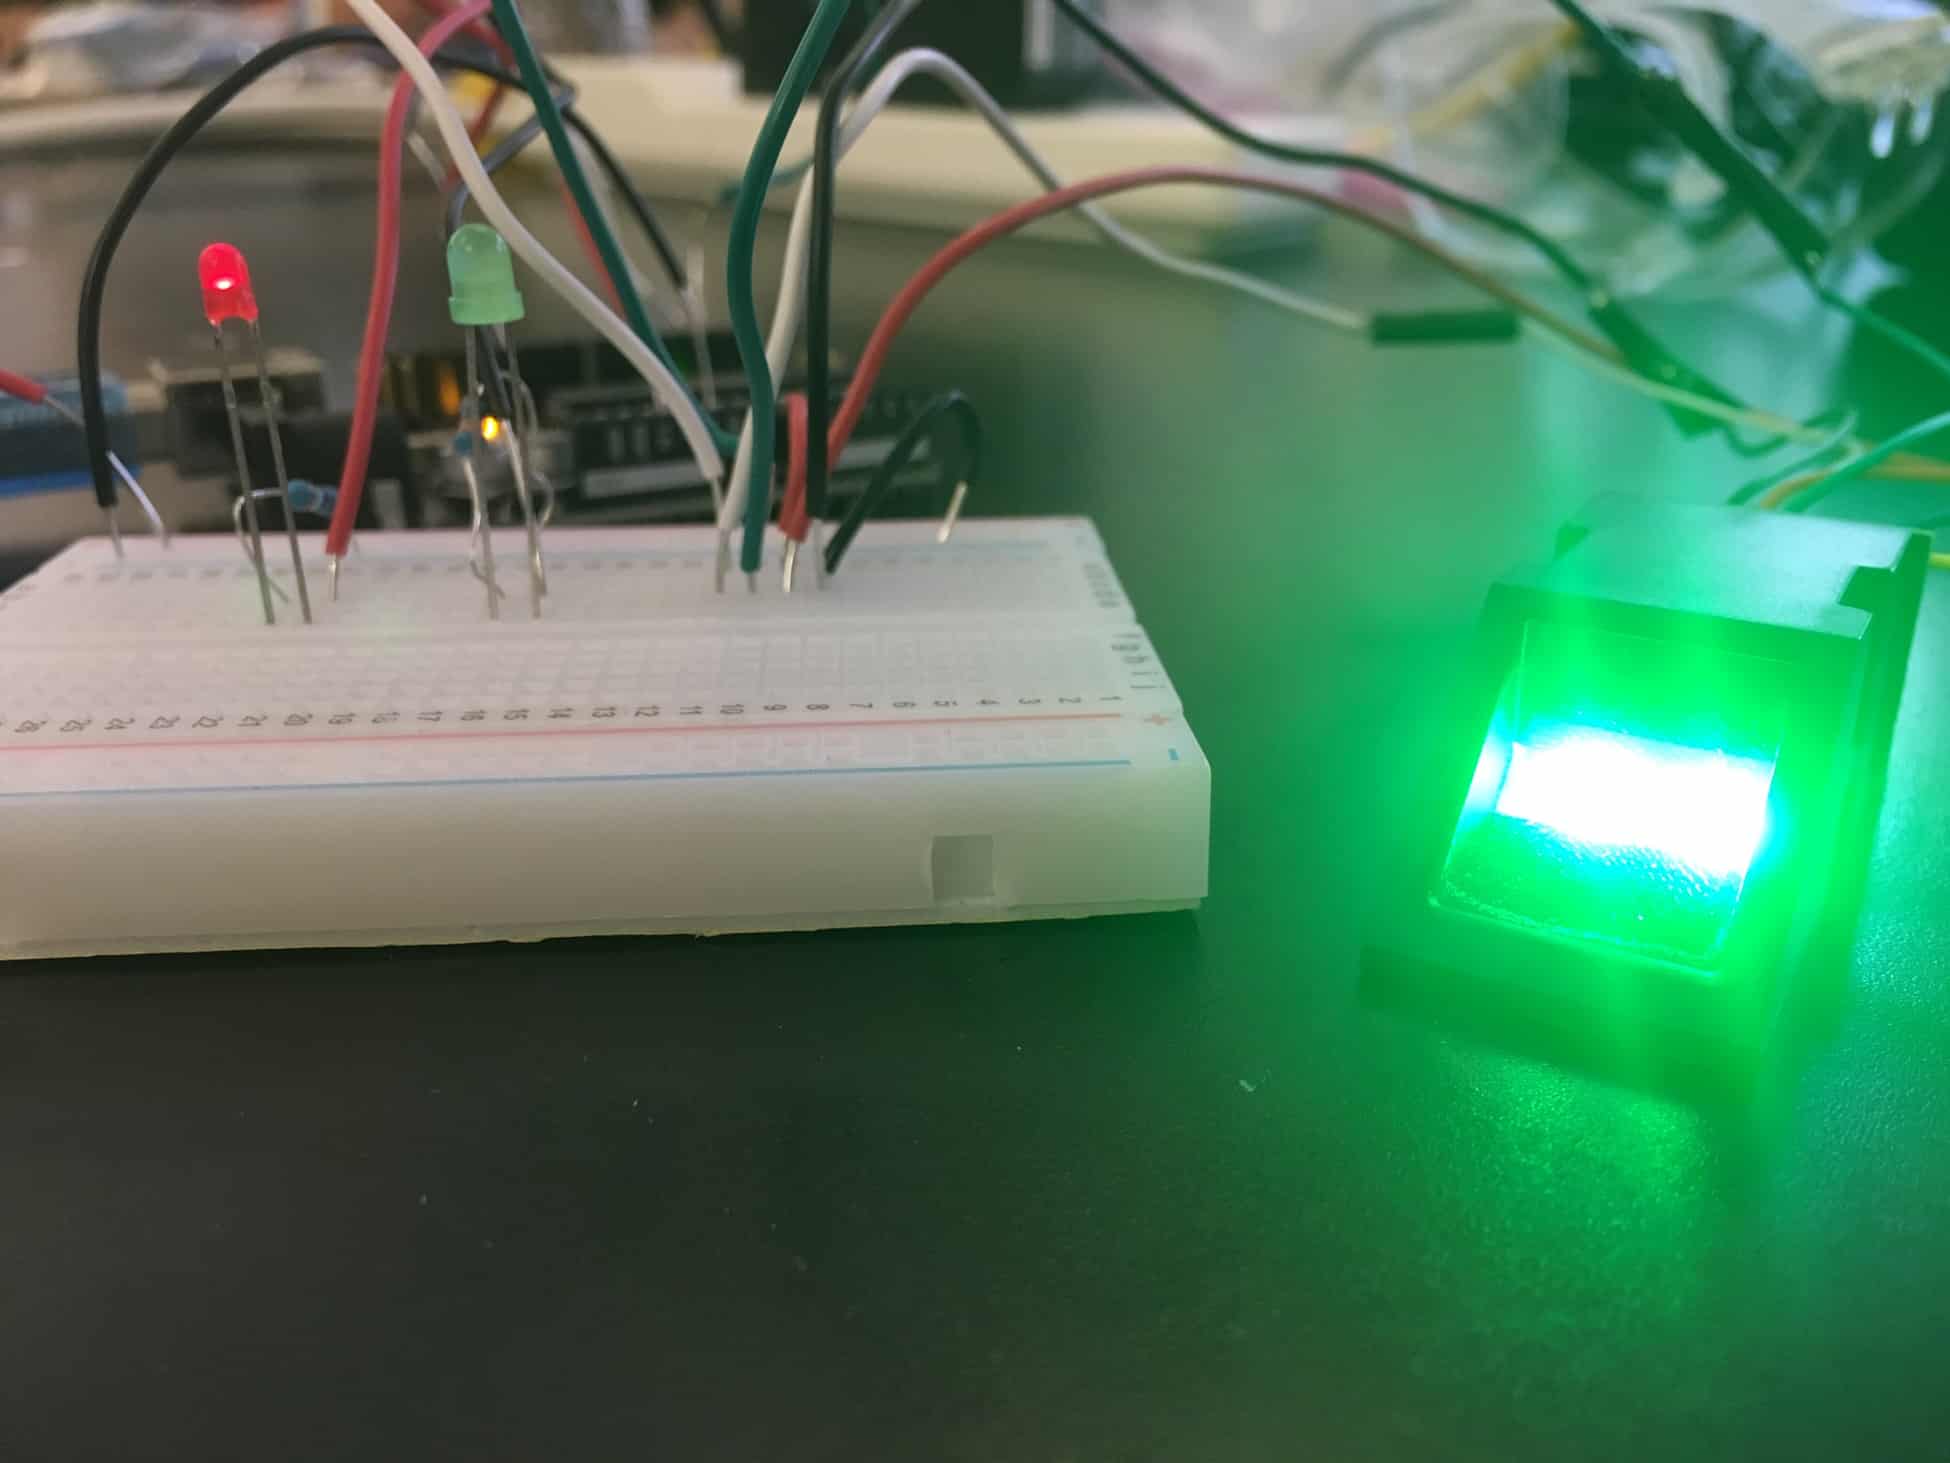
This is a close up image of the fingerprint scanner. You place your finger on the green light and if it is the right finger, the green LED should light up and if not, the red LED should stay on.
There is a fingerprint scanner that is connected to the Arduino and on this fingerprint scanner, there are some wires that were too thin to fit into this breadboard. In order to lock my fingerprint on the scanner, I needed to download a Windows program that set my finger to an ID (specifically mine is set to 3) and the scanner remembers those IDs. Because the wires connected to the scanner were too thin, I took some thicker wires and soldered them to the thin wires that were connected to the fingerprint scanner. I put some electrical tape around it to maintain an electrical current and no shortages occur. I connected 4 of the wires that were needed which are the power wire, ground wire, the RX wire and TX wire to the breadboard. I locked my finger into the scanner using the Windows program which left me to connect the Arduino and scanner with the LEDs. Another end of each resistor was connected to pins 11 and 12 of the Arduino. I had some code on the Arduino which basically lit up the red LED when there was no fingerprint on the scanner. In figure 1, my finger is not touching anything and the red LED is lit up. However, whenever a correct fingerprint was put onto it, the green LED lit up indicating that there is no intruder. A wrong fingerprint will keep the red LED lit up indicating an intruder.
Starter Project
The starter project I completed is The Larson Scanner. There is first a battery case where two AA batteries are required to provide a power source. On this battery case, there is an on/off setting. The lights come from light emitting diodes (LEDs), electrical components that emit light when current is applied in a specific direction (Figure 1). As for the board, there is a pre-programmed microcontroller, which is a smaller computer that can execute programs on other devices. In this case, the microcontroller managed the timing that the LED glowed. There are also eight resistors that correspond with each LED which essentially limits the current that goes through the LEDs.
How It Works
When you set the battery case to the on the setting, the lights started to glow red at a slow speed. The lights come from light emitting diodes (LEDs), electrical components that emit light when current is applied in a specific direction. When you press the switch, the speed of the LEDs goes to medium speed. When you press the switch one last time, the LEDs will glow very fast. When you press the switch after the fastest setting it resets to the slowest and it repeats the process. When you press the switch one last time, the LEDs will glow very fast. When you press the switch after the fastest setting it resets to the slowest and it repeats the process.
My Experience
Overall, this project was a great start to introduce me to different technological parts that are generally used in these types of projects. What I learned the most is soldering effectively. Because of the size of the parts I needed to solder, it really tested whether or not I can solder without messing up. However, I was able to solder without any problem. I was also introduced to new parts and their use on the board. Some parts include resistors microcontrollers, switches, and much more.
This is the Larson Scanner in action. The power source is turned on and this supplies the current that is required for the LEDs to light up.
