
Hi! My name is Maya, and I am a rising sophomore at Ramaz High School. For my starter project, I made a phone charger called the Mintyboost because I thought that it would be very useful to me. My main project was a sun-tracking solar panel with a windup clock drive. I chose to build this because I knew it involved a lot of mechanical engineering, which I was very interested in. I really enjoyed Bluestamp and learned a lot of useful things about solving problems and basic engineering. I think that this project ensured that if I wanted to go into a career in engineering, it would definitely be in the mechanical field because the results are rewarding, and the work is worth it.
Image of my Sun-Tracking Solar Panel:

Bill of Materials: Final BOM
Instructable: Sun-Tracking Solar Panel with Windup Clock Drive
My Final Milestone! (July 29, 2015)
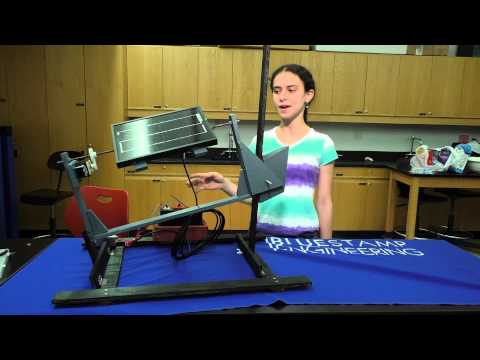
I have just completed my final milestone for the sun-tracking solar panel. Since my last milestone, I have painted my build and stabilized it further. I have also added a circuit with a switch, an LED, and a lead acid battery. The switch directed the energy produced by the solar panel to either power the LED or charge the battery.
I also did another model on Sketchup, this time of my full build.
![]()
My Second Milestone! (July 22, 2015)
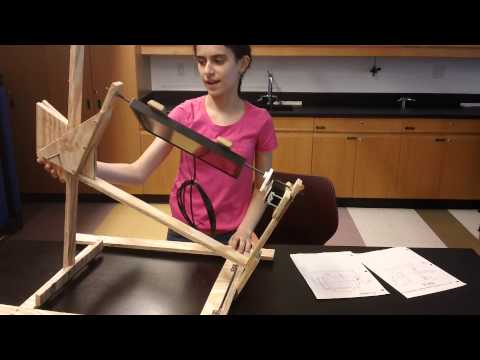
I have just completed my second milestone for building my sun tracking solar panel. I first drew a schematic for the base and the frame for the solar panel, both by hand and on Sketchup.


I figured out all of the dimensions and where everything was going to be screwed together, and then I got to work. I sawed all of the pieces from half-inch wood and drilled all of the holes needed to screw all of the pieces together. Finally, I put everything together and watched it come to life. My next step was to attach the solar panel to the frame. I did this by cutting a piece of threaded rod and putting it through holes I drilled in the wood that was attached to the back of the solar panel. I also had to make sure the moving/sliding mechanism that allowed the solar panel to be tilted to the angle of the sun was steady enough so that it could support the weight of the solar panel. I did this by cutting two triangular pieces of wood which would generate enough friction when they surrounded the long piece of wood when they were fitted with a friction wedge. Finally I attached the motor and made sure that all of the gears meshed.


I had a bunch of problems while completing the more mechanical components of my project. First, the friction wedge worked, but only for certain elevations. Once the frame was moved below about 30 degrees, it would just slide down by itself. I fixed this by drilling another hole further down the friction wedge and moving the threaded rod to that hole. Second, one of the holes that I had drilled for the frame was too big, so it was very wobbly and unsteady. I tried drilling more holes and securing it that way, but in the end, the only thing that worked was adding a triangular piece of wood to brace the two pieces of wood perpendicular to each other. Another problem was that the solar panel would rotate on its own, and it was only supposed to rotate when the threaded rod rotates. I decided to secure the panel to the rod with epoxy.
My First Milestone! (July 7, 2015)
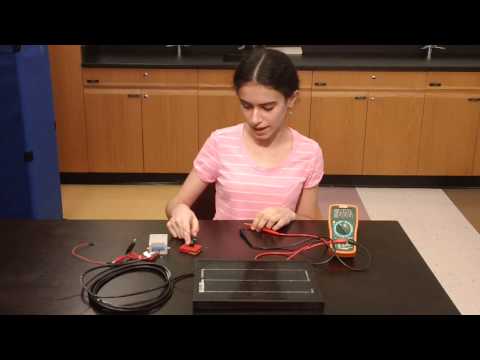
I have just completed my first milestone and succeeded in seeing my solar panel convert the light energy of photons to electrical energy. The solar panel has lots of photovoltaic cells that are made of semiconductors like silicon. When the sunlight strikes the cells, its energy is transferred to the semiconductor and knocks out the electrons, which produces the electrical energy. The photovoltaic cells have an electrical field that forces the freed electrons to go in a specific direction. This is done by placing metal contacts on the top and bottom of the cell to direct the current. This current will determine the cell’s voltage and how much power it can produce.

I was very excited when I tested the solar panel’s controller with a multimeter and saw that it was producing around 13 V, but I decided that I wanted to see it power something visible. I then created a circuit with an LED and a resistor and watched the light turn on when I connected the wires. The fact that my power source was unlimited as long as it was supplied light energy made me realize that solar energy is very valuable, and that it will be an important part of our future.
My Starter Project: MintyBoost (June 30,2015)
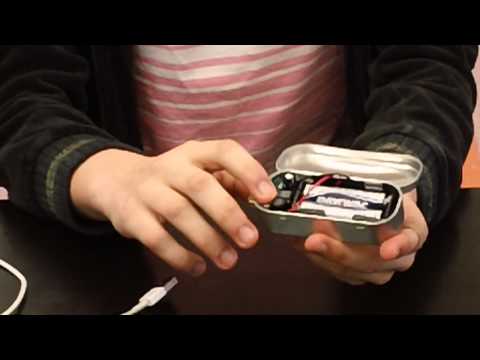
I have just completed my started project, which was the MintyBoost. The Mintyboost is a portable charger that can charge iPhones and iPods.
I got the instructions for the Mintyboost from the adafruit website, and they were very helpful, especially since it was my first time soldering.
https://learn.adafruit.com/minty-boost/make-it

To build the Mintyboost, I had to use a lot of different electrical components. There were two capacitors which stored electrical energy and helped stabilize the voltage. There was a diode that made sure that the energy only flowed in one direction: from the batteries, to the USB port to the device I was charging. The most important part that I used was a boost converter chip. This took the 3V that were given by the two AA batteries, combined it with the energy that was stored in the power inductor that was there and converted it to 5V.

I had a couple of problems while making this project. First, I lost one of my resistors, so I had to replace it by putting two resistors in parallel to form an equivalent resistance. I had also soldered one of the resistors in the wrong place, and when I tried to desolder it, it broke. I fixed this by soldering two resistors together in series which added up to the same resistance.