
Milestone 2
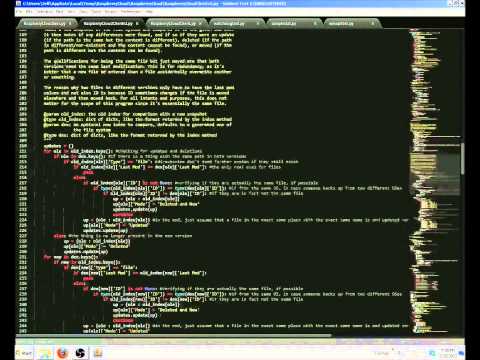
My second milestone is getting a lot of the code for my program working. Approximately 80-90% of the project is all about programming, so this is relatively significant even though there may not be very visible. The program will monitor a part of the file system for changes, and if it finds any it will synchronize it with the server. Similarly, if there are changes on the server to your files it will communicate that and download it to the client. I primarily wrote the beginning and the base for interaction. From here, I need to write the fairly simple implementation of all those methods; it currently has the capability to do almost everything I need it to, it just needs some simple instructions on when to do things and how to dispatch events to the already written methods.
Milestone 1
My first milestone is getting the RPi (Raspberry Pi) up and running well with full internet and package installation working. While it may not seem like a significant point in the project, it is a crucial step in ensuring that everything else works, since if the RPi doesn’t start up or can’t install the necessary software nothing else will work. It also required more time than expected due to equipment limitations (which was mainly because of underestimation of the requirements for using it). The main limitation was being able to ssh (securely connect via command line) to the RPi while giving it internet connection to download important packages. After many failed attempts, wherein I tried to bridge my wireless internet to it via ethernet and tried to give it direct ethernet access, it finally worked over LAN connection thanks to an old DSL router.
MiniPOV Starter Project
A MiniPOV device works by taking configurations for the LEDs and cycling through fast enough that the afterimages can form pictures or words. It is a relatively simple build; it uses a total of 10 resistors of two types, three diodes, 8 LEDs, a microcontroller and socket, 2 AA batteries, and a serial port. The soldering itself was a good process, as although I had soldered before it had not been for a long time. Some tips were set rather close together, but it became more of an interesting challenge than real difficulty. One of the unique parts of the project is that it has a computer science component with AVR and using a C program to set up the LEDs. There were a number of issues along the way with having to use a USB to serial converter and the microcontroller outputting incorrectly. This was solved by reinstalling some of the software and testing certain LED configurations (all on, all off, etc.), which showed that it worked even though the output initially looked odd.
The way the MiniPOV works is by transferring data from the computer through a serial port to the microcontroller, which coordinates the lights and cycles through the configuration values fast enough for the afterimage effect. This is done by running the AVR program on the computer, which is software for this family of microcontrollers, on the C files that are provided with the MiniPOV. In one of the files, there is a table of 8-bit binary values that correspond to the 8 LEDs so you can customize the displayed output (this can be done manually or by using one of the various online and executable tools). It is then transferred to the microcontroller through the serial port on the computer (or through a USB/serial port converter). When powered, the microcontroller runs the uploaded program which instructs it to cycle through the LEDs with about a millisecond of delay. If the device is moved quickly in front of a camera lens or a person’s eyes it will very briefly appear to have a readable message.

Hey Mattori,
Great project by the way. Funny how your milestone is Raspberry Pi, reminds me of the food. Its so cool what you can do with it. is it more complicated than the last years project