Introduction
 I’m Luis B. I am about to go into the 11th grade at Harmony Science Academy in Houston. I was born in Peru, but I was raised here in Houston. I want to be an aeronautical engineer and also a commercial pilot because I love travelling and flying planes.


Reflection
- After being 6 weeks in BlueStamp Engineering, I have learned many things from here. In the beginning of the program i had no idea what to do but as time went on i started learning different things. When I started with my main project I only knew a couple of things about programming and about actually building things because i had never done this before. As time past I learned from the things they though me here at BlueStamp Engineering, for example like how to program an arduino base on what you were doing or how to solder wires onto the rotary potentiometer. It was an amazing experience being in this program because now I know that i truly want to be an engineer.
Final Video Post
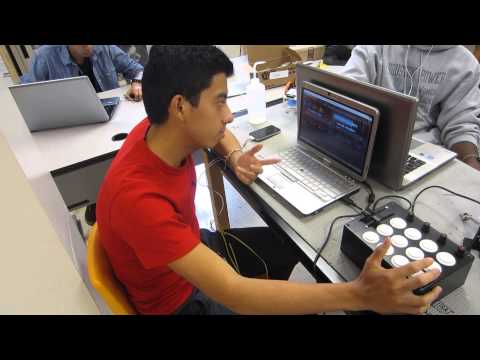
- For my last milestone, I programmed the MIDI controller and then mapped it on the software Traktor 2 so I could control the volume with the sliders and then with the button I can set loops and play those loops and with the rotary potentiometer I could set the high, the mid, and the low of the songs.
Luis' Final Showcase - BSE Houston 2014
DOCUMENTATION
1. Arduino Uno code (Credit to Michael Blazer)
2. Luis’s MIDI controller CAD
3. MIDI Controller schematic (Credit to Fragnator from instructables)

4. Hints and Tips
- One tip would be too keep the wiring neat because it can get really disorganized when soldering wires and connecting them together.
- A hint is to use a resistor in every button so that way even when you run the serial to midi converter it will read all the buttons and show that its transferring data.
- Another hint is to connect one sliders to one ground and the other slider to the other ground so then when you are running the running test on the Arduino program you can get the exact read backs on both sliders.
5. The BOM of this project
-
Arduino Uno DEV-11021 Sparkfun $24.95 https://www.sparkfun.com/products/11021 Project Enclosure, 8x6x3″ 270-1809 RadioShack $8.99 http://www.radioshack.com/product/index.jsp? productId=2062285 Sanwa Push Buttons – 6pack B00367KDVU Amazon $20.87 http://www.amazon.com/White-Sanwa-Push-Buttons-OBSF-30-W/dp/B00367KDVU/ref=sr_1_1?ie=UTF8&qid=1406212654&sr=8-1&keywords=B00367KDVU Linear Potentiometer 10K COM-09940 Sparkfun $0.95 https://www.sparkfun.com/products/9939 Potentiometer Knobs B00CZ6JXBE Amazon $6.06 http://www.amazon.com/Split-Shaft-Insert-Black-Potentiometer/dp/B00CZ6JXBE/ref=sr_1_14?ie=UTF8&qid=1406212788&sr=8-14&keywords=potentiometer+knob Slide Pot – X Large COM-09119 Sparkfun $2.95 https://www.sparkfun.com/products/9119 Slide Pot Knob COM-09120 Sparkfun $0.95 https://www.sparkfun.com/products/9120 M3x10mm Threaded Spacer B00JR3XQSE Amazon $5.17 http://www.amazon.com/10mm-Board-Hexagonal-Threaded-Spacer/dp/B00JR3XQSE/ref=sr_1_1?ie=UTF8&qid=1406213080&sr=8-1&keywords=B00JR3XQSE 16mm M3 screws 91420A126 McMaster Carr $3.20 http://www.mcmaster.com/#catalog/120/3031/=sz6a7a 4mm M2 self-tapping screws 96817A204 McMaster Carr $5.96 http://www.mcmaster.com/#catalog/120/3004/=sz6b58 Stick-on Rubber Feet B003CIWPSC Amazon $9.49 http://www.amazon.com/Self-Adhesive-Rubber-Large-Square-Bumpers/dp/B003CIWPSC/ref=sr_1_1?ie=UTF8&qid=1406213439&sr=8-1&keywords=B003CIWPSC&dpPl=1 USB A to B cable CAB-00512 Sparkfun $3.95 https://www.sparkfun.com/products/512
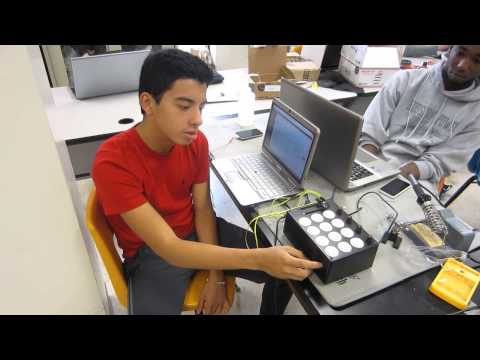
2nd Milestone video
- My second milestone was completed when I mounted my buttons, sliders, and rotary potentiometers and I connected them onto the Arduino Uno. During this process I learned how resistors work and also how to use the perf boards to connect all the buttons and rotary potentiometers to one ground so I could then use the other two grounds for my sliders.
Luis' Second Milestone - BSE Houston 2014
1st Milestone Video
- For my first milestone, I worked on the layout for the cut outs of the buttons, sliders, and the rotary potentiometers the box on the DraftSight CAD program from Dassualt Systems. I also got their measurement to a 1:1 ratio from the real pieces and also in the program I learned how to find the exact measurements of my drawings
Luis' First Milestone - BSE Houston 2014
Starter Project
- For the first week here I have done my starter project “TV Be Gone” and I have learned that the microchip had 230 codes embedded on it and using the transistors it make the power of the signal stronger so they can send to the TV LED through the controller LED’s. I have also started on my main project which is a MIDI controller for DJ’s. So far I have learned how to use the drill and mount things on the box.
Luis' Starter Project (TV-B-Gone) - 2014 Houston BSE
