Kenny S.

My name is Kenny; I am a Xavier graduate. My starter project was the Mini POV4. My intensive project, inspired by Caitlin B, is the Knee sensor suite that could measure the angle of one’s knee and the acceleration. Throughout my high school career, I was, and still am, very into physical activity. I chose to do the knee sensor because during my experience on the Outdoor Track and Field team, I was taught that precise form is key for becoming faster. The knee sensor could help improve running and exercising form and also physical therapy.

Engineer

Kenny So

Area of Interest

Computer Engineering/Electrical Engineering

School

Stony Brook University

Grade

Incoming Freshman

Reflection

Prior to most students, I came into BlueStamp with minimal knowledge on engineering. I had only taken a robotics course that helped me understand the fundamentals of creating and programing a lego-based robot. As I entered the BlueStamp classroom for the first time, I was overwhelmed by the plethora of bundled wires, fine tools, and unfamiliar pieces of technologies. As the program emphasizes on self learning and discipline, there was no way I was going to finish my project with such little knowledge and patience — or so I thought. After my initial sense of fear kicked in, however, a feeling of excitement and vigor took over my mind and led me to work hard. The exposure to such a lively and productive environment inspired me to be the engineer I want to be. It was a rough beginning, but soldering, circuitry and (most importantly) researching became second nature to me. I learned slowly that, in a practical sense, everything is possible. If there was a seemingly impossible procedure I wanted my project to carry out, there was always a way around it exemplified in the creation of my hand made bend sensor. While BlueStamp has led me to become a proficient and knowledgable engineer, the technical skills can be acquired anywhere where there is resource for learning (for better or worse). However, in terms of developing necessary values and personal growth, the BlueStamp experience has been irreplaceable. I am more open to self learning and have realized my responsibility to learning. Instead of hesitating when exposed to something I am unfamiliar with, I am now eager to learn anything and everything. Overall, through my time at BlueStamp I have grown into a more proficient engineer and matured person.

Final Milestone

BOM (Bill of Materials)


Arduino Code

In this milestone, I overcame a huge obstacle and became wireless. Through method of bluetooth, I am now able to see measurements from the knee brace on my laptop. The HC-05 (the bluetooth chip I use) allows for the Arduino to communicate with the computer and also relay data. One of the important parts of setting up the HC-05 was to remember that the “Rx” (Receiver) and “Tx” (Transmitter) pins of the chip must be crossed with the “Tx” and Rx” ports. In this set up, the Arduino transmits data which is received by the bluetooth chip/computer. Secondly, I learned the hard way that you must disconnect these pins when uploading code to the Arduino because when they are plugged in, the Arduino gets confused where to send data.

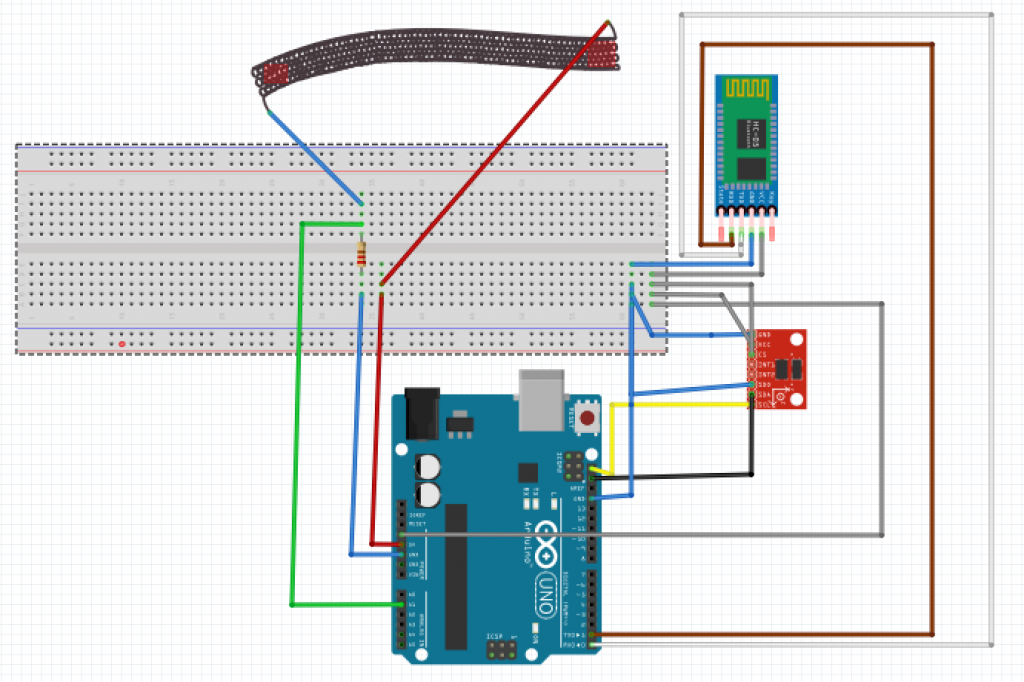
The last part is setting up the code. Initially, I was confused how to set up bluetooth in the code: Did I just need to find an example and put it in my own code, or was there a function for bluetooth  throughout the code. After some research I discovered the ‘SoftwareSerial’ library that helped set bluetooth commands for data to be relayed onto my computer from my Arduino. The greatest obstacle (arguably of the whole class) was working with a malfunctioning bluetooth chip. Initially, the bluetooth chip I was working with could not connect to my laptop easily and when it did, no data was being transmitted for the Arduino. After weeks and weeks of debugging, I tried using a different accelerometer and discovered the source of the problem. The simple solution was buy a new accelerometer from a reliable store. In my final milestone, I will be attempting to portray the data from Arduino onto processing graphs.

Second Milestone

In this milestone I interfaced my accelerometer and got it to work together with the bend sensor. The two main parts of interfacing the accelerometer was calibrating it and converting incomprehensible six bit data to physical measurements. Calibration was fairly simple. I found an online code for my ADXL-345 that would configure the x, y, and z axis into their proper orientations. The conversion from six bit data to m/s/s was the difficult part. The first obstacle was to convert the hex numbers to decimal numbers– comprehensible raw data. After a bit of research, I discovered and learned about the “Wire” library that in Arduino that has functions to convert hex numbers into decimal raw data. However, this raw data is still not convenient for analysis because it is not measured in meter per second per second — the unit for acceleration. In order to translate this, I needed to find a constant that could be multiplied by each data output, x,y, and z, and relay accurate acceleration. The easy way to test this is to keep the accelerometer still and flat and getting both x and z to equal 0 m/s/s (trial and error). The tricky part of the y axis — up and down orientation — was to make sure that its acceleration was about 9.8 m/s/s because it is affected by gravity. After some testing, I was finally able to get the numbers close to accurate and comprehensible for analysis.

First Milestone

Bend Sensor attached to knee brace
In this milestone, I have successfully created a bend sensor system that measures resistance, while also translating it into an angle (that the bend sensor is creating) for analysis. The first part was creating the bend sensor itself. I cut out two rectangle pieces of neoprene, approximately 5” by 1” and sewed a small piece of conductive fabric at each end for future connections. Then, I weaved conductive thread through both pieces of neoprene and each conductive fabric so that resistance could be measured. To amplify the electricity running through the system, I inserted a piece of velostat in the middle and sandwiched all the pieces together by sewing them.
The code to translate resistance to an angle was relatively easy to find online; however, data measured in the Arduino was not appearing on processing graphically. After some debugging, I realized that within the Arduino, I did not include a command that reads the data being produced by Analog 0 (the port that connects the bend sensor). Within the Processing code, I had also put in the wrong COM port number for the Arduino so it was not getting any data. Once the code was fixed, a graph was produced and I was able to visually analyze the amplitude of the bend in the sensor (although there is no units present). However, I mindlessly installed a weak resistor (47 ohm) in the system and received a very small data range which was hard to analyze. I learned about voltage dividers and how it works leading me to conclude that the greater resistance I used, the larger the data range. Ultimately, I used a 2.8K ohm resistor. The data presented portrays the sensor bending and unbending. The high slopes represent a significant bend while a low slope represents little to no bend in the sensor. My next step is to attach the sensor to the knee brace, hook up the Arduino through bluetooth, and get specific angles that can be used for accurate running form and/or physical therapy.

Starter Project

My starter project is the MiniPOV 4. The MiniPOV is an instrument used to portray 8-bit images in the form of light art. This project deals with both hardware and software. The hardware aspect of the project dealt mostly with soldering parts into their respective places.  A battery gives power to the controller, the brain, so that it can store and display images imported through a laptop. These images are produced through these 8 LED lights. As for the software aspect, becoming familiar with the image processor application Processing is necessary for images to be shown from my laptop onto the controller. I encountered an issue where Processing was not picking up the controller through the usb connection. After revising my work and further research, I discovered that the MiniPOV requires an older version of Processing to work. Once I downloaded version 2.2.1, I ran a test and I got positive results. Overall, this project went smoothly and it was a great introduction to lead into my intensive project.

Leave a Comment

Start typing and press Enter to search

Bluestamp Engineering