
Hi, I’m Kaizena, a rising senior at Galileo Academy of Science and Technology. My starter project is a Mini POV 4, and my main project is the Omnidirectional robot. I chose the Omnibot because when I first heard about BlueStamp, it was what first caught my interest.
Despite the name of my school, it wasn’t really mainly science or technology oriented, and I had pretty much no experience in engineering before BlueStamp. I joined BlueStamp because computers and other machines are everyday objects, yet I didn’t know anything about how they worked or were made at all. I also didn’t have any idea what I wanted to do with my life, so this was also an experiment to see if engineering was what I wanted to do in the future. I learned a lot in this program; everything I did everyday was new to me. I found that coding was harder than expected and that I had the most fun putting together the physical robot itself. It was challenging but fun and worth it. Though I’m still not quite sure if engineering is what I want to pursue, I now know what it is about engineering that interests me, and that I will definitely look further into the subject.
Main Project:

Bill of Materials
Final Code
New Ping Library
PS2X Library
PS2 Controller/Receiver Connection Guide
Complete Schematic:

Final Milestone:
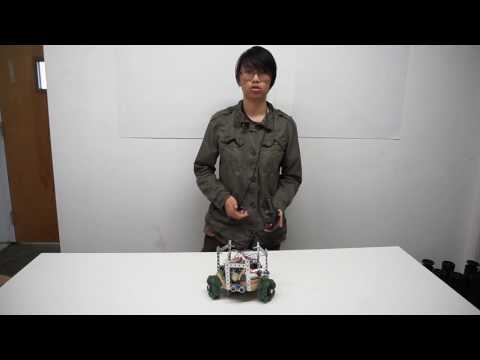
Since the last milestone, I’ve replaced the breadboard I had with a perfboard, and soldered on all the wires and parts so that everything is connected permanently. I had to solder on a female end of a jumper wire into the perfboard as a way to plug the battery in because I couldn’t just solder in the battery as well since the battery needs to be unattached to get charged. After soldering everything onto the perfboard, I found that the wheels moved in the wrong directions when I tried to control it. That was because some wires had been rearranged for convenience when transferring them to the perfboard. I had to flip some of the code so that the wheels moved in the direction that would correct the omnidirectional motion. I also added support beams for my metal bars so that they can’t fall down. My ultrasonic sensors now hang from the holes in the metal bars by small wires instead of being attached with electrical tape.
After attaching the main parts of the omnibot onto the perfboard, it started glitching out again. This was because the resistor that people online said was necessary for the data pin of the PS2 controller receiver to be connected properly wasn’t actually necessary. After removing the resistor, the receiver connected and the omnibot was fine, that is, until later on, when it started glitching again. This time, it was because the controller receiver kept disconnecting and reconnecting, and every single time it reconnected, the controller would send an analog stick signal to the receiver. However, because the analog stick is what controls the motors, the omnibot would move. This was fixed by setting it so that the analog stick would only be able to control the motors if another button was held down at the same time.
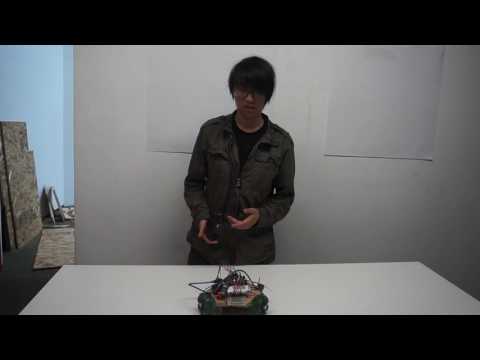
Milestone 4:
Since the last milestone, I’ve added metal bars as preparation for when I add a second layer to my omnibot later on. I’ve also added three ultrasonic sensors on the sides of the hexagon where there aren’t wheels. Each one has a pin for power, ground, trigger, and echo. The power for all three sensors are connected to the 5 volts pin of the Arduino. The trigger pin, which sends out a signal, and the echo pin, which receives signals, are combined through the breadboard and lead to a single digital pin on the Arduino. Combining them works and saves pin room on the board. For the coding, I set conditions so that if the sensors detect a distance greater than 0 cm and less than 7 cm, the omnibot moves backwards. This way, the omnibot will never hit an obstacle. The distance range of which the omnibot reacts needs to be greater than 0 cm because if the sensors don’t detect anything within its sensing range, the distance will be read as 0 cm as well, and I don’t want the omnibot moving backwards when there’s nothing in its way.
When I first put in the code for the sensors to send out a signal, it didn’t work. That was because I needed some sort of delay between each time a sensor pinged. The ‘delay’ function wasn’t the right one to use because it would delay the whole code, which meant there was a lag in reaction time between the PS2 controller and the omnibot actually moving as well. So I used the ‘millis’ (millisecond) function instead, which was supposed to delay the sensors but not the rest of the code. The sensors then worked, but the motors would stop moving every time the sensors pinged. That problem was eventually fixed by decreasing the interval between each ping. It didn’t give the motors enough time to slow down. Another problem I encountered was that the motors kept glitching out even when I wasn’t touching the controller. It turns out that the batteries were dying, and after charging the batteries, the motors responding to two of the sensors stopped glitching. After replacing the third sensor with a spare, the motors responding to that one finally stopped glitching as well.
#include <Servo.h>
#include <PS2X_lib.h> //for v1.6
PS2X ps2x; // create PS2 Controller Class
int error = 0;
byte type = 0;
byte vibrate = 0;
Servo motorA;
Servo motorB;
Servo motorC;
#define trigpin 7
#define trigpina 4
#define trigpinb 8
#define maxdistance 400
NewPing sonar(trigpin,trigpin,maxdistance); //(trigger pin, echo pin, max distance)
NewPing sonara(trigpina,trigpina,maxdistance);
NewPing sonarb(trigpinb,trigpinb,maxdistance);
unsigned long previousMillis = 0;
const long interval = 50;
unsigned long currentMillis;
int dis;
int disa;
int disb;
void setup(){
Serial.begin(57600);
error = ps2x.config_gamepad(10,12,11,13, true, true); //setup pins and settings: GamePad(clock, command, attention, data, Pressures?, Rumble?) check for error
if(error == 0){
Serial.println(“Found Controller, configured successful”);
Serial.println(“Try out all the buttons, X will vibrate the controller, faster as you press harder;”);
Serial.println(“holding L1 or R1 will print out the analog stick values.”);
Serial.println(“Go to www.billporter.info for updates and to report bugs.”);
}
else if(error == 1)
Serial.println(“No controller found, check wiring, see readme.txt to enable debug. visit www.billporter.info for troubleshooting tips”);
else if(error == 2)
Serial.println(“Controller found but not accepting commands. see readme.txt to enable debug. Visit www.billporter.info for troubleshooting tips”)
else if(error == 3)
Serial.println(“Controller refusing to enter Pressures mode, may not support it. “);
type = ps2x.readType();
switch(type) {
case 0:
Serial.println(“Unknown Controller type”);
break;
case 1:
Serial.println(“DualShock Controller Found”);
break;
case 2:
Serial.println(“GuitarHero Controller Found”);
break;
}
motorA.attach(9);
motorA.write(90);
motorB.attach(6);
motorB.write(90);
motorC.attach(5);
motorC.write(90);
}
void loop(){
/* You must Read Gamepad to get new values
Read GamePad and set vibration values
ps2x.read_gamepad(small motor on/off, larger motor strenght from 0-255)
if you don’t enable the rumble, use ps2x.read_gamepad(); with no values
you should call this at least once a second
*/
if(error == 1) //skip loop if no controller found
return;
if(type == 2){ //Guitar Hero Controller
ps2x.read_gamepad(); //read controller
}
else { //DualShock Controller
ps2x.read_gamepad(false, vibrate); //read controller and set large motor to spin at ‘vibrate’ speed
}
int x = map(ps2x.Analog(PSS_LX),0,255,100,-100); //setting the middle position of analog sticks at the coordinates (0,0)
int y = map(ps2x.Analog(PSS_LY),0,255,-100,100);
//equations for changing rectangular to polar coordinates
float theta = atan2(y,x); //theta=arctan(y/x)
int r=sqrt(x*x+y*y); //radius, basically pythagorean thereom
float cosa=r*cos(theta); //r*cos(theta)=x. since wheels move on one axis in either direction,cosine is used.
float cosb=r*cos(theta+4.18879029479); //This is for the position of the next wheel, which is 120 degrees away, but arduino only reads radians, so 4.18-so on is 120 degrees in radians
float cosc=r*cos(theta+2.09439510239); //2.09-so on is 240 degrees in radians. 240 is another 120 degrees away.
float A=map(cosa,-142,142,1000,2000); //Analog stick position to speed. 142 is used because square root of 100^2+100^2 is 142, which is the furthest calue the analog stick could have
float B=map(cosb,-142,142,1000,2000);
float C=map(cosc,-142,142,1000,2000);
int RotationVal = map(ps2x.Analog(PSS_RX),0,255,1300,1700); //mapping for rotating the omnibot
//For the sensors
float A2=map(cosa,-142,142,1500,2000); //mapping wheels to move in only one direction (away from the obstacle sensors sense)
float A3=map(cosa,-142,142,1000,1500);
float B2=map(cosb,-142,142,1500,2000);
float B3=map(cosb,-142,142,1000,1500);
float C2=map(cosc,-142,142,1500,2000);
float C3=map(cosc,-142,142,1000,1500);
//The timed pinging of sensors
currentMillis=millis();
if (currentMillis – previousMillis > interval)
{previousMillis = currentMillis;
dis = sonar.ping_cm();
disa = sonara.ping_cm();
disb = sonarb.ping_cm();
}
//The actual setting up of motors
if(disa>0 && disa<7) //if distance sensed is between 0 and 7 cm, move wheels that way {motorA.writeMicroseconds(1500); motorB.writeMicroseconds(B2); motorC.writeMicroseconds(C3); } else if(dis>0 && dis<7) {motorA.writeMicroseconds(A3); motorB.writeMicroseconds(1500); motorC.writeMicroseconds(C2); } else if(disb>0 && disb<7)
{motorA.writeMicroseconds(A2);
motorB.writeMicroseconds(B3);
motorC.writeMicroseconds(1500);
}
else if(ps2x.Analog(PSS_RX) ==128) //if right analog stick in default position, then omnidirectional motion
{motorA.writeMicroseconds(A);
motorB.writeMicroseconds(B);
motorC.writeMicroseconds(C);
}
else if(x==0) //if left analog stick’s x-axis in default position, then rotation motion
{motorA.writeMicroseconds(RotationVal);
motorB.writeMicroseconds(RotationVal);
motorC.writeMicroseconds(RotationVal);
}
delay(50);
}
Milestone 3:
Since the last milestone, I tossed the code that controlled the bot with the arrow keys because it wasn’t omnidirecitonal motion, and this is supposed to be an omnidirectional robot. With the help of Max’s code , the omnidirectional aspect of the bot’s motion was eventually worked out. Firstly, the analog sticks of the PS2 controller are based off a 0 to 255 axis, with 127 or 128 being the default center position. They were remapped to be based off -100 to 100 axes, with (0,0) being the default center position so that the use of trigonometry would be easier. The motors only work along one axis (hence the cosine), so each one needed to be mapped according to its position, which is where the trigonometry came in. The equations to turn rectangular coordinates to polar coordinates (radius=(x^2+y^2)^0.5 and theta=arctangent(y/x)) were defined to make radius and theta available to be used. Then, using the maximum value (the furthest coordinates from default) of the analog sticks and the range of speed, the motion of the wheels according to the position of the analog sticks were set. These values were set up as floating integers instead of just integers to account for decimals. They were then written into each motor, and the omnidirectional motion worked.
I had first tried to add the analog sticks into my previous set of ‘if else’ statements, but found that it didn’t work because the analog sticks aren’t supposed to be used the same way as the buttons were. So as mentioned before, I got rid of the arrow key code and used the mapping function instead. The analog sticks could then work the motors. However, I could only get the motors to work on one axis of the analog stick at a time. To make it work, trigonometry would have to be used. At first, I didn’t understand Max’s explanation of how he found the positions of the motors. When I finally got the math behind all the thetas, angles, and triangles his diagram had, I realized it didn’t have to be so complicated. If I saw it as a circle being 360 degrees, with the three wheels 120 degrees away from each other (because 360/3 is 120), I could just add those 120 degrees with theta to get the position of the next wheel.
#include <PS2X_lib.h> //for v1.6
PS2X ps2x;
int error = 0;
byte type = 0;
byte vibrate = 0;
Servo motorA;
Servo motorB;
Servo motorC;void setup(){
Serial.begin(57600);error = ps2x.config_gamepad(13,11,10,12, true, true); //setup pins and settings: GamePad(clock, command, attention, data, Pressures?, Rumble?) check for error
if(error == 0){
Serial.println(“Found Controller, configured successful”);
Serial.println(“Try out all the buttons, X will vibrate the controller, faster as you press harder;”);
Serial.println(“holding L1 or R1 will print out the analog stick values.”);
Serial.println(“Go to www.billporter.info for updates and to report bugs.”);
}
else if(error == 1)
Serial.println(“No controller found, check wiring, see readme.txt to enable debug. visit www.billporter.info for troubleshooting tips”);
else if(error == 2)
Serial.println(“Controller found but not accepting commands. see readme.txt to enable debug. Visit www.billporter.info for troubleshooting tips”);
else if(error == 3)
Serial.println(“Controller refusing to enter Pressures mode, may not support it. “);
type = ps2x.readType();
switch(type) {
case 0:
Serial.println(“Unknown Controller type”);
break;
case 1:
Serial.println(“DualShock Controller Found”);
break;
case 2:
Serial.println(“GuitarHero Controller Found”);
break;
}
motorA.attach(9);
motorA.write(90);
motorB.attach(6);
motorB.write(90);
motorC.attach(5);
motorC.write(90);
}
void loop(){
/* You must Read Gamepad to get new values
Read GamePad and set vibration values
ps2x.read_gamepad(small motor on/off, larger motor strenght from 0-255)
if you don’t enable the rumble, use ps2x.read_gamepad(); with no values
you should call this at least once a second
*/
if(error == 1) //skip loop if no controller found
return;
if(type == 2){ //Guitar Hero Controller
ps2x.read_gamepad(); //read controller
}
else { //DualShock Controller
ps2x.read_gamepad(false, vibrate); //read controller and set large motor to spin at ‘vibrate’ speed
}
int x = map(ps2x.Analog(PSS_LX),0,255,100,-100); //setting the middle position of analog sticks at the coordinates (0,0)
int y = map(ps2x.Analog(PSS_LY),0,255,-100,100);
//equations for changing rectangular to polar coordinates
float theta = atan2(y,x); //theta=arctan(y/x)
int r=sqrt(x*x+y*y); //radius, basically pythagorean thereom
float cosa=r*cos(theta); //r*cos(theta)=x. since wheels move on one axis in either direction,cosine is used.
float cosb=r*cos(theta+4.18879029479); //This is for the position of the next wheel, which is 120 degrees away, but arduino only reads radians, so 4.18-so on is 120 degrees in radians
float cosc=r*cos(theta+2.09439510239); //2.09-so on is 240 degrees in radians. 240 is another 120 degrees away.
float A=map(cosa,-142,142,1000,2000); //The speeds of the wheels. 142 is used because square root of 100^2+100^2 is 142, which is the furthest calue the analog stick could have
float B=map(cosb,-142,142,1000,2000);
float C=map(cosc,-142,142,1000,2000);
int RotationVal = map(ps2x.Analog(PSS_RX),0,255,1300,1700);
if(ps2x.Analog(PSS_RX) ==128)
{motorA.writeMicroseconds(A);
motorB.writeMicroseconds(B);
motorC.writeMicroseconds(C);
}
else if(x==0)
{motorA.writeMicroseconds(RotationVal);
motorB.writeMicroseconds(RotationVal);
motorC.writeMicroseconds(RotationVal);
}
if(ps2x.Button(PSB_L1) || ps2x.Button(PSB_R1)) // print stick values if either is TRUE
{
Serial.print(“Stick Values:”);
Serial.print(ps2x.Analog(PSS_LY), DEC); //Left stick, Y axis. Other options: LX, RY, RX
Serial.print(“,”);
Serial.print(ps2x.Analog(PSS_LX), DEC);
Serial.print(“,”);
Serial.print(ps2x.Analog(PSS_RY), DEC);
Serial.print(“,”);
Serial.println(ps2x.Analog(PSS_RX), DEC);
}
delay(50);
}
Milestone 2:

Changes I’ve made since my last milestone include sawing out a hexagonal base for my omnibot, and attaching the motors to the base with L-brackets by pre-drilling holes for the screws. I kept the drive shafts and wheels from falling off the motors by using shaft collars. I then connected my battery to the Arduino by plugging in the black wire to ground, and the red wire to the Vin pin. The battery powers the Arduino and motors separately, meaning it doesn’t power the motors through the Arduino, because if the motors were powered through the Arduino, the Arduino could get burned out since the motors require more current than the Arduino is designed to supply. As for coding the motion of the bot, I’ve added ‘else if’ statements for each additional button I use between the ‘if’ and ‘else’ I had before. They make it so that ‘if’ a button is pressed, then the motors will move, ‘else if’ a different buttons is pressed, then the motors will move another way, ‘else’ if nothing is pressed, the motors don’t turn. So far, I’ve programmed the omnibot to move in four directions (forwards, backwards, right, left) using the arrow keys. I haven’t figured out how to work the analog sticks of the PS2 controller though, so the omnibot doesn’t truly move omnidirectionally yet.
As mentioned before, the drive shafts of the wheels kept falling out of the motor, so I was able to use the shaft collars as a block. Another problem I had was that the ends of the battery wire was too weak to plug into the breadboard. I eventually managed to connect it into a male-female jumper wire to use as a medium, which worked well. I taped the connection point with electrical tape just in case as insurance. When coding the omnibot to move in the four directions, it was easy to make it go forwards and backwards,but hard to figure out exactly how fast and what direction each wheel had to turn to move the bot straight right or straight left. After a bit of research and playing around with the numbers, I managed to make the bot move mostly straight right or left. I found that to supposedly go straight, one wheel should go one direction, with a faster speed, and the other two wheels should go in the opposite direction at a slower speed.
#include <PS2X_lib.h> //for v1.6
PS2X ps2x; // create PS2 Controller Class
int error = 0;
byte type = 0;
byte vibrate = 0;
Servo motorA;
Servo motorB;
Servo motorC;
void setup(){
Serial.begin(57600);
error = ps2x.config_gamepad(13,11,10,12, true, false); //setup pins and settings: GamePad(clock, command, attention, data, Pressures?, Rumble?) check for error
if(error == 0){
Serial.println(“Found Controller, configured successful”);
Serial.println(“Try out all the buttons, X will vibrate the controller, faster as you press harder;”);
Serial.println(“holding L1 or R1 will print out the analog stick values.”);
Serial.println(“Go to www.billporter.info for updates and to report bugs.”);
}
else if(error == 1)
Serial.println(“No controller found, check wiring, see readme.txt to enable debug. visit www.billporter.info for troubleshooting tips”);
else if(error == 2)
Serial.println(“Controller found but not accepting commands. see readme.txt to enable debug. Visit www.billporter.info for troubleshooting tips”);
else if(error == 3)
Serial.println(“Controller refusing to enter Pressures mode, may not support it. “);
//Serial.print(ps2x.Analog(1), HEX);
type = ps2x.readType();
switch(type) {
case 0:
Serial.println(“Unknown Controller type”);
break;
case 1:
Serial.println(“DualShock Controller Found”);
break;
case 2:
Serial.println(“GuitarHero Controller Found”);
break;
}
motorA.attach(9);
motorA.write(90);
motorB.attach(6);
motorB.write(90);
motorC.attach(5);
motorC.write(90);
}
void loop(){
/* You must Read Gamepad to get new values
Read GamePad and set vibration values
ps2x.read_gamepad(small motor on/off, larger motor strenght from 0-255)
if you don’t enable the rumble, use ps2x.read_gamepad(); with no values
you should call this at least once a second
*/
if(error == 1) //skip loop if no controller found
return;
if(type == 2){ //Guitar Hero Controller
ps2x.read_gamepad(); //read controller
}
else { //DualShock Controller
ps2x.read_gamepad(false, vibrate); //read controller and set large motor to spin at ‘vibrate’ speed
if(ps2x.Button(PSB_START)) //will be TRUE as long as button is pressed
Serial.println(“Start is being held”);
if(ps2x.Button(PSB_SELECT))
Serial.println(“Select is being held”);
}
if(ps2x.Button(PSB_L3))
Serial.println(“L3 pressed”);
if(ps2x.Button(PSB_R3))
Serial.println(“R3 pressed”);if(ps2x.Button(PSB_L2))
{Serial.println(“R2 pressed”);
motorA.write(70);
motorB.write(70);
motorC.write(70);
}
else if(ps2x.Button(PSB_R2))
{motorA.write(120);
motorB.write(120);
motorC.write(120);
}
else if(ps2x.Button(PSB_PAD_UP))
{motorB.write(70);
motorC.write(110);
}
else if(ps2x.Button(PSB_PAD_DOWN))
{motorB.write(110);
motorC.write(70);
}
else if(ps2x.Button(PSB_PAD_RIGHT))
{motorA.write(60);
motorB.write(110);
motorC.write(110);
}
else if(ps2x.Button(PSB_PAD_LEFT))
{motorA.write(120);
motorB.write(80);
motorC.write(80);
}
else
{motorA.write(90);
motorB.write(90);
motorC.write(90);
}
if(ps2x.Button(PSB_L1) || ps2x.Button(PSB_R1)) // print stick values if either is TRUE
{
Serial.print(“Stick Values:”);
Serial.print(ps2x.Analog(PSS_LY), DEC); //Left stick, Y axis. Other options: LX, RY, RX
Serial.print(“,”);
Serial.print(ps2x.Analog(PSS_LX), DEC);
Serial.print(“,”);
Serial.print(ps2x.Analog(PSS_RY), DEC);
Serial.print(“,”);
Serial.println(ps2x.Analog(PSS_RX), DEC);
}
delay(50);
}
Base Dimensions:

Milestone 1:
The PS2 controller receiver and motor are connected up to the Arduino using jumper wires. The PS2 controller is connected with 6 wires for data, command, ground, power, attention, and clock. With the help of the PS2X library, I was able to program the controller, since it had an example I could base my code off of. I started by making LEDs connected to a breadboard turn on as practice. I got them to work using ‘if…else’ statements. Then I connected one of the motors to the Arduino. The motor was connected to a digital PWM pin, 5V power, and ground. Then, using the Servo Library that was already provided, I wrote a code to spin the motor in both directions using using an ‘if, else if, else’ statement.
When coding the LEDs, instead of turning on when the button was pressed and off when the button was released, the LED turned on when the button was clicked and off only when the button was clicked a second time. I fixed it by using ‘if…else’ statements. Then I tried to program in a second LED, but this time, the LED would flash on then off immediately whether the button was clicked or held. I found that I was using the wrong function from the PS2X library. When coding the motors, I was able to make it turn in one direction, but not the other, because the ‘else’ in the ‘if…else’ statement cancelled out the other direction. It was fixed with an ‘else if’, which allows another condition to be set.
Starter Project:

The Mini POV’s power source consists of three AAA batteries. Three transistors control the red, green, and blue colors of the LEDs. The resistors make sure the transistors and LEDs don’t get overloaded by balancing the current. The potentiometer and 12MHz crystal controls the speed at which the LEDs flash. The capacitors keep the input and output voltages stabilized and filter out high and low frequency noises. There are zener diodes, which keep the current moving in one direction, for the USB connector so that when the POV is connected to the computer, the POV won’t be overwhelmed. Lastly is the microcontroller chip, which stores the information for the image the POV will display and the timing of the LED flashes.
A problem I ran into while working on the POV was that the wires connecting the circuit board to the battery pack kept snapping. After soldering them on, one snapped. So I had to de-solder it and then re-solder it back on again. I got the POV working. Then both wires snapped off. I de- and re-soldered them.