Reflection
I learned a lot from building this project, including how to work the raspberry pi and how to navigate through terminal. I learned a lot about linux commands, and I also got a lot more familiar with editing code and downloading/installing files through terminal.
On a more personal note, I learned of how capable I am to build a project from start to finish independently, with only mentors answering my questions. Before Bluestamp, whenever I built a project, I would always have somebody guiding me through this project step by step. This experience showed me that I am capable of building a project by myself, and because of this, motivates me to build more projects in the future.
Second Milestone
In my Second Milestone, I built the frame of my Smart Mirror, and also got the display software working on my Raspberry Pi. I am finished with my base project at this point, and it now looks like an actual Smart Mirror, displaying the weather, time, etc., as well as being a mirror and being reflective.
This is the last milestone of my base project. At this point, I am completely done with my base project, and am now starting to add modifications.
How Weather API Works
Weather API is a function that allows developers to access the forecast of any place, anytime. It takes information of the forecast and allows developers to display them, etc. This occurs by creating a unique weather API token for each use, and then using this token, you can specify where you want the forecast from, and it will get the forecast in a json file, a type of Python file.
I used this in my code by calling the specific elements I wanted from this file by using a specific Python command. Lastly, I then formatted these elements onto my big display screen using some Python formatting code.
class WeatherClass(Frame):
def __init__(self, parent, *args, **kwargs):
Frame.__init__(self, parent, bg=’black’)
self.temperature = ”
self.forecast = ”
self.location = ”
self.currently = ”
self.icon = ”
self.degreeFrm = Frame(self, bg=”black”)
self.degreeFrm.pack(side=TOP, anchor=W)
self.temperatureLbl = Label(self.degreeFrm, font=(‘Helvetica’, xlarge_text_size), fg=”white”, bg=”black”)
self.temperatureLbl.pack(side=LEFT, anchor=N)
self.iconLbl = Label(self.degreeFrm, bg=”black”)
self.iconLbl.pack(side=LEFT, anchor=N, padx=20)
self.currentlyLbl = Label(self, font=(‘Helvetica’, medium_text_size), fg=”white”, bg=”black”)
self.currentlyLbl.pack(side=TOP, anchor=W)
self.forecastLbl = Label(self, font=(‘Helvetica’, small_text_size), fg=”white”, bg=”black”)
self.forecastLbl.pack(side=TOP, anchor=W)
self.locationLbl = Label(self, font=(‘Helvetica’, small_text_size), fg=”white”, bg=”black”)
self.locationLbl.pack(side=TOP, anchor=W)
self.get_weather()
#def get_ip(self):
# try:
# ip_url = “http://jsonip.com/”
# req = requests.get(ip_url)
# ip_json = json.loads(req.text)
# return ip_json[‘ip’]
# except Exception as e:
# traceback.print_exc()
# return “Error: %s. Cannot get ip.” % e
def get_weather(self):
try:
if latitude is None and longitude is None:
# get location
location_req_url = “http://freegeoip.net/json/%s” % self.get_ip()
r = requests.get(location_req_url)
location_obj = json.loads(r.text)
lat = location_obj[‘latitude’]
lon = location_obj[‘longitude’]
location2 = “%s, %s” % (location_obj[‘city’], location_obj[‘region_code’])
# get weather
weather_req_url = “https://api.darksky.net/forecast/%s/%s,%s?lang=%s&units=%s” % (weather_api_token, lat,lon,weather_lang,weather_unit)
else:
location2 = “”
# get weather
weather_req_url =”https://api.openweathermap.org/data/2.5/weather?id=5393485&appid=e15473cc0e22811e031c3d244bb50a45”
r = requests.get(weather_req_url)
weather_obj = json.loads(r.text)
degree_sign= u’\N{DEGREE SIGN}’
temperature2 = “%s%s” % (str(int((int(weather_obj[‘main’][‘temp’])-273.15)*1.8+32)), degree_sign)
#print (temperature2)
currently2 = weather_obj[‘weather’][0][‘description’]
#print (currently2)
forecast2 = weather_obj[“wind”][“speed”]
#print (forecast2)
icon_id = weather_obj[‘weather’][0][‘icon’]
#print (icon_id)
icon2 = None
if icon_id in icon_lookup:
icon2 = icon_lookup[icon_id]
#print (icon2)
if icon2 is not None:
if self.icon != icon2:
self.icon = icon2
image = Image.open(icon2)
image = image.resize((100, 100), Image.ANTIALIAS)
image = image.convert(‘RGB’)
#print (image)
photo = ImageTk.PhotoImage(image)
#print (photo)
self.iconLbl.config(image=photo)
self.iconLbl.image = photo
else :
# remove image
self.iconLbl.config(image=”)
if self.currently != currently2:
self.currently = currently2
self.currentlyLbl.config(text=currently2)
if self.forecast != forecast2:
self.forecast = forecast2
self.forecastLbl.config(text=forecast2)
if self.temperature != temperature2:
self.temperature = temperature2
self.temperatureLbl.config(text=temperature2)
if self.location != location2:
if location2 == “, “:
self.location = “Cannot Pinpoint Location”
self.locationLbl.config(text=”Cannot Pinpoint Location”)
else:
self.location = location2
self.locationLbl.config(text=location2)
except Exception as e:
traceback.print_exc()
print (“Error: %s. Cannot get weather.”) % e
self.after(600000, self.get_weather)
@staticmethod
def convert_kelvin_to_fahrenheit(kelvin_temp):
return 1.8 * (kelvin_temp – 273) + 32
HDMI Display Issues
Throughout the process to get my Smart Mirror base built, I encountered many HDMI Display issues with the Raspberry Pi 3 and my HDMI Display. Listed below are many of the problems I encountered, and how I fixed them.
# For more options and information see
# http://rpf.io/configtxt
# Some settings may impact device functionality. See link above for details
# uncomment if you get no picture on HDMI for a default “safe” mode
#hdmi_safe=1
# uncomment this if your display has a black border of unused pixels visible
# and your display can output without overscan
disable_overscan=1
# uncomment the following to adjust overscan. Use positive numbers if console
# goes off screen, and negative if there is too much border
#overscan_left=24
#overscan_right=24
#overscan_top=24
#overscan_bottom=24
# uncomment to force a console size. By default it will be display’s size minus
# overscan.
#framebuffer_width=1280
#framebuffer_height=720
# uncomment if hdmi display is not detected and composite is being output
#hdmi_force_hotplug=1
hdmi_ignore_edid=0xa5000080
# uncomment to force a specific HDMI mode (this will force VGA)
#hdmi_group=2
#hdmi_mode=4
# uncomment to force a HDMI mode rather than DVI. This can make audio work in
# DMT (computer monitor) modes
#hdmi_drive=2
# uncomment to increase signal to HDMI, if you have interference, blanking, or
# no display
config_hdmi_boost=4
# uncomment for composite PAL
#sdtv_mode=2
#uncomment to overclock the arm. 700 MHz is the default.
#arm_freq=800
# Uncomment some or all of these to enable the optional hardware interfaces
#dtparam=i2c_arm=on
#dtparam=i2s=on
#dtparam=spi=on
# Uncomment this to enable infrared communication.
#dtoverlay=gpio-ir,gpio_pin=17
#dtoverlay=gpio-ir-tx,gpio_pin=18
# Additional overlays and parameters are documented /boot/overlays/README
# Enable audio (loads snd_bcm2835)
dtparam=audio=on
[pi4]
# Enable DRM VC4 V3D driver on top of the dispmanx display stack
dtoverlay=vc4-fkms-v3d
max_framebuffers=2
[all]
#dtoverlay=vc4-fkms-v3d
display_rotate=1


Specific HDMI Problems
Background: After getting my Raspberry Pi 3 set up with the original HDMI Display working, I realized I had to get my display replaced with a bigger one because a bigger display was more practical for building my project, a Smart Mirror. After getting my new display(10.1 inches!), the problems started rolling in.
First problem: After receiving my bigger display, I tried hooking up the Raspberry Pi 3 to this new display. However, initially, it did not work and displayed No Signal. I was very puzzled, and then proceeded to try and hook up the Raspberry Pi to my TV, a different HDMI display. The Raspberry Pi worked on the TV, but again, when I tried to do it on my 10.1 inch display, it did not work. As a result, I initially thought the issue had something to do with the power source, since the 10.1 inch display and the Raspberry Pi 3 were getting power from the same source, while the TV got power from a different source. However, after some research, I found out that it was not a power issue because if it was, the Raspberry Pi’s red light would blink, and it was not blinking. This made me very confused because I did not know what was causing this No Signal issue. However, after some playing with the display, I realized the issue was that I was not on the right channel the entire time, and after switching to the display’s HDMI channel, it worked.
Second Problem: All seemed to go well, until again I encountered another No Signal. After checking that I was on the right channel, I decided to fix this by editing config.txt in the Raspberry Pi. I uncommented the comment that said hdmi_safe=1. After this, my display started working again.
Second Problem Part 2: However, I encountered another issue from this. My display had a black border around it, and it seemed to be squishing the Smart Mirror Screen together so that it was very small. Initially, I tried to disable overscan, because that was what all sources told me to do. However, I realized that the Raspberry Pi was not letting me disable overscan for some odd reason. After fiddling around, I noticed that my display was outputting the Raspberry Pi in 640×480 resolution, not the display’s actual resolution. I tried changing the resolution, but it did not let me change the resolution as well. I then realized that this was because hdmi_safe=1 was putting my Raspberry Pi into safe mode, which could only operate on one specific set of settings that wouldn’t let me change the resolution. After this, I researched what hdmi_safe did, and realized that I could replace hdmi_safe with multiple lines of code which would imitate what hdmi_safe does, except without the restrictions of the same resolution. After replacing these lines of code, I was able to change the resolution, the black border disappeared, and the Smart Mirror Screen was working great again.
First Milestone
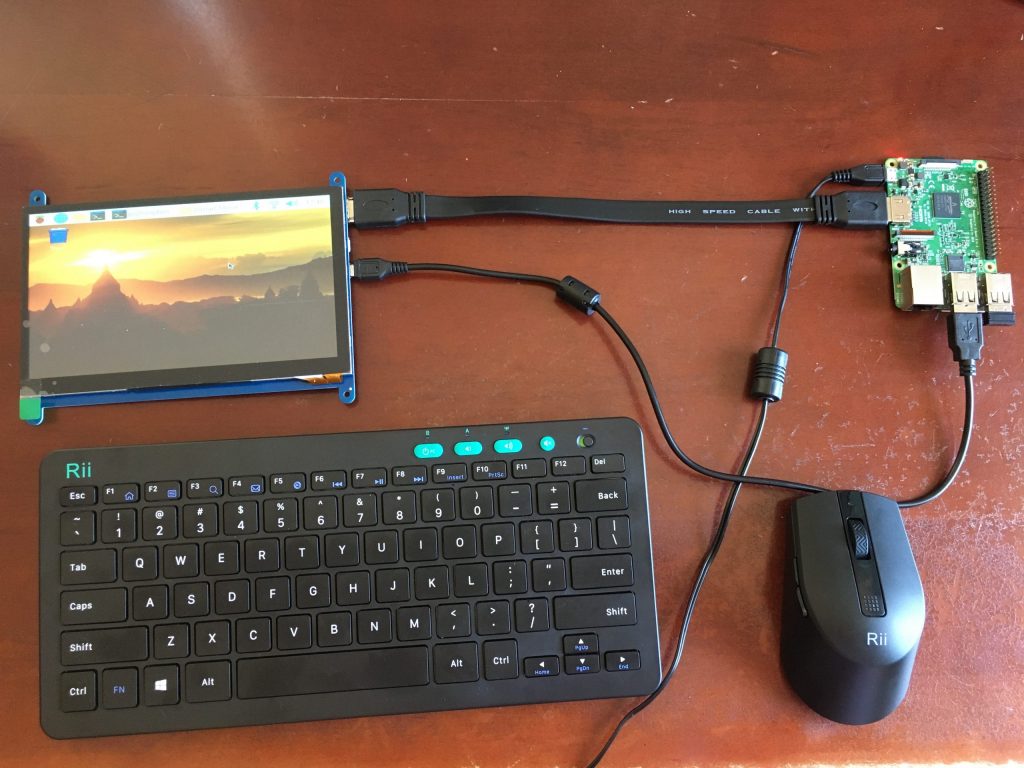
My First Milestone was to get my Raspberry Pi 3 working and hooked up to my HDMI display. The Raspberry Pi is basically a mini computer; it allows you to access web browsers, play games, edit code, and do much more. To get my Raspberry Pi 3 started, I had to download the OS to an SD card, then insert this SD card into the Raspberry Pi, which I then connected to a power source. After this, I just connected the HDMI display to the Raspberry Pi, and I also connected a mouse and keyboard to it.
Technical Difficulties Encountered In Setup
The Raspberry Pi 3 booted up fine, but my challenges started when I tried to connect it to my HDMI display. At first, when I plugged in the HDMI cable, my display was displaying ‘No Signal’, with a blue screen. Because of this, to troubleshoot this, I first re-wrote the OS onto my SD card. Then, I tried again, but it was still displaying no signal. After this, I attempted to use a different HDMI display(and in the process, changed the power source), but it still displayed ‘No Signal’ on this new HDMI display.
After trying with the new HDMI display, I just connected my Raspberry Pi back to my original power source and re-connected it with my original HDMI display, then it started working, and I was able to go through the initial configuration settings. I do not know exactly why this fixed itself, but have a few guesses, one being that it may have been related to the power source. This is because now, when I plug my Raspberry Pi into another power source, the display will show ‘No Signal’, but when I plug it into my original power source, the display will work.


