3D Printed robot arm

A robot arm, controlled by a few swipes of your fingers, made from 3d printed parts able to pick things up and you guessed it, put them down.

Milestone 1: Controlled Robot Arm

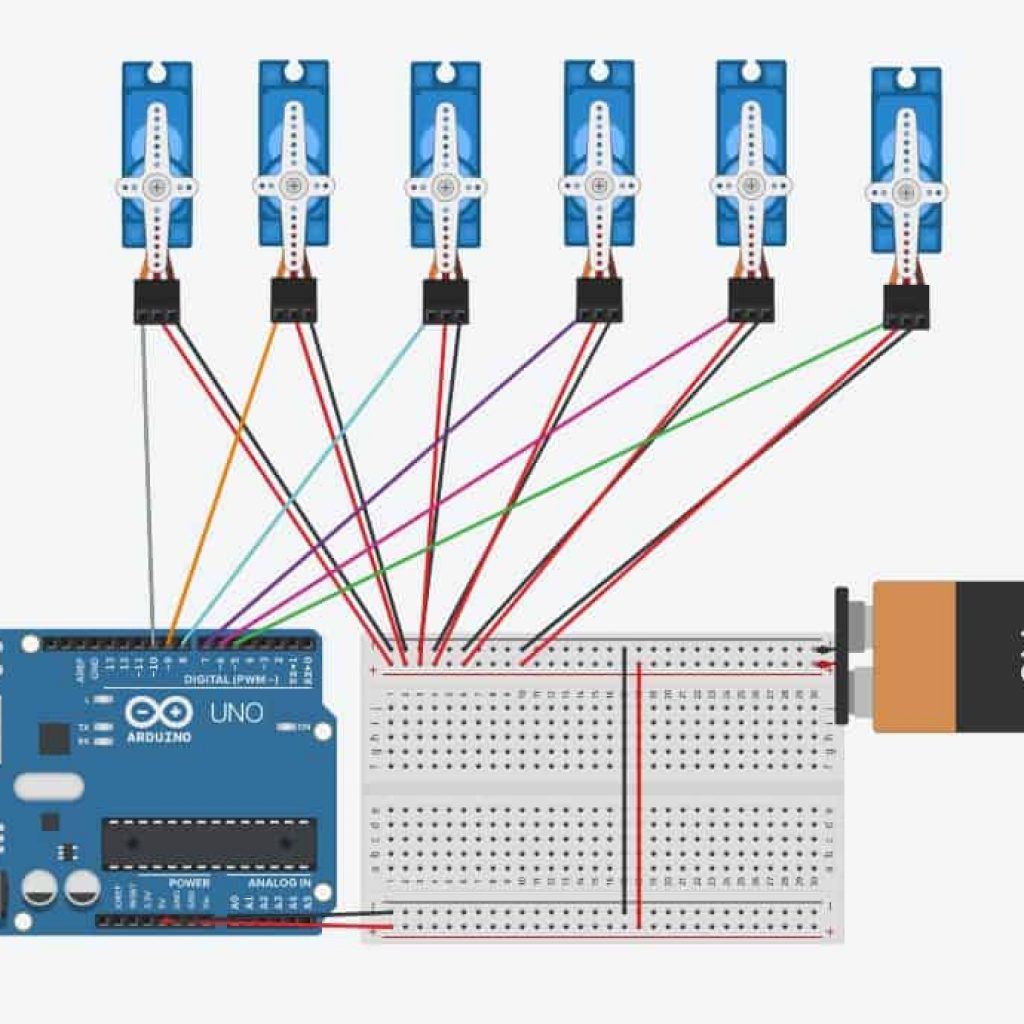
My First Milestone for the 3D Printed Robot Arm is to have all the parts of a working arm connected. This consists mainly of three parts, the code, the wiring, and the arm itself. Creating the program that controls the arm was an amalgamation of original code and programs other users have built in order to create the best program that will work with the parts I have. The wiring was a simpler process, just a matter of finding which wires needed to connect to which servos and which places need to be connected to the Arduino, then solder it all together. Finally, the arm, creating this consisted of hours of 3d printing and a few more using nuts and bolts to hold all the parts together. When all three parts were combined, a robotic arm came alive

Progress
Milestone Completion 100%

CIRCUITS

The circuitry of this project consisted of connecting each servo to the Arduino and then powering them through an external battery pack. The major problems I ran into while working on the circuitry  was creating secure connections that would not fall apart with the movement of  the arm. There were a surprising number of times where the arm would start spamming and all of the circuitry would be ripped from the arm. I solved this by soldiering wires together to form stronger connections.

PARTS

All of the 3D printed parts were sourced from the internet and created by Dejan. Certain modifications were made in regard to scaling and small add-ons to increase stability. The arm consists of 14 different 3D printed parts which took about 24 hours to make. Each one is made from PLA plastic and put together with screws, nuts, and  bolts.

CODE

The code for this milestone took inputs given through an application called Tera Term, passes them through the serial port to the Arduino, which then directs each motor to move. The code was originally from halim930112 and then altered to better work with my setup.

Milestone 2: Chess Piece Mover

Milestone 2 was all about me asking the hard questions: How the heck am I going to move the chess pieces? Also what chess pieces? For this milestone I had to consider the options before me to answer those two questions. I decided to move away from the claw and design a electromagnetic component to my arm. I redesigned and 3D printed a part of the claw to hold a 5V electromagnet. I wired it up added some code and was ready to go. But how would the electromagnet pick up the chess pieces? I found models online for a cool looking chess set and redesigned them to be able to hold magnets. I 3D printed the pieces and had myself a pretty cool chess set. And then I was able to move chess pieces with my arm.

Progress
Milestone Completion 100%

Chess pieces

I went looking online for cool chess pieces that I could adapt to my own needs and I found a set designed by disoculated. I took the 3D models and cut open the tops to allow me to place magnets inside. After redesigning the heads I 3D printed the pieces and tested them with the electromagnet. I had to make some more alterations later but the general design was good.

Electromagnet

Going into this milestone I had no Idea how to work an electromagnet, much less use one in my build. But when someone recommended the idea to me I liked the sound of it so I set out to learn all I could. After a few hours of googling I thought I had a pretty good handle on it. I set to work redesigning part of the claw to hold the electromagnet and then 3D printed it. I had to redo the design once because I forgot which side the screws had to go on but after that I was all good.

CODE & Wiring

The final part of this process was wiring up the electromagnet and sending it some code. For this I utilized a DC motor driver to send the electromagnet a current. Once it was all wired I scoured the internet for example code to control the magnet. It took me a bit to find because every single person had a different setup and my code required a lot of trial and error but in the end I got it.

Milestone 3: Tic tac toe time

Milestone #3 was all about making a playable game. Something either the user could interact with or watch. The first step in this progress was programming presets and functions to move pieces from one location to another. Next I adapted a Tic Tac Toe to work with the presets I had created. Finding ways to adapt the code to my presets proved a difficult challenge that required an immense amount of resilience. I tried three different methods to create the functions, had power source problems as well as many code bugs including errors that stumped anyone who looked at them.

Progress
Milestone Completion 85%

Movement Code

The code to design presets and move functions proved a difficult challenge that took almost two weeks. My first go at this problem was an attempt to create functions and arrays to represent each square on the chess board. As I continued to work the code I had designed was not sufficient with too much loose code and redundancy. Next I attempted to create a class that could encompass both a way to define squares and move pieces from one square to another. Again this method failed given the class was not able to reliably move pieces. Finally I created a series of functions that utilized 2D and 3D arrays to create positions on the chess board that my arm could understand. From there using only four functions to create movement.

Tic Tac Toe Code

After finding Tic Tac Toe code designed to use lights and buttons I spent a few days working to adapt it to my arm. Luckily the code also utilized 2D arrays so the adaptation process went over smoothly. Once that was done the robot could play itself at Tic Tac Toe!

Biography Biography Biography Biography Biography Biography Biography Biography Biography Biography Biography Biography

Biography Biography Biography Biography Biography Biography Biography Biography Biography Biography Biography Biography

Start typing and press Enter to search

Bluestamp Engineering