
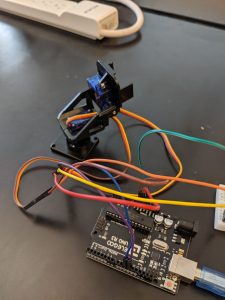
Laser Turret
The laser turret is made up of two servos on top of a box for support and is connected to an arduino and a breadboard with a capacitor so it doesn’t shake.
Engineer
Jacob K
Area of Interest
Mechanical/ Electrical Engineering
School
Ramaz High School
Grade
Incoming Freshman
Final Milestone
For my final milestone I attached potentiometers and a laser to my project.
There are two potentiometers, one to move it vertically and one to move horizontally. They use analog read to determine the value of the servo. There is digital and analog. Digital can be on or off and analog is any number on a range. I had lots of problems with this project. There was supposed to be two servos, but one is broken now. It’s hard for me to get what was wrong. At first some wires were crossed and then there were some other problems. My arduino fried, my capacitor fried, my laser broke, than my other laser broke, and than my servo broke, and than the replacement servo broke, and than the OTHER replacement servo broke.
First Milestone
#include <servo.h>
Servo vert,hori;  // create servo object to control a servo
                // a maximum of eight servo objects can be created
int pos = 0;    // variable to store the servo position
void setup()
{
  hori.attach(9);
  vert.attach(10);  // attaches the servo on pin 9,10 to the servo objects
  vert.write(0);
  hori.write(0);
}

void loop()
{
  for(pos = 0; pos < 180; pos += 10)  // goes from 0 degrees to 180 degrees
  {                                  // in steps of 10 degrees
    vert.write(pos);
    hori.write(pos);    // tell servo to go to position in variable 'pos'
    delay(100);                       // waits 100ms for the servo to reach the position
  }
  for(pos = 180; pos>=1; pos-=10)     // goes back from 180 degrees to 0 degrees
  {
    vert.write(pos);              // tell servo to go to position in variable 'pos'
    hori.write(pos);
    delay(100);                       // waits 100ms for the servo to reach the position
  }
For my first milestone I built and coded the servo tower. Link to instructions here.
There are two servos, one to move vertically and one to move horizontally. They are screwed into a base so the move together. There are wires connecting the servos to an arduino, which I uploaded the code to. The code is designed to make each servo move 180 degrees in 10 steps, 18 degrees per step. I did make one mistake. The code wasn’t compiling because it couldn’t find the servo library. It turned out that I had to make it a capital s in servo.After this I added on the potentiometers and coded them with the arduino.
Starter Project
H bridge
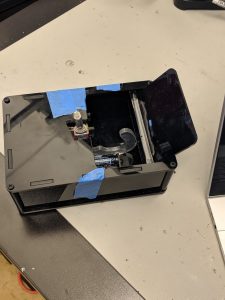
For my starter project, I completed the Useless Machine. Link to instructions here
When you flip the switch, it turns on a motor. This motor turns an arm that comes out of the top of the box. This arm then flips the switch back to its original position making the arm go back in the box.
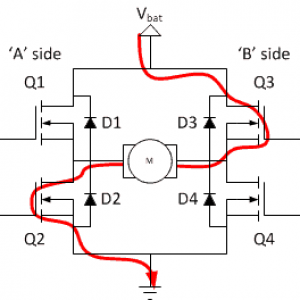
In the Useless Machine, there are two switches: a toggle switch and a limit switch. Normally the limit switch is closed, but when something is pressing on it it is open. When the arm is in its regular position it is pressing the limit switch meaning that circuit is open. At the same time the toggle switch is flipped away from the arm meaning the toggle switch is closed. When you flip the toggle switch it closes that circuit making the arm move. When the arm hits the toggle switch, it opens that circuit so it is no longer pressing the limit switch. That means the circuit is closed, making the arm move in the opposite direction and opening the limit switch again. That is because the circuit is an H-bridge, which can reverse the polarity of the voltage. It does this by opening and closing certain switches. If switch Q1 and Q4 are closed and Q2 and Q3 are open then the voltage is positive. Similarly, if Q1 and Q4 are open and Q2 and Q3 are closed, the voltage is negative.
I learned what a limit switch was and how it worked. I got better at soldering. At the end I learned what an h bridge was. Since my first starter project was a watch, I learned that a watch crystal is very small and very easy to break.
During this project I made lots of mistakes. First I soldered the toggle switch wrong. It required more than three hands because I had to hold the board, iron, solder, and switch, which was held at an angle by mistake. Then I dropped the top of the box and broke it. I also dropped a nut and lost it. Since the switch was bent the arm wouldn’t hit it so I tried to glue something on for the arm to hit, but the glue didn’t work. That also meant that the switch couldn’t fit in the hole in the top of the box, so I had to file it to make the bigger.
H bridge
For my final milestone I attached potentiometers and a laser to my project.
There are two potentiometers, one to move it vertically and one to move horizontally. They use analog read to determine the value of the servo. There is digital and analog. Digital can be on or off and analog is any number on a range. I had lots of problems with this project. There was supposed to be two servos, but one is broken now. It’s hard for me to get what was wrong. At first some wires were crossed and then there were some other problems. My arduino fried, my capacitor fried, my laser broke, than my other laser broke, and than my servo broke, and than the replacement servo broke, and than the OTHER replacement servo broke.