Hi my name is Ilyssa and I’m going into my junior year at STRIVE Prep SMART Academy. I became interested in engineering ever since I was working on my final freshmen project for my physics class. However, this is the first time I am taking an actual engineering class. The starter project I chose was a Metro-gnome, and my final project will be a LED cube that I will modify to light up to music. Both projects are a perfect match for me because I love working with electronics, and listening to music.
Final Project: LED Cube

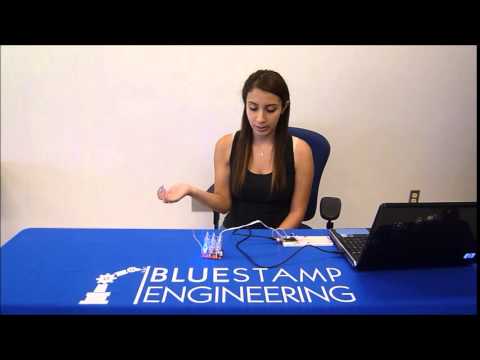
Main Project: LED Cube- Third Milestone
In the end I finally got a EMF detector to work with my project. I was not planning on making it, but while I was setting up the microphone I noticed that the floating wire that connects to pin 23 on the microcontroller detects electromagnetic waves. I decided to take my project a different route, and make it into a EMF detector. I decided just to keep the code that I was planning on using for the microphone, and use it for the EMF detector. It works the same way, but instead of reading the microphone it finds the waves.
The code
In the beginning I did not know how to write code because I had never done it before. With the help of my instructors, using Arduino, I was able to code the whole thing. Now I know the basics, and can explain what each part does as shown in the video. This code runs the cube, and allows the cube to communicate with the microphone. However, when the microphone is not connected the code turns the cube into an EMF detector.

Documentaiton
The first part of my project was finishing the LED cube kit that I got from Sparkfun.
BOM
Build instructions
Schematics
Main Project: LED Cube- Second Milestone
For my second milestone, I have finished the LED cube completely! All that’s left to do now is to modify it, so that it will light up to music as it plays. Once I got the first layer of LEDs and the PCB bored done, it was easy to finish the next two layers. It was a challenge when one of the LEDs was off track with the others, but then I realized it was because the blue and green wires on the two LEDs were crossed. It was also a challenge to get the LEDs stacked all the same way and same order. However, I fixed that by making a board that would hold the LEDs in place while I soldered them. What’s next is for my project is to add the pieces, and program it to be able to hear sound and respond to it. Another piece that Iwouldlike to get toif I have time is todesign a cube cover.
Main Project: LED Cube- First Milestone
For my first milestone I was able to get the most important part of the LED cube done, which is the bottom layer of LEDs. It’s the most important because if it’s not correct the rest of the layers won’t work because of the wiring. My biggest challenge was that one of the LEDs broke, and it set me back on time because I had to wait and order another one. It took me a long time to get everything soldered, but once I got the hang of everything, it just became a pattern. The biggest lesson I got from the project was how every piece works, and how they react with each other. For example, I learned that the LEDs are always on, however, its the transistors that divert the current flow to control the pattern of the LEDs. My next steps would be to just add the next layers of LEDs, and program it to light up to the beat of music.
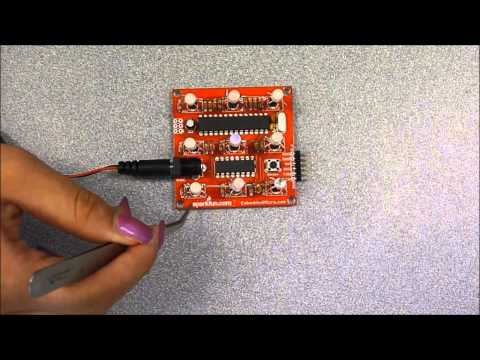
Starter Project: Metro-gnome
For my starter project I chose to do a Metro-gnome because I thought it is interesting how it keeps a steady beat, so that you are able to play an instrument with a steady rhythm. The parts that are included in the kit are the ATMega microcontroller, two capacitors, up and down buttons, a buzzer, side switch, a resistor, diode, batteries with a holder, and two hex9 displays. The most important part of the project, however, is the microcontroller because it’s a small circuit that contains the processor core, memory, and is used to program in and output peripherals. The main problems I ran into with building was rushing through, and soldering the wrong pieces to the PCB board. It’s very important to follow the kit instructions, and solder the parts in order.