
Third Eye for the Blind
The Third Eye for the Blind is a device meant to help blind people navigate. Using an ultrasonic sensor and other components, this device gives blind individuals immediate feedback about their surroundings. When the device senses an object within 50cm, it beeps or vibrates, respective to the obstacle’s distance from the user.
Engineer
Hillary C
Area of Interest
Software Engineering
School
Lynbrook High School
Grade
Incoming Junior
Third Milestone
For my third milestone, I finished assembling my project. There was a problem in my circuit, so using the voltmeter, I checked the connections on each wire and re-soldered my project numerous times. For my design, I decided to set the perf board in front of the Arduino. This way, I would be able to connect the EasyVR shield, along with wires, to the Arduino.

For my servo motors, I researched gimbals, which also worked by using an accelerometer and a servo motor and had the same function. However, instead of making a similar structure, I set a servo on one side of the perf board so it would shift the board up or down like a teeter totter. As for the voice recognition chip, I soldered wires to the ports I would be using, connected the chip to the Arduino, and connected the base project to the chip.
Second Milestone
For my second milestone, I brainstormed and added modifications to improve my project. Initially I wanted to add more sensors to enhance the user’s senses. Because taste and touch were hard to implement, I mainly worked on ideas that would give haptic feedback and alert the user based on their touch and hearing. I thought of stimulating touch sensory or emitting some sort of kinesthetic alert for hearing. However, the ultrasonic sensor and vibrating motor were already very useful, and had better functions compared to the sensors I researched. Therefore, instead of adding more sensors, I worked on improving my project.
Standing from a user’s viewpoint, I discovered a few changes that would make my project more convenient. Based on my prototype, users would have to hold their arms straight out in order to sense potential obstacles. Therefore, I decided to utilize the accelerometer and servo motors to level the ultrasonic sensor to detect objects in the user’s surroundings. This way, the user would be able to walk without holding their arms out in the air. I also decided to implement a voice recognition chip which would turn the device on or off based on the user’s command.
I started by setting up my accelerometer. I encountered a lot of problems, and tried trouble shooting the code to fix it. However, I suspected the issue might have been in the hardware, since the wires were not fitted tightly into the holes of the accelerometer. Therefore, I decided to solder the base project first. I started by drawing out a diagram of the perf board, and taping all of the peripherals onto the board. Then, I trimmed the wires of certain sensors, and soldered wires to the pins and created a ground rail.
First Milestone
For my project, I am building a third eye for the visually impaired using an Arduino Uno and peripherals, such as an ultrasonic sensor, toggle switch, buzzer, LED, and vibrating motor.
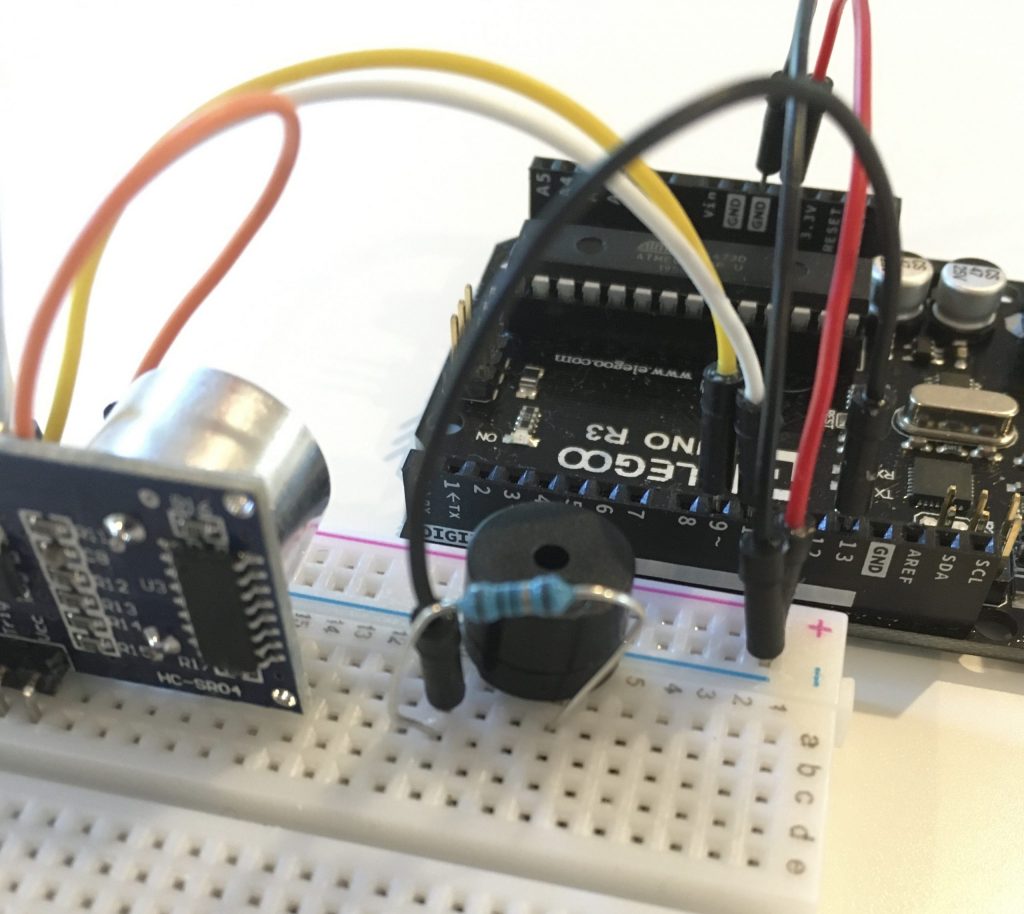
For my first milestone, I created a prototype of the device on a breadboard. I started by researching a main part of my project: the ultrasonic sensor. The ultrasonic sensor uses a method similar to echolocation, and works by emitting sound waves, then calculating the time it takes to receive the waves. Using the formula distance = (time x speed of sound)/2 and the time it took for the sound waves to “echo”, or travel back from an object, the sensor finds the distance of the object from the sensor.

After I set up my ultrasonic sensor and learned to track its output in the serial monitor, I set up the buzzer. I experimented with the different values in the code, and realized the buzzer changes pitch and and intensity. Because of this, I combined the code for my ultrasonic sensor and buzzer. Using an if statement, I set the buzzer to beep in a higher pitch rapidly when the ultrasonic sensor sensed an object within 25 -50 cm, and to produce a lower beep at a lower intensity when an object was sensed within 24 cm.
A problem I encountered while I was building my prototype was connecting the toggle switch to the peripherals it would work with. I researched the concept of single pole double throw, and learned that the switch has a single terminal that is connected to two output terminals—either the upper or lower.
The purpose of the toggle switch in my project was to help the user switch between two different modes: beeping or vibrating. Therefore, I worked on connecting the switch to the buzzer and vibrating motor.
While I was trying to set up the hardware of the switch, I wasn’t sure whether to connect the switch to the ground pin of my buzzer and the ground pin of the vibrating motor, or to connect these peripherals using my code. Because I thought it would be more convenient and easier to track every the wires, I decided to connect these peripherals through the software using if-statements. I also coded a red LED that flashes along with the buzzer.
In addition, I encountered a short circuit while I was working on my switch. I realized there was a short circuit because I was unfamiliar with the pins of the toggle switch, and flipped the ground pin with the +5 volt pin. My program had shut down because one end that was supposed to be connected to the ground rail was receiving power instead.

When I set up the vibrating motor, I encountered an uploading error. I learned that my Arduino couldn’t upload the code because I had connected a wire to the zero port. This caused problems because the zero port is the receiving port, and I wasn’t supposed to any wires to it while uploading.
long int inches, remaincm;
int switch_pin = 4;
int led_pin = 13;
const int pingPin = 10; // Trigger Pin of Ultrasonic Sensor
const int echoPin = 9; // Echo Pin of Ultrasonic Sensor
const int buzz = 12; //buzzer to arduino pin 12
const int motorPin = 6;
byte leds = 0;
void setup(){
pinMode(switch_pin, INPUT);
pinMode(led_pin, OUTPUT);
Serial.begin(9600); // Starting Serial Terminal
pinMode(buzz, OUTPUT); // Set buzzer – pin 9 as an output
pinMode(motorPin, OUTPUT);
}
void loop() {
//ultrasonic sensor
long duration, inches, cm, total_centimeters;
pinMode(pingPin, OUTPUT);
digitalWrite(pingPin, LOW);
delayMicroseconds(2);
digitalWrite(pingPin, HIGH);
delayMicroseconds(10);
digitalWrite(pingPin, LOW);
pinMode(echoPin, INPUT);
duration = pulseIn(echoPin, HIGH);
//inches = microsecondsToInches(duration);
cm = microsecondsToCentimeters(duration);
total_centimeters=microseconds_total_centimeters(duration);
//ultrasonic sensor senses object between 24 & 50cm
if (total_centimeters<=50 && total_centimeters>0 && total_centimeters>24){ //if far – if switch low:vibrating
// if switch high: buzzer/beep
if(digitalRead(switch_pin) == LOW){ //vibrating mode
digitalWrite(motorPin, HIGH);
digitalWrite(led_pin, HIGH);
delay(2000);
digitalWrite(motorPin, LOW);
digitalWrite(led_pin, LOW);
delay(2000);
}
if(digitalRead(switch_pin) == HIGH){ //buzzer
int d = map(total_centimeters,1,100,20,2000);
digitalWrite(led_pin, HIGH);
tone(buzz,1000);
delay(1000);
digitalWrite(led_pin, LOW);
noTone(buzz);
delay(1000);
}
}
//ultrasonic sensor senses object between 0 & 24cm
if (total_centimeters<=24 && total_centimeters>0){ //if close (about 9.4 in) – if switch low: vibrating
if(digitalRead(switch_pin) == LOW){ //vibrating mode
digitalWrite(motorPin, HIGH);
digitalWrite(led_pin, HIGH);
delay(1000);
digitalWrite(motorPin, LOW);
digitalWrite(led_pin, LOW);
delay(1000);
}
if(digitalRead(switch_pin) == HIGH){ //buzzer mode
int d = map(total_centimeters,1,100,20,2000);
digitalWrite(led_pin, HIGH);
tone(buzz,1000);
delay(100);
digitalWrite(led_pin, LOW);
noTone(buzz);
delay(100);
}
}
Serial.print(“Distance: “);
// Serial.print(inches);
// Serial.print(“in, “);
Serial.print(cm);
Serial.print(“cm\n”);
// Serial.println();
delay(100);
}
long microseconds_total_centimeters(long microseconds)
{
return microseconds/29/2;
}
//cm
long microsecondsToCentimeters(long microseconds) {
return (microseconds*.0343)/2;
}