Computer Unlocker
Tired of remembering long passwords? But at the same time want to make it secure at the same time? Then the Computer Unlocker will be perfect for you.
Engineer
Hamza A
Area of Interest
Biology
School
East Meadow High School
Grade
Incoming Senior
Reflection
During my journey at BlueStamp, I learned many important skills. I learned the basics of computer programming, electrical engineering, and how to self-teach. I now feel that I am confident enough to do any project I want and where to go if I ever run into problems. Before I came to BlueStamp, I had very little experience in engineering and computer science. Now I feel that I have gained a good understanding of engineering, and am able to build personal projects. After BlueStamp, I hope to continue my education by applying to college this fall and major in either Engineering or Computer Science. Additionally, I hope to complete more Arduino projects and eventually move to working with Raspberry Pi.
Final Milestone
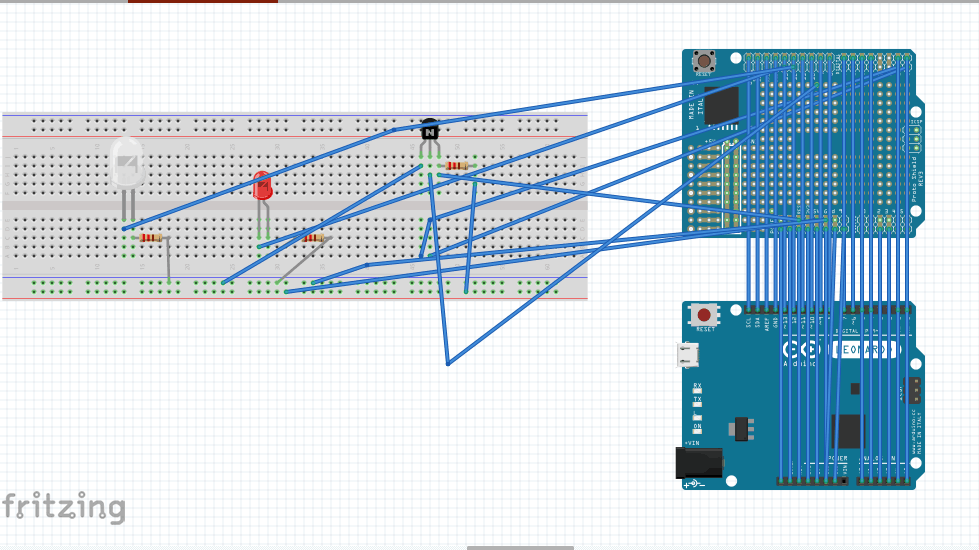
For my final milestone, I added modifications to my two factor authentication to make it easier to use. One of the issues with the fingerprint scanner was that it did not give you any sign to see if you had entered a correct fingerprint. To solve this problem, I added LEDs to my circuit to detect when a correct fingerprint had been scanned. Now, when a correct fingerprint was scanned the green LED would turn on for a second. Another issue that I tried to solve through modifications was not having to reset my Arduino after the first time. The reason I would reset my Arduino was because after the first run through it would now only be one factor. To solve this issue, I added a resistor and transistor to my circuit to implement a soft reset. I first defined Pin 9 as an output in my code and have it on LOW. The LOW setting would ensure that no voltage was present at Pin 9. When the digital pin is set on LOW the transistor was off, which prevented current from flowing and that leaves the reset on 5 volts. Then at the end of my code, I would set the pin on HIGH, which would consequently set the voltage of the reset to 0 volts. This would automatically reset my Arduino, and I would not have to press the reset button from my arduino. The biggest challenge for me while trying to achieve my third milestone was learning how to reset the code. At first, I tried to reset the loop by making my own function and then resetting the function. However, I found that resetting the Arduino through hardware rather than software was easier and achieved the same effect. I learned many skills from doing these modifications. I learned electrical engineering skills, which were implementing a reset into my circuit. I also learned that not every problem can be solved through code, and to approach future problems with a different mindset.
Final Bill of Materials: https://docs.google.com/spreadsheets/d/17jODujWblGa6P6ejM3cs1kbahhyoCbtFIVap2theGHw/edit#gid=0
digitalWrite(13,LOW);    //set the red LED off

  digitalWrite(12,HIGH);    //set the green LED on

  delay(1000);             //wait for a second

  digitalWrite(12,LOW);     //set the green LED off

  delay(1000);             //wait for a second

  digitalWrite(13,HIGH);   //set the red LED on
/////Use this code in the setup

pinMode(9,OUTPUT);    //sets the digital pin 9 as output

digitalWrite(9,LOW);  //turns off transistor

////////////////////////////////////////////// Use this Code in loop

digitalWrite(9, HIGH);       // sets the digital pin 9 on

  delay(1000);                  // waits for a second

  digitalWrite(9, LOW);        // sets the digital pin 9 off

  delay(1000);
#include <Wire.h>

#include <Adafruit_NFCShield_I2C.h>

#include <Keyboard.h>

#include <Adafruit_Fingerprint.h>

#include <SoftwareSerial.h>

#define IRQ 6 // this trace must be cut and rewired!

#define RESET 7

#define mySerial Serial1

Adafruit_Fingerprint finger = Adafruit_Fingerprint(&mySerial);

Adafruit_NFCShield_I2C nfc(IRQ, RESET);

void setup() {

   //while (!Serial);  // For Yun/Leo/Micro/Zero/...

  Serial.begin(9600);

  Serial.println("Adafruit finger detect test");

pinMode(9,OUTPUT);    //sets the digital pin 9 as output

digitalWrite(9,LOW);  //turns off transistor

  // set the data rate for the sensor serial port

  finger.begin(57600);


  if (finger.verifyPassword()) {


    Serial.println("Found fingerprint sensor!");

  } else {

    Serial.println("Did not find fingerprint sensor :(");

    while (1);

  }

  Serial.println("Waiting for valid finger...");

  // put your setup code here, to run once:

  // find Adafruit RFID/NFC shield


  nfc.begin();

uint32_t versiondata = nfc.getFirmwareVersion();

  if (! versiondata) {

    Serial.print("Didn't find PN53x board");

    while (1); // halt

  }

  // Got ok data, print it out!

  Serial.print("Found chip PN5"); Serial.println((versiondata>>24) & 0xFF, HEX);

  Serial.print("Firmware ver. "); Serial.print((versiondata>>16) & 0xFF, DEC);

  Serial.print('.'); Serial.println((versiondata>>8) & 0xFF, DEC);

  // configure board to read RFID tags

  nfc.SAMConfig();

Keyboard.begin(); //initiate the Keyboard

}

//////////////////////////////////////////////////////////////////////////////////////////////////////////////////////////////////////////// LOOP

unsigned digit = 1;

uint8_t getFingerprintID() {

  uint8_t p = finger.getImage();

  Serial.print("p= ");

  Serial.println(p);

  switch (p) {

    case FINGERPRINT_OK:

      break;

    case FINGERPRINT_NOFINGER:

      return p;

    case FINGERPRINT_PACKETRECIEVEERR:

      return p;

    case FINGERPRINT_IMAGEFAIL:

      return p;

    default:

      return p;

  }

  // OK success!

  p = finger.image2Tz();

  switch (p) {

    case FINGERPRINT_OK:


      Serial.println("Image converted");

      break;

    case FINGERPRINT_IMAGEMESS:

      return p;

    case FINGERPRINT_PACKETRECIEVEERR:

      return p;

    case FINGERPRINT_FEATUREFAIL:

      return p;

    case FINGERPRINT_INVALIDIMAGE:

      return p;

    default:

      return p;

  }


  // OK converted!

  p = finger.fingerFastSearch();

  if (p == FINGERPRINT_OK) {

  } else if (p == FINGERPRINT_PACKETRECIEVEERR) {

    return p;

  } else if (p == FINGERPRINT_NOTFOUND) {

    return p;

  } else {

    return p;

  }


  // found a match!

  Serial.print("Found ID #"); Serial.print(finger.fingerID);

  Serial.print(" with confidence of "); Serial.println(finger.confidence);

}

// returns -1 if failed, otherwise returns ID #

int getFingerprintIDez() {

  uint8_t p = finger.getImage();

  if (p != FINGERPRINT_OK)  return -1;

  p = finger.image2Tz();

  if (p != FINGERPRINT_OK)  return -1;

  p = finger.fingerFastSearch();

  if (p != FINGERPRINT_OK)  return -1;


  // found a match!

  digitalWrite(13,LOW);    //set the red LED off

  digitalWrite(12,HIGH);    //set the green LED on

  delay(1000);             //wait for a second

  digitalWrite(12,LOW);     //set the green LED off

  delay(1000);             //wait for a second

  digitalWrite(13,HIGH);   //set the red LED on

  Serial.print("Found ID #"); Serial.print(finger.fingerID);

  Serial.print(" with confidence of "); Serial.println(finger.confidence);

  return finger.fingerID;

}

/////////////////////////////////////////////////////////////////////////////////////////////////////////////////////

void loop() {

  getFingerprintIDez();

  delay(50);            //don't ned to run this at full speed.

   digitalWrite (13,HIGH);

   if (finger.confidence >= 50){

   uint8_t success;

  uint8_t uid[] = { 0, 0,0 ,0 , 0, 0, 0 }; // Buffer to store the returned UID

  uint8_t uidLength; // Length of the UID (4 or 7 bytes depending on ISO14443A card type)

  // wait for RFID card to show up!

  Serial.println("Waiting for an ISO14443A Card ...");


  // Wait for an ISO14443A type cards (Mifare, etc.). When one is found

  // 'uid' will be populated with the UID, and uidLength will indicate

  // if the uid is 4 bytes (Mifare Classic) or 7 bytes (Mifare Ultralight)

  success = nfc.readPassiveTargetID(PN532_MIFARE_ISO14443A, uid, &uidLength);

  uint32_t cardidentifier = 0;

  if (success) {

    // Found a card!

    Serial.print("Card detected #");

    // turn the four byte UID of a mifare classic into a single variable #

    cardidentifier = uid[3];

    cardidentifier <<= 8; cardidentifier |= uid[2];

    cardidentifier <<= 8; cardidentifier |= uid[1];

    cardidentifier <<= 8; cardidentifier |= uid[0];

    Serial.println(cardidentifier);

    if (cardidentifier == 1695046679) {

    #include <Keyboard.h>

      Keyboard.write('h');

      Keyboard.write('a');

       Keyboard.write('m');

        Keyboard.write('z');

         Keyboard.write('a');

          Keyboard.write('1');

           Keyboard.write('2');

            Keyboard.write('3');

             Keyboard.write(KEY_RETURN);

                 delay(5000); //makes sure the password isn't repeated

digitalWrite(9, HIGH);       // sets the digital pin 13 on

  delay(1000);                  // waits for a second

  digitalWrite(9, LOW);        // sets the digital pin 13 off

  delay(1000);


     }


   }


}

}
Final Wiring of Project
Second Milestone
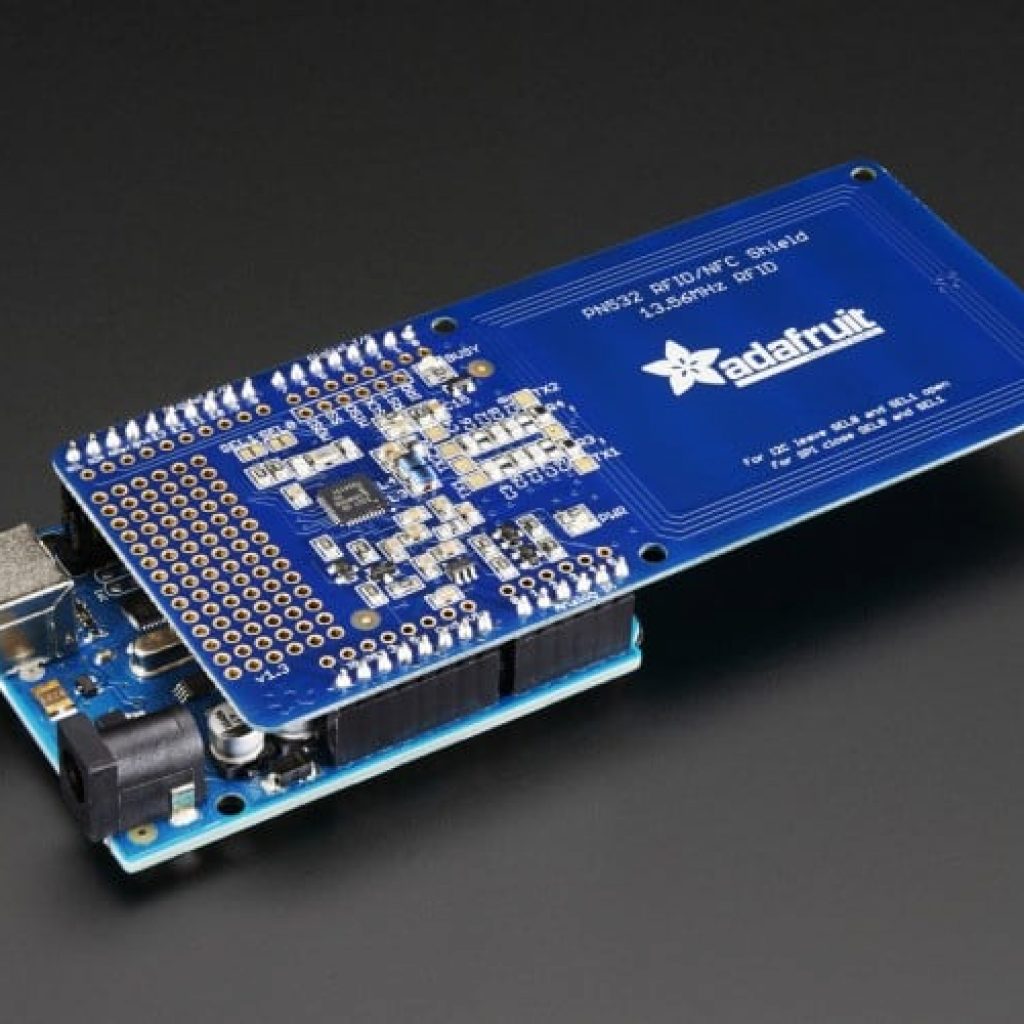
For my second milestone, I added two factor authentication . Alongside the NFC Card Reader, logging in now requires a fingerprint scanner. In order for the Arduino Leonardo to type the password, the correct RFID card and fingerprint had to both be entered. The Fingerprint Scanner connects to the Arduino Leonardo with its 4 wires: power, ground, TX, and RX . The Fingerprint Scanner. The TX and RX ports are used to transmit and receive fingerprint data, respectively, while the power and ground are used for the main power itself. Since the NFC card reader was already attached to the Arduino, the wires had to be attached through the pass-through ports of the NFC card reader shield (Picture attached). I also decided to use a breadboard to make designing my circuit easier. Breadboards are used for temporary prototype testing and do not require any soldering so it is easier to fix any mistakes without having to go through the desoldering process. After putting together the circuit, the code for the fingerprint scanner had to be combined with the code for the Card Reader. The Fingerprint Scanner works through the process of enrolling fingerprints onto its FLASH memory, and then it will only unlock the computer if it recognizes your fingerprint in its database. FLASH memory is a type of memory that retains data without power. Some examples of FLASH memory are flash drives and hard drives. I used an enrolling system that came with the fingerprint system to make my fingerprints stored in the FLASH memory. After enrolling, a verification process needed to be coded to verify whether the finger scanned matched any of those stored in its database. While trying to achieve this milestone, I encountered many problems. One of these issues was soldering the fragile wires onto the Arduino Leonardo. I solved this problem by using a breadboard and then using male to male headers to connect to the Arduino Leonardo. Another issue was debugging my code, when it was not working properly. I learned that the ports that I had defined in my code were not the ports that I had connected to, which is why it was not working. During the process of trying to achieve my milestone, I learned many useful skills such as using breadboards and basics of code.
#include <Adafruit_Fingerprint.h>

// On Leonardo/Micro or others with hardware serial, use those! #0 is green wire, #1 is white

// uncomment this line:

 #define mySerial Serial1

// For UNO and others without hardware serial, we must use software serial...

// pin #2 is IN from sensor (GREEN wire)

// pin #3 is OUT from arduino  (WHITE wire)

// comment these two lines if using hardware serial

//#include <SoftwareSerial.h>

//SoftwareSerial mySerial(2, 3);

Adafruit_Fingerprint finger = Adafruit_Fingerprint(&mySerial);

uint8_t id;

void setup()

{

  Serial.begin(9600);

  while (!Serial);  // For Yun/Leo/Micro/Zero/...

  delay(100);

  Serial.println("\n\nAdafruit Fingerprint sensor enrollment");

  // set the data rate for the sensor serial port

  finger.begin(57600);


  if (finger.verifyPassword()) {

    Serial.println("Found fingerprint sensor!");

  } else {

    Serial.println("Did not find fingerprint sensor :(");

    while (1) { delay(1); }

  }

}

uint8_t readnumber(void) {

  uint8_t num = 0;


  while (num == 0) {

    while (! Serial.available());

    num = Serial.parseInt();

  }

  return num;

}

void loop()                     // run over and over again

{

  Serial.println("Ready to enroll a fingerprint!");

  Serial.println("Please type in the ID # (from 1 to 127) you want to save this finger as...");

  id = readnumber();

  if (id == 0) {// ID #0 not allowed, try again!

     return;

  }

  Serial.print("Enrolling ID #");

  Serial.println(id);


  while (!  getFingerprintEnroll() );

}

uint8_t getFingerprintEnroll() {

  int p = -1;

  Serial.print("Waiting for valid finger to enroll as #"); Serial.println(id);

  while (p != FINGERPRINT_OK) {

    p = finger.getImage();

    switch (p) {

    case FINGERPRINT_OK:

      Serial.println("Image taken");

      break;

    case FINGERPRINT_NOFINGER:

      Serial.println(".");

      break;

    case FINGERPRINT_PACKETRECIEVEERR:

      Serial.println("Communication error");

      break;

    case FINGERPRINT_IMAGEFAIL:

      Serial.println("Imaging error");

      break;

    default:

      Serial.println("Unknown error");

      break;

    }

  }

  // OK success!

  p = finger.image2Tz(1);

  switch (p) {

    case FINGERPRINT_OK:

      Serial.println("Image converted");

      break;

    case FINGERPRINT_IMAGEMESS:

      Serial.println("Image too messy");

      return p;

    case FINGERPRINT_PACKETRECIEVEERR:

      Serial.println("Communication error");

      return p;

    case FINGERPRINT_FEATUREFAIL:

      Serial.println("Could not find fingerprint features");

      return p;

    case FINGERPRINT_INVALIDIMAGE:

      Serial.println("Could not find fingerprint features");

      return p;

    default:

      Serial.println("Unknown error");

      return p;

  }


  Serial.println("Remove finger");

  delay(2000);

  p = 0;

  while (p != FINGERPRINT_NOFINGER) {

    p = finger.getImage();

  }

  Serial.print("ID "); Serial.println(id);

  p = -1;

  Serial.println("Place same finger again");

  while (p != FINGERPRINT_OK) {

    p = finger.getImage();

    switch (p) {

    case FINGERPRINT_OK:

      Serial.println("Image taken");

      break;

    case FINGERPRINT_NOFINGER:

      Serial.print(".");

      break;

    case FINGERPRINT_PACKETRECIEVEERR:

      Serial.println("Communication error");

      break;

    case FINGERPRINT_IMAGEFAIL:

      Serial.println("Imaging error");

      break;

    default:

      Serial.println("Unknown error");

      break;

    }

  }

  // OK success!

  p = finger.image2Tz(2);

  switch (p) {

    case FINGERPRINT_OK:

      Serial.println("Image converted");

      break;

    case FINGERPRINT_IMAGEMESS:

      Serial.println("Image too messy");

      return p;

    case FINGERPRINT_PACKETRECIEVEERR:

      Serial.println("Communication error");

      return p;

    case FINGERPRINT_FEATUREFAIL:

      Serial.println("Could not find fingerprint features");

      return p;

    case FINGERPRINT_INVALIDIMAGE:

      Serial.println("Could not find fingerprint features");

      return p;

    default:

      Serial.println("Unknown error");

      return p;

  }


  // OK converted!

  Serial.print("Creating model for #");  Serial.println(id);


  p = finger.createModel();

  if (p == FINGERPRINT_OK) {

    Serial.println("Prints matched!");

  } else if (p == FINGERPRINT_PACKETRECIEVEERR) {

    Serial.println("Communication error");

    return p;

  } else if (p == FINGERPRINT_ENROLLMISMATCH) {

    Serial.println("Fingerprints did not match");

    return p;

  } else {

    Serial.println("Unknown error");

    return p;

  }


  Serial.print("ID "); Serial.println(id);

  p = finger.storeModel(id);

  if (p == FINGERPRINT_OK) {

    Serial.println("Stored!");

  } else if (p == FINGERPRINT_PACKETRECIEVEERR) {

    Serial.println("Communication error");

    return p;

  } else if (p == FINGERPRINT_BADLOCATION) {

    Serial.println("Could not store in that location");

    return p;

  } else if (p == FINGERPRINT_FLASHERR) {

    Serial.println("Error writing to flash");

    return p;

  } else {

    Serial.println("Unknown error");

    return p;

  }

}
#include <Wire.h>
#include <Adafruit_NFCShield_I2C.h>
#include <Keyboard.h>
#include <Adafruit_Fingerprint.h>
#include <SoftwareSerial.h>

#define IRQ 6 // this trace must be cut and rewired!
#define RESET 7

#define mySerial Serial1
Adafruit_Fingerprint finger = Adafruit_Fingerprint(&mySerial);
Adafruit_NFCShield_I2C nfc(IRQ, RESET);

void setup() {
//while (!Serial); // For Yun/Leo/Micro/Zero/...
Serial.begin(9600);
Serial.println("Adafruit finger detect test");

// set the data rate for the sensor serial port
finger.begin(57600);

if (finger.verifyPassword()) {
Serial.println("Found fingerprint sensor!");
} else {
Serial.println("Did not find fingerprint sensor :(");
while (1);
}
Serial.println("Waiting for valid finger...");
// put your setup code here, to run once:

// find Adafruit RFID/NFC shield

nfc.begin();

uint32_t versiondata = nfc.getFirmwareVersion();
if (! versiondata) {
Serial.print("Didn't find PN53x board");
while (1); // halt
}
// Got ok data, print it out!
Serial.print("Found chip PN5"); Serial.println((versiondata>>24) & 0xFF, HEX);
Serial.print("Firmware ver. "); Serial.print((versiondata>>16) & 0xFF, DEC);
Serial.print('.'); Serial.println((versiondata>>8) & 0xFF, DEC);

// configure board to read RFID tags
nfc.SAMConfig();
Keyboard.begin(); //initiate the Keyboard
}

//////////////////////////////////////////////////////////////////////////////////////////////////////////////////////////////////////////// LOOP

unsigned digit = 1;

uint8_t getFingerprintID() {
uint8_t p = finger.getImage();
switch (p) {
case FINGERPRINT_OK:
break;
case FINGERPRINT_NOFINGER:
return p;
case FINGERPRINT_PACKETRECIEVEERR:
return p;
case FINGERPRINT_IMAGEFAIL:
return p;
default:
return p;
}

// OK success!

p = finger.image2Tz();
switch (p) {
case FINGERPRINT_OK:

Serial.println("Image converted");
break;
case FINGERPRINT_IMAGEMESS:
return p;
case FINGERPRINT_PACKETRECIEVEERR:
return p;
case FINGERPRINT_FEATUREFAIL:
return p;
case FINGERPRINT_INVALIDIMAGE:
return p;
default:
return p;
}

// OK converted!
p = finger.fingerFastSearch();
if (p == FINGERPRINT_OK) {
} else if (p == FINGERPRINT_PACKETRECIEVEERR) {
return p;
} else if (p == FINGERPRINT_NOTFOUND) {
return p;
} else {
return p;
}

// found a match!
Serial.print("Found ID #"); Serial.print(finger.fingerID);
Serial.print(" with confidence of "); Serial.println(finger.confidence);
}

// returns -1 if failed, otherwise returns ID #
int getFingerprintIDez() {
uint8_t p = finger.getImage();
if (p != FINGERPRINT_OK) return -1;

p = finger.image2Tz();
if (p != FINGERPRINT_OK) return -1;

p = finger.fingerFastSearch();
if (p != FINGERPRINT_OK) return -1;

// found a match!
digitalWrite(13,LOW); //set the red LED off
digitalWrite(12,HIGH); //set the green LED on
delay(1000); //wait for a second
digitalWrite(12,LOW); //set the green LED off
delay(1000); //wait for a second
digitalWrite(13,HIGH); //set the red LED on
Serial.print("Found ID #"); Serial.print(finger.fingerID);
Serial.print(" with confidence of "); Serial.println(finger.confidence);
return finger.fingerID;

}

/////////////////////////////////////////////////////////////////////////////////////////////////////////////////////
void loop() {
getFingerprintIDez();

delay(50); //don't ned to run this at full speed.
digitalWrite (13,HIGH);

if (finger.confidence >= 50){
uint8_t success;
uint8_t uid[] = { 0, 0,0 ,0 , 0, 0, 0 }; // Buffer to store the returned UID
uint8_t uidLength; // Length of the UID (4 or 7 bytes depending on ISO14443A card type)

// wait for RFID card to show up!
Serial.println("Waiting for an ISO14443A Card ...");

// Wait for an ISO14443A type cards (Mifare, etc.). When one is found
// 'uid' will be populated with the UID, and uidLength will indicate
// if the uid is 4 bytes (Mifare Classic) or 7 bytes (Mifare Ultralight)
success = nfc.readPassiveTargetID(PN532_MIFARE_ISO14443A, uid, &uidLength);

uint32_t cardidentifier = 0;

if (success) {
// Found a card!

Serial.print("Card detected #");
// turn the four byte UID of a mifare classic into a single variable #
cardidentifier = uid[3];
cardidentifier <<= 8; cardidentifier |= uid[2];
cardidentifier <<= 8; cardidentifier |= uid[1];
cardidentifier <<= 8; cardidentifier |= uid[0];
Serial.println(cardidentifier);

if (cardidentifier == 1695046679) {
#include <Keyboard.h>
Keyboard.write('h');
Keyboard.write('a');
Keyboard.write('m');
Keyboard.write('z');
Keyboard.write('a');
Keyboard.write('1');
Keyboard.write('2');
Keyboard.write('3');
Keyboard.write(KEY_RETURN);
delay(5000); //makes sure the password isn't repeated
}

}

}
}
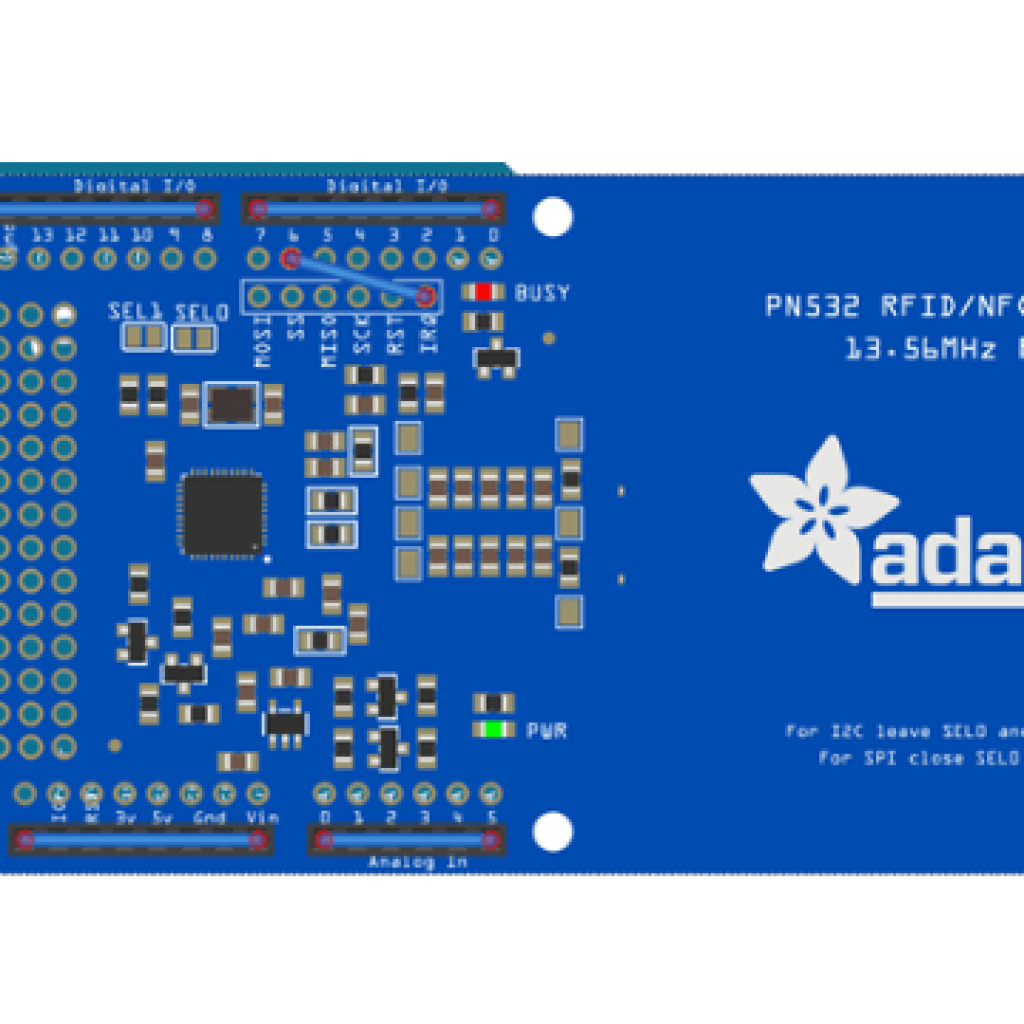
NFC Card Reader Shield Ports
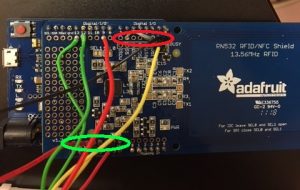
Figure 1: Around the Red Circle is where the TX/RX Ports are located. Around the Green Circle is where the Power/Ground Ports are located.
First Milestone
#include <Wire.h>
#include <Adafruit_NFCShield_I2C.h>
#include <Keyboard.h>

#define IRQ 6 // this trace must be cut and rewired!
#define RESET 8

Adafruit_NFCShield_I2C nfc(IRQ, RESET);

//////////////////////////////////// SETUP

void setup() {
// set up Serial library at 9600 bps
Serial.begin(9600);

// find Adafruit RFID/NFC shield
nfc.begin();

uint32_t versiondata = nfc.getFirmwareVersion();
if (! versiondata) {
Serial.print("Didn't find PN53x board");
while (1); // halt
}
// Got ok data, print it out!
Serial.print("Found chip PN5"); Serial.println((versiondata>>24) & 0xFF, HEX);
Serial.print("Firmware ver. "); Serial.print((versiondata>>16) & 0xFF, DEC);
Serial.print('.'); Serial.println((versiondata>>8) & 0xFF, DEC);

// configure board to read RFID tags
nfc.SAMConfig();
Keyboard.begin(); //initiate the Keyboard
}

/////////////////////////////////// LOOP

unsigned digit = 0;

void loop() {
uint8_t success;
uint8_t uid[] = { 0, 0, 0, 0, 0, 0, 0 }; // Buffer to store the returned UID
uint8_t uidLength; // Length of the UID (4 or 7 bytes depending on ISO14443A card type)

// wait for RFID card to show up!
Serial.println("Waiting for an ISO14443A Card ...");

// Wait for an ISO14443A type cards (Mifare, etc.). When one is found
// 'uid' will be populated with the UID, and uidLength will indicate
// if the uid is 4 bytes (Mifare Classic) or 7 bytes (Mifare Ultralight)
success = nfc.readPassiveTargetID(PN532_MIFARE_ISO14443A, uid, &uidLength);

uint32_t cardidentifier = 0;

if (success) {
// Found a card!

Serial.print("Card detected #");
// turn the four byte UID of a mifare classic into a single variable #
cardidentifier = uid[3];
cardidentifier <<= 8; cardidentifier |= uid[2];
cardidentifier <<= 8; cardidentifier |= uid[1];
cardidentifier <<= 8; cardidentifier |= uid[0];
Serial.println(cardidentifier);

if (cardidentifier == 1695046679) {
#include <Keyboard.h>
Keyboard.write('b');
Keyboard.write('s');
Keyboard.write('e');
Keyboard.write('r');
Keyboard.write('o');
Keyboard.write('c');
Keyboard.write('k');
Keyboard.write('s');
Keyboard.write(KEY_RETURN);
delay(5000); //makes sure the password isn't repeated
}
}
}