Engineer
Eytan I
Area of Interest
Computer Engineering/Computer Science
School
SAR High School
Grade
Incoming Senior
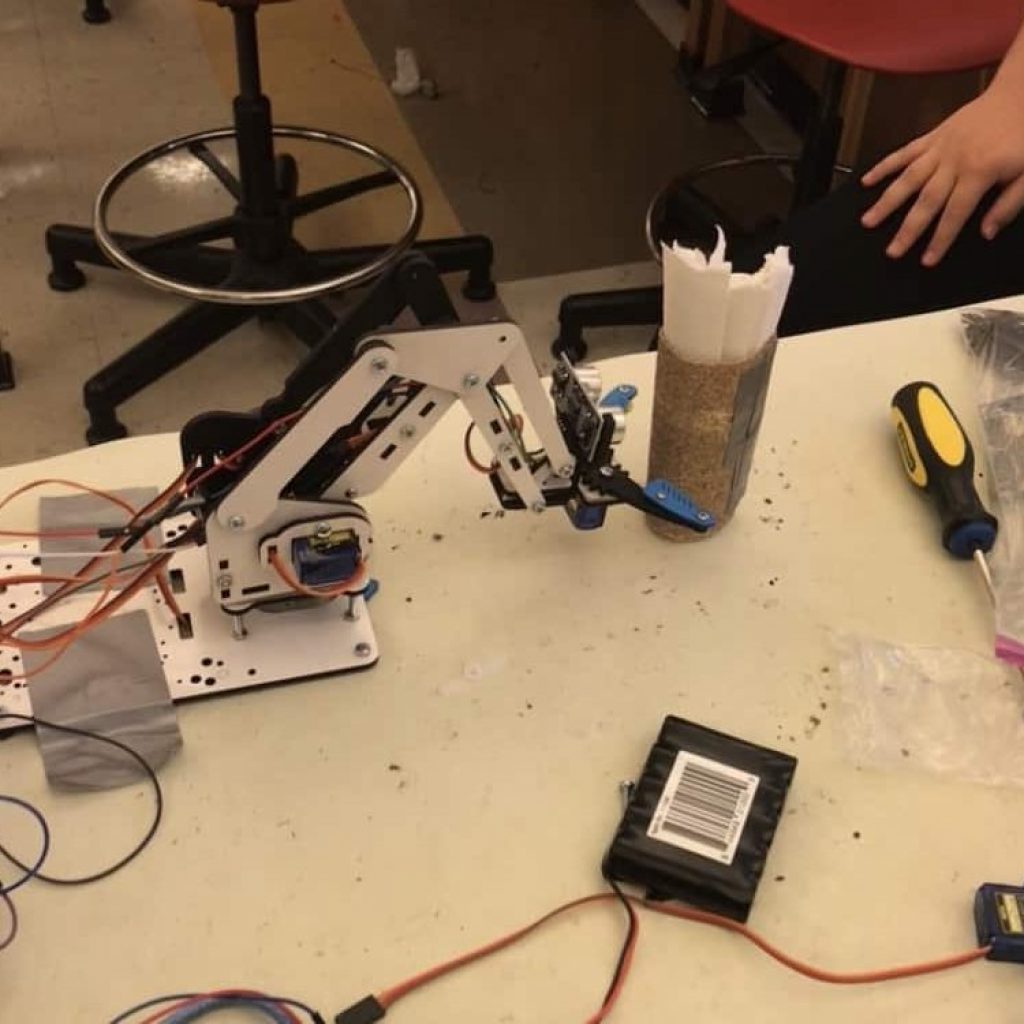
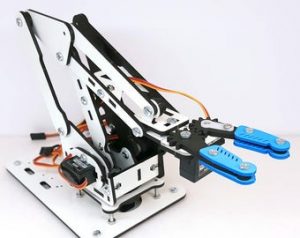
Main Project: 4 Joint Robotic Arm
Final Milestone: Neaten up wires and code, and add a gyroscope function
For my final milestone, I made my robotic arm much more condensed, easier to carry, and smooth. In order to make it more visually appearing, I removed almost all of the jumper wires, and replaced them with non-bendable wires. Additionally, I soldered the 4 servo motors, HC-06 Bluetooth Module, and switch into a proto-sheild. A proto-sheild has strips of powered and grounded places to solder, allowing companants to be able to be connected to power and ground very easily. Another modification I made was adding notes to my code and cleaning it up. This way, those looking for guidance in my code could be more well guided. Lastly, a large modification that I made was adding a mode of control which is through using a gyroscope sensor. I made it so that if the device turns to the left, so does the arm, and if the device leans forward, the arm does as well. This modification was fascinating for me to try, and very thrilling. I then added a close and open claws button to it to make it more practical. A major problem I had was figuring out how to communicate multiple values to the arduino and for the arduino to know which arm the command corresponds to. I ended up sending back numbers in the 100’s for the x axis and 200’s for the y axis. This way I was able to allow both to be read and set different commands for each.

What my arm could do
- Mode One
- When the arm initializes, it is in mode one. In mode one, the arm is controlled through 4 potentiometers.
- A potentiometer is a variable resistor. The potentiometer allows me to control the current let into the arduino read pin and turn that into a value
- In mode one, the arm is also searching for two possible events
- The button is pushed
- A command is sent through the Bluetooth module
- If those take place…
- If a button is pressed the mode is changed to two
- If a command is received, the arm moves to a central position and then the mode is changed to three
- When the arm initializes, it is in mode one. In mode one, the arm is controlled through 4 potentiometers.
- Mode Two
- Mode two is the autonomous mode of the project.
- How it works
- The arm first goes to a starting position of all the way to the right, down, and claw open
- The arm starts rotating to the left, while constantly checking the distance sensors.
- If an object is read to be closer than 20 cm, the object stops
- It then moves forward(which involves moving up and forward due to the way the arm is engineered) until it reaches 3 cm
- Once it is 3 cm away, the claws of the body close, and the object is brought up
- The mode is changed back two one
- Mode Three
- Mode three is entered by connecting the kindle app to the Bluetooth module and sending any signal
- The mode begins by gradually bringing the arm from the position of the potentiometers to the starting position of the mode(Center, medium height, arms open).
- When one presses down a button it sends a number to the arduino and the arduino reads that as a command
- When the button is released, another number is sent and the arduino stops carrying out the action
- The controller can also click on “mode 1” or “mode 2” to make the arm gradually go into position to go into those modes, and then enter them.
- LASTLY, there is a button that says Gyroscope.
- When one clicks that button they are brought to a new screen on the app. The app measures the x and y tilt of the kindle and sends values back to the kindle telling it to move left or right, and forward and backwards.
BEFORE
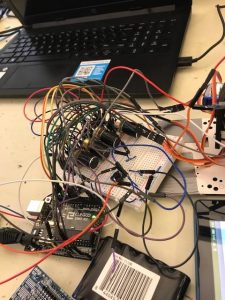
Before this milestone, all of my wires were bendable jumper wires. Additionally, I had two breadboards to hold all my components. I took out the main bread board, and soldered all of its components to a proto-sheild. Additionally, I replaced the wires still needed with rigid wire. The few bendable wires present are needed to allow for slack for the servos.
AFTER


MIT App Inventor


MIT App Inventor has two parts to it, the design workshop, and the code workshop. In this milestone I used the design workshop to make the layout of the app look very nice. I also added to the code. The code could be accessed using this link.


#include <Servo.h>

Servo myservo1; // create servo object to control a servo
Servo myservo2; // create servo object to control a servo
Servo myservo3; // create servo object to control a servo
Servo myservo4; // create servo object to control a servo

int potpin1 = 0; // analog pin used to connect the potentiometer
int potpin2 = A1; // analog pin used to connect the potentiometer
int potpin3 = A2; // analog pin used to connect the potentiometer
int potpin4 = A3; // analog pin used to connect the potentiometer


int val1 = 0; // variable to read the value from the analog pin
int val1avg = 0; // variable to read the value from the analog pin
int val1RevertTo; // variable that keeps value of potentiameter
int val2 = 0; // variable to read the value from the analog pin
int val2avg = 0; // variable to read the value from the analog pin
int val2RevertTo; // variable that keeps value of potentiameter
int val3 = 0; // variable to read the value from the analog pin
int val3avg = 0; // variable to read the value from the analog pin
int val3RevertTo ; // variable that keeps value of potentiameter
int val4 = 0; // variable to read the value from the analog pin
int val4avg = 0; // variable to read the value from the analog pin
int val4RevertTo; // variable that keeps value of potentiameter
int timeslooped = 0; // variable to read the value from the analog pin

// For ultrasonic
const int trigPin = 6;
const int echoPin = 5;
// defines variables
long duration;
int distance;

int mode = 1; //Mode of either manual, autonomous, or bluetooth
int setposition = 0; // variable that allows arm to fully get to starting spot in mode 2
int rotatingPosition = 1; // part of rotating function in mode 2
bool clockwise = true; // part of rotating function in mode 2
bool foundObject = false; // part of search function in mode 2
int endposition = 0; // part of rotating function in mode 2


#include <SoftwareSerial.h> // Allows communication with Bluetooth

SoftwareSerial mySerial(0, 1); // RX, TX
int data = ""; // variable for ncoming data
int miniData = 0;
int miniData2 = 0;// variables for data in gyroscope mode
int blueServo1 = 90; // variables for orientation of servos while in bluetooth mode
int blueServo2 = 90;
int blueServo3 = 45;
int blueServo4 = 90; // variables for orientation of servos while in bluetooth mode
int dataTenNum = 0;

void setup() {
myservo1.attach(9); // attaches the servo1 on pin 9 to the servo object
myservo2.attach(10); // attaches the servo2 on pin 10 to the servo object
myservo3.attach(11); // attaches the servo3 on pin 11 to the servo object
myservo4.attach(3); // attaches the servo4 on pin 4 to the servo object

pinMode(2, INPUT); // attach button reader
pinMode(8, OUTPUT); // attach mode indicator LED

pinMode(trigPin, OUTPUT); // Sets the trigPin as an Output
pinMode(echoPin, INPUT); // Sets the echoPin as an Input


// Open serial communications and wait for port to open:
Serial.begin(57600);
pinMode(8, OUTPUT);
while (!Serial) {
; // wait for serial port to connect. Needed for native USB port only
}


Serial.println("Initiated");

// set the data rate for the SoftwareSerial port
mySerial.begin(9600);
mySerial.println("Hello, world?");
}


void loop() {

checkForButton(); // function that checks if the button is pressed and if it is, changes modes
if (mode == 3)
{
myservo1.write(blueServo1);
myservo2.write(blueServo2);
myservo3.write(blueServo3);
myservo4.write(blueServo4); // start servos at certain position
if (mySerial.available() and data != 11) // if recieve data and not in gyroscope mode
{
data = mySerial.read(); // define data as the num recieved from BT
Serial.write(data);
Serial.print(data);
delay(100);


}

while (data == 11) //When data is 11, and stay in function until it is not
{

miniData = mySerial.read(); // new variable is for the data recieved while in 11


if (miniData > 80 and miniData < 120) // input sent from BLUETOOTH for x axis
{
myservo1.write(map(miniData, 90, 110, 180, 0)); // scale it and move base servo
}
if ((miniData) > 180 and miniData < 220)
{

myservo4.write(map(miniData, 190, 210, 60, 180));
myservo2.write(map(miniData, 190, 210, 60, 180)); // move arm up and forwards
}
if ((miniData) == 13)
{

myservo3.write(90); // open arm
}
if ((miniData) == 14)
{

myservo3.write(0); // close arm
}
if ((miniData) == 15)
{
data = 30;
return();// leave gyroscope mode
}
}
if (data == 10) // search and stop function
{

if (( abs(blueServo1 - 1)) > 3 or ( abs(blueServo4 - 108)) > 3 or ( abs(blueServo2 - 60)) > 3)
{ // this variable ensures that all arms are in correct possition before starting to search
goGraduallyTowards(&blueServo1, 1); // function that gradually increments a value to another value
goGraduallyTowards(&blueServo4, 108);
goGraduallyTowards(&blueServo3, 90);
goGraduallyTowards(&blueServo2, 60);
myservo1.write(blueServo1); // sets the servo position according to the scaled value
myservo2.write(blueServo2);
myservo3.write(blueServo3);
myservo4.write(blueServo4);
Serial.println("STILL SETTING");
foundObject = false;
dataTenNum++;
}
else if (foundObject == false and dataTenNum > 10) // if position is in start, and object is not yet found
{

goAround(); // function that sweeps arm across and searches for object in proximity
Serial.print("GOING AROUND");
}
else if ( foundObject == true and dataTenNum > 10) // if position is in start, and object is not yet found
{

setposition = 0;
foundObject = false;
blueServo1 = rotatingPosition;
blueServo2 = 60;
blueServo3 = 90;
blueServo4 = 108;
data = 30;
rotatingPosition = 0; // reset all variables and make it leave function
}
}

else if (data == 1 ) // brings the arm to position of the potentiameters and then back to mode 1
{
while (( abs(blueServo2 - val2RevertTo)) > 3 and ( abs(blueServo1 - val1RevertTo)) > 3)
{
goGraduallyTowards(&blueServo1, val1RevertTo);
goGraduallyTowards(&blueServo2, val2RevertTo);
goGraduallyTowards(&blueServo3, val3RevertTo);
goGraduallyTowards(&blueServo4, val4RevertTo);
myservo1.write(blueServo1); // sets the servo position according to the scaled value
myservo2.write(blueServo2);
myservo3.write(blueServo3);
myservo4.write(blueServo4);
delay(10);
}
mode = 1;
}
else if (data == 2 ) // enter mode 2
{

while (( abs(blueServo2 - val2RevertTo)) > 3 and ( abs(blueServo1 - val1RevertTo)) > 3)
{
goGraduallyTowards(&blueServo1, val1RevertTo);
goGraduallyTowards(&blueServo2, val2RevertTo);
goGraduallyTowards(&blueServo3, val3RevertTo);
goGraduallyTowards(&blueServo4, val4RevertTo);
myservo1.write(blueServo1); // sets the servo position according to the scaled value
myservo2.write(blueServo2);
myservo3.write(blueServo3);
myservo4.write(blueServo4);
delay(50);
}

mode = 2;


}
else if (data == 3 and blueServo1 < 180 ) // base right
{
blueServo1 = blueServo1 + 1;
delay(20);

}
else if (data == 4 and blueServo1 > 0) //base left
{
blueServo1 = blueServo1 - 1;
delay(20);

}
else if (data == 9 and blueServo2 < 180 ) // arm up
{
blueServo2 = blueServo2 + 1;
delay(20);

}
else if (data == 0 and blueServo2 > 60) //arm down
{

blueServo2 = blueServo2 - 1;
delay(20);
}
else if (data == 7 and blueServo3 < 90 ) //claw open
{

blueServo3 = blueServo3 + 1;
delay(20);

}
else if (data == 8 and blueServo3 > 0) // claw close
{

blueServo3 = blueServo3 - 1;
delay(20);
}
else if (data == 5 and blueServo4 < 180) //claw forward
{

blueServo4 = blueServo4 + 1;
delay(20);

}
else if (data == 6 and blueServo4 > 60) //claw back
{

blueServo4 = blueServo4 - 1;
delay(20);
}

}

if (mode == 1) // if in manual mode
{
if (mySerial.available()) { //if data is recieved while in mode 1

while (( abs(blueServo2 - val2RevertTo)) > 3 and ( abs(blueServo1 - val1RevertTo)) > 3)
{
goGraduallyTowards(&val1avg, 90);
goGraduallyTowards(&val2avg, 90);
goGraduallyTowards(&val3avg, 45);
goGraduallyTowards(&val4avg, 90);
myservo1.write(val1avg); // go to starting position of BT mode
myservo2.write(val2avg);
myservo3.write(val3avg);
myservo4.write(val4avg);
val1RevertTo = val1avg;
val2RevertTo = val2avg;
val4RevertTo = val3avg;
val4RevertTo = val4avg;
delay(20);
}


mode = 3;
blueServo1 = 90;
blueServo2 = 90;
blueServo3 = 45;
blueServo4 = 90;
}
//NOW REGULAR MANUAL CODE
timeslooped = timeslooped + 1;
val1 = val1 + analogRead(potpin1); // reads the value of the potentiometer (value between 0 and 1023) and makes the value, the sum of seven
val2 = val2 + analogRead(potpin2); // this is to make it jitter less because it is an average
val3 = val3 + analogRead(potpin3);
val4 = val4 + analogRead(potpin4);

if (timeslooped >= 7) //if seven values have been added
{
val1avg = val1 / 7; // take an average
val2avg = val2 / 7;
val3avg = val3 / 7;
val4avg = val4 / 7;

val1avg = map(val1avg, 0, 1023, 0, 180); // scale it to use it with the servo (value between 0 and 180), using the average value
val2avg = map(val2avg, 0, 1023, 60, 180);
val3avg = map(val3avg, 2, 1023, 0, 90);
val4avg = map(val4avg, 0, 1023, 60, 180);


val1RevertTo = val1avg;
val2RevertTo = val2avg;
val3RevertTo = val3avg;
val4RevertTo = val4avg;

myservo1.write(val1avg); // sets the servo position according to the scaled value
myservo2.write(val2avg);
myservo3.write(val3avg);
myservo4.write(val4avg);
//
timeslooped = 0; // reset loop
val1 = 0;
val2 = 0;
val3 = 0;
val4 = 0;
}
}
else if ( mode == 2)
{

if (setposition < 200) { // this variable ensures that all arms are in correct possition before starting to search
goGraduallyTowards(&val1avg, 1); // function that gradually increments a value to another value
goGraduallyTowards(&val4avg, 108);
goGraduallyTowards(&val3avg, 90);
goGraduallyTowards(&val2avg, 60);
myservo1.write(val1avg); // sets the servo position according to the scaled value
myservo2.write(val2avg);
myservo3.write(val3avg);
myservo4.write(val4avg);
Serial.println("STILL SETTING");
}
else if (setposition >= 200 and foundObject == false) // if position is in start, and object is not yet found
{

goAround(); // function that sweeps arm across and searches for object in proximity

}

else if (setposition >= 200 and foundObject == true)
{

while (distance > 4 and distance < 20) // if object is found, make the arm go forward(and up to stay at level) until 3 cm away from object
{
Ultrasonic();
val2avg = val2avg + 4;
val4avg = val4avg + 3;
// val4avg=val4avg+5;
delay(200);
myservo2.write(val2avg);
myservo4.write(val4avg);
Serial.println(distance);
}
while ((distance <= 4) or (distance > 20)) // once within 3 (or the reading reads incorrect value because it is too close) close arms
{
if (val3avg > 0) {
val3avg--;
delay(30);
myservo3.write(val3avg);
}

else if (val3avg < 70) //and (abs(val4avg-130)>5) and (abs(val2avg-90)>5) // once arms are closed, move object back and up
{
if (endposition < 50)
{
val1 = analogRead(potpin1); // reads the value of the potentiometer (value between 0 and 1023) and makes the value, the sum of seven
val2 = analogRead(potpin2); // this is to make it jitter less because it is an average
val3 = analogRead(potpin3);
val4 = analogRead(potpin4);

val1 = map(val1, 0, 1023, 0, 180); // scale it to use it with the servo (value between 0 and 180), using the average value
val2 = map(val2, 0, 1023, 60, 180);
val3 = map(val3, 2, 1023, 0, 90);
val4 = map(val4, 0, 1023, 60, 180);
goGraduallyTowards(&val1avg, val1);
goGraduallyTowards(&val2avg, val2);
goGraduallyTowards(&val3avg, val3);
goGraduallyTowards(&val4avg, val4);
myservo4.write(val4avg); //
myservo2.write(val2avg); //
myservo1.write(val1avg); //
myservo3.write(val3avg); //
endposition = endposition + 1;
Serial.println("STILL HERE");
Serial.println(endposition);
}
else if (endposition >= 50)
{
setposition = 0; // go back to mode one and reset variables
rotatingPosition = 1;
clockwise = true;
foundObject = false;
mode = 1;
endposition = 0;
Serial.println("YES");
Serial.println("MODE");
Serial.println(mode);
return (mode);

}
}
}


}

}

}

int goGraduallyTowards(int *x, int y)
{
Serial.println("GRADUAL");
if ( (abs(*x - y)) < 3)
{
setposition = setposition + 1;

//
}
else if ( *x < y)
{
*x = *x + 1;
Serial.println("value x up");
Serial.println(*x);
//delay(500);
}
else if ( *x > y)
{
*x = *x - 1;
Serial.println(*x);
Serial.println("value x down");
// delay(500);
}

//return x;

}
//PROBLEM- – DOESNT RESET NUMBER OF INT X
//MODEL LIKE OTHER ONE


int goAround()
{

while (( rotatingPosition < 180 ) and (clockwise == true) )
{
Ultrasonic();
rotatingPosition = rotatingPosition + 3;
delay(200);
Serial.println( distance);
myservo1.write(rotatingPosition);

if (distance < 20)
{
foundObject = true;
return (distance);

}


}
while (( rotatingPosition >= 180) and (clockwise == true))
{
clockwise = false;
rotatingPosition = 178;
myservo1.write(rotatingPosition);

return (rotatingPosition);

}
while (( rotatingPosition > 1) and (clockwise == false))
{
rotatingPosition = rotatingPosition - 3;
delay(30);
Serial.println( rotatingPosition);

myservo1.write(rotatingPosition);


}

while (( rotatingPosition <= 1) and (clockwise == false))
{
rotatingPosition = 1;
clockwise = true;
myservo1.write(rotatingPosition);
return (rotatingPosition);

}

}
int Ultrasonic()
{
digitalWrite(trigPin, LOW);
delayMicroseconds(2);
// Sets the trigPin on HIGH state for 10 micro seconds
digitalWrite(trigPin, HIGH);
delayMicroseconds(10);
digitalWrite(trigPin, LOW);
// Reads the echoPin, returns the sound wave travel time in microseconds
duration = pulseIn(echoPin, HIGH);
// Calculating the distance
distance = duration * 0.034 / 2;
Serial.println(distance);
}

int checkForButton()
{


if (digitalRead(2) == true) // IF SWITCH IS PRESSED
{
delay(500);

if (mode == 1)
{
mode = 2;
val1RevertTo = val1avg;
val2RevertTo = val2avg;
val3RevertTo = val3avg;
val4RevertTo = val4avg;
Serial.println("MAKING ");
}
else if (mode == 2) /// if the mode is one, make it two. If two, make one
{

mode = 1;
goGraduallyTowards(&val1avg, val1RevertTo);
goGraduallyTowards(&val2avg, val2RevertTo);
goGraduallyTowards(&val3avg, val3RevertTo);
goGraduallyTowards(&val4avg, val4RevertTo);
myservo1.write(val1avg); // sets the servo position according to the scaled value
myservo2.write(val2avg);
myservo3.write(val3avg);
myservo4.write(val4avg);
Serial.println("MOVING BACK");

}
}
if (digitalRead(2) == true) // IF SWITCH IS PRESSED
{
delay(500);
// Serial.println("READ"); //print read
if (mode == 1)
{
mode = 2;
val1RevertTo = val1avg;
val2RevertTo = val2avg;
val3RevertTo = val3avg;
val4RevertTo = val4avg;
}
else if (mode == 2 and (abs(val1avg - val1RevertTo) < 5) ) /// if the mode is one, make it two. If two, make one
{
mode = 1;
goGraduallyTowards(&val1avg, val1RevertTo);
goGraduallyTowards(&val2avg, val2RevertTo);
goGraduallyTowards(&val3avg, val3RevertTo);
goGraduallyTowards(&val4avg, val4RevertTo);
myservo1.write(val1avg); // sets the servo position according to the scaled value
myservo2.write(val2avg);
myservo3.write(val3avg);
myservo4.write(val4avg);

}
}

if (mode == 2)
{
digitalWrite(8, true); // IF mode Two, turn on light
}
else if (mode == 1)
{
digitalWrite(8, false);
setposition = 0;
}// waits for the servo to get there
}
3rd Milestone: Connect Arm With Bluetooth Controlled App
For my 3rd milestone, I created an app through MIT App Inventor which controls the arm using a Bluetooth module. MIT App Inventor has two aspects of it: design and code. In the design phase of the app, I made a display which shows 10 buttons, and a drop down, Bluetooth options, display. Once completing the design and making it look neat, I moved on to the coding aspect. MIT App Inventor allows its users to chose from an array of options, and use pre-defined code to carry out functions. In order to code my app to work effectively, I programmed the drop down list to have the elements of all available Bluetooth addresses, and for the Bluetooth of the device to connect to the selected address. Next, I programmed the buttons to when initially pressed down, send a one byte number through the Bluetooth module to the arduino, and then another one once it is release. On the arduino end, I added code so that when the arm is in mode 1 (manual mode) and the arduino receives any data, the device enters mode 3. In mode three, the arduino reads the numbers it receives and carries out certain commands based on the number it receives. I also added buttons which bring it back to mode 1, or into mode 2 (autonomous mode).

Design Mode

Code Mode

#include <Servo.h>

Servo myservo1; // create servo object to control a servo
Servo myservo2; // create servo object to control a servo
Servo myservo3; // create servo object to control a servo
Servo myservo4; // create servo object to control a servo

int potpin1 = 0; // analog pin used to connect the potentiometer
int potpin2= A1; // analog pin used to connect the potentiometer
int potpin3= A2; // analog pin used to connect the potentiometer
int potpin4= A3;// analog pin used to connect the potentiometer


int val1=0; // variable to read the value from the analog pin
int val1avg=0; // variable to read the value from the analog pin
int val1RevertTo; // variable that keeps value of potentiameter
int val2=0; // variable to read the value from the analog pin
int val2avg=0; // variable to read the value from the analog pin
int val2RevertTo; // variable that keeps value of potentiameter
int val3=0; // variable to read the value from the analog pin
int val3avg=0; // variable to read the value from the analog pin
int val3RevertTo ; // variable that keeps value of potentiameter
int val4=0; // variable to read the value from the analog pin
int val4avg=0;// variable to read the value from the analog pin
int val4RevertTo; // variable that keeps value of potentiameter
int timeslooped = 0; // variable to read the value from the analog pin

// For ultrasonic
const int trigPin = 13;
const int echoPin = 12;
// defines variables
long duration;
int distance;

int mode = 1; //Mode of either manual or autonomous
int setposition = 0;
int rotatingPosition = 1;
bool clockwise= true;
bool foundObject= false;
int endposition=0;


#include <SoftwareSerial.h>

SoftwareSerial mySerial(0, 1); // RX, TX
int data= "";
int blueServo1=90;
int blueServo2=90;
int blueServo3=45;
int blueServo4=90;


void setup() {
myservo1.attach(9); // attaches the servo1 on pin 9 to the servo object
myservo2.attach(10); // attaches the servo2 on pin 10 to the servo object
myservo3.attach(11); // attaches the servo3 on pin 11 to the servo object
myservo4.attach(3); // attaches the servo4 on pin 4 to the servo object

pinMode(2,INPUT); // attach button reader
pinMode(8, OUTPUT); // attach mode indicator LED

pinMode(trigPin, OUTPUT); // Sets the trigPin as an Output
pinMode(echoPin, INPUT); // Sets the echoPin as an Input


// Open serial communications and wait for port to open:
Serial.begin(57600);
pinMode(8,OUTPUT);
while (!Serial) {
; // wait for serial port to connect. Needed for native USB port only
}


Serial.println("Goodnight moon!");

// set the data rate for the SoftwareSerial port
mySerial.begin(9600);
mySerial.println("Hello, world?");
}


void loop() {

checkForButton(); // function that checks if the button is pressed and if it is, changes modes
if (mode == 3)
{
myservo1.write(blueServo1);
myservo2.write(blueServo2);
myservo3.write(blueServo3);
myservo4.write(blueServo4);
if (mySerial.available()) {
data= mySerial.read();
// Serial.write(data);
Serial.print(data);
delay(100);
// sets the servo position according to the scaled value

}
if (data == 1 )
{
while (( abs(blueServo2 - val2RevertTo))>3 and ( abs(blueServo1 - val1RevertTo))>3)
{
goGraduallyTowards(&blueServo1,val1RevertTo);
goGraduallyTowards(&blueServo2,val2RevertTo);
goGraduallyTowards(&blueServo3, val3RevertTo);
goGraduallyTowards(&blueServo4,val4RevertTo);
myservo1.write(blueServo1); // sets the servo position according to the scaled value
myservo2.write(blueServo2);
myservo3.write(blueServo3);
myservo4.write(blueServo4);
delay(10);
}
mode=1;
}
if (data == 2 )
{
while (( abs(blueServo2 - val2RevertTo))>3 and ( abs(blueServo1 - val1RevertTo))>3)
{
goGraduallyTowards(&blueServo1,val1RevertTo);
goGraduallyTowards(&blueServo2,val2RevertTo);
goGraduallyTowards(&blueServo3, val3RevertTo);
goGraduallyTowards(&blueServo4,val4RevertTo);
myservo1.write(blueServo1); // sets the servo position according to the scaled value
myservo2.write(blueServo2);
myservo3.write(blueServo3);
myservo4.write(blueServo4);
delay(10);
}
mode=2;


}
if (data == 3 and blueServo1 < 180 )
{
blueServo1=blueServo1+1;
delay(20);


}
if (data == 4 and blueServo1 >0)
{
blueServo1=blueServo1-1;
delay(20);
}
if (data == 5 and blueServo2 < 180 )
{
blueServo2=blueServo2+1;
delay(20);

}
if (data == 6 and blueServo2 >60)
{

blueServo2=blueServo2-1;
delay(20);
}
if (data == 7 and blueServo3 <90 )
{

blueServo3=blueServo3+1;
delay(20);

}
if (data == 8 and blueServo3 >0)
{

blueServo3=blueServo3-1;
delay(20);
}
if (data == 9 and blueServo4 <180)
{

blueServo4=blueServo4+1;
delay(20);

}
if (data == 0 and blueServo4 >60)
{

blueServo4=blueServo4-1;
delay(20);
}

}

if (mode == 1) // if in manual mode
{
if (mySerial.available()) {
mode=3;
}
timeslooped=timeslooped + 1;
val1 = val1+analogRead(potpin1); // reads the value of the potentiometer (value between 0 and 1023) and makes the value, the sum of seven
val2 = val2+analogRead(potpin2); // this is to make it jitter less because it is an average
val3 = val3+analogRead(potpin3);
val4= val4+analogRead(potpin4);

if (timeslooped>=7) //if seven values have been added
{
val1avg= val1/7; // take an average
val2avg=val2/7;
val3avg=val3/7;
val4avg=val4/7;


val1avg = map(val1avg, 0, 1023, 0, 180); // scale it to use it with the servo (value between 0 and 180), using the average value
val2avg= map(val2avg,0,1023,60,180);
val3avg= map(val3avg,2,1023,0,90);
val4avg= map(val4avg,0,1023,60,180);


val1RevertTo= val1avg;
val2RevertTo= val2avg;
val3RevertTo= val3avg;
val4RevertTo= val4avg;

myservo1.write(val1avg); // sets the servo position according to the scaled value
myservo2.write(val2avg);
myservo3.write(val3avg);
myservo4.write(val4avg);
//
timeslooped=0; // reset loop
val1=0;
val2=0;
val3=0;
val4=0;
}
}
else if( mode == 2)
{

if (setposition<200) { // this variable ensures that all arms are in correct possition before starting to search
goGraduallyTowards(&val1avg,1); // function that gradually increments a value to another value
goGraduallyTowards(&val2avg,108);
goGraduallyTowards(&val3avg, 90);
goGraduallyTowards(&val4avg,60);
myservo1.write(val1avg); // sets the servo position according to the scaled value
myservo2.write(val2avg);
myservo3.write(val3avg);
myservo4.write(val4avg);
Serial.println("STILL SETTING");
}
else if (setposition >= 200 and foundObject==false) // if position is in start, and object is not yet found
{

goAround(); // function that sweeps arm across and searches for object in proximity

}

else if (setposition >= 200 and foundObject==true)
{

while (distance >4 and distance < 20) // if object is found, make the arm go forward(and up to stay at level) until 3 cm away from object
{
Ultrasonic();
val4avg=val4avg+4;
val2avg=val2avg+3;
// val4avg=val4avg+5;
delay(200);
myservo2.write(val2avg);
myservo4.write(val4avg);
Serial.println(distance);
}
while ((distance <=4) or (distance > 20)) // once within 3 (or the reading reads incorrect value because it is too close) close arms
{
if (val3avg>0){
val3avg--;
delay(30);
myservo3.write(val3avg);
}

else if (val3avg<70) //and (abs(val4avg-130)>5) and (abs(val2avg-90)>5) // once arms are closed, move object back and up
{
if (endposition<50)
{
val1 = analogRead(potpin1); // reads the value of the potentiometer (value between 0 and 1023) and makes the value, the sum of seven
val2 = analogRead(potpin2); // this is to make it jitter less because it is an average
val3 = analogRead(potpin3);
val4= analogRead(potpin4);

val1 = map(val1, 0, 1023, 0, 180); // scale it to use it with the servo (value between 0 and 180), using the average value
val2= map(val2,0,1023,60,180);
val3= map(val3,2,1023,0,90);
val4= map(val4,0,1023,60,180);
goGraduallyTowards(&val1avg, val1);
goGraduallyTowards(&val2avg, val2);
goGraduallyTowards(&val3avg, val3);
goGraduallyTowards(&val4avg, val4);
myservo4.write(val4avg); //
myservo2.write(val2avg); //
myservo1.write(val1avg); //
myservo3.write(val3avg); //
endposition=endposition+1;
Serial.println("STILL HERE");
Serial.println(endposition);
}
else if (endposition >= 50)
{
setposition = 0; // go back to mode one and reset variables
rotatingPosition = 1;
clockwise= true;
foundObject= false;
mode=1;
endposition=0;
Serial.println("YES");
Serial.println("MODE");
Serial.println(mode);
return(mode);

}
}
}


}


}

}

int goGraduallyTowards(int *x, int y)
{
Serial.println("GRADUAL");
if ( (abs(*x-y))<3)
{
setposition=setposition+1;

//
}
else if ( *x < y)
{
*x=*x+1;
Serial.println("value x up");
Serial.println(*x);
//delay(500);
}
else if ( *x > y)
{
*x=*x-1;
Serial.println(*x);
Serial.println("value x down");
// delay(500);
}

//return x;

}
//PROBLEM- – DOESNT RESET NUMBER OF INT X
//MODEL LIKE OTHER ONE


int goAround()
{

while (( rotatingPosition <180 ) and (clockwise == true) )
{
Ultrasonic();
rotatingPosition=rotatingPosition+3;
delay(200);
Serial.println( distance);
myservo1.write(rotatingPosition);

if (distance < 20)
{
foundObject=true;
return(distance);

}


}
while (( rotatingPosition>=180) and (clockwise ==true))
{
clockwise = false;
rotatingPosition=178;
myservo1.write(rotatingPosition);

return(rotatingPosition);

}
while (( rotatingPosition>1) and (clockwise==false))
{
rotatingPosition= rotatingPosition-3;
delay(30);
Serial.println( rotatingPosition);

myservo1.write(rotatingPosition);


}

while (( rotatingPosition<=1)and (clockwise==false))
{
rotatingPosition=1;
clockwise=true;
myservo1.write(rotatingPosition);
return(rotatingPosition);

}

}
int Ultrasonic()
{
digitalWrite(trigPin, LOW);
delayMicroseconds(2);
// Sets the trigPin on HIGH state for 10 micro seconds
digitalWrite(trigPin, HIGH);
delayMicroseconds(10);
digitalWrite(trigPin, LOW);
// Reads the echoPin, returns the sound wave travel time in microseconds
duration = pulseIn(echoPin, HIGH);
// Calculating the distance
distance= duration*0.034/2;
Serial.println(distance);
}

int checkForButton()
{


if (digitalRead(2)== true) // IF SWITCH IS PRESSED
{
delay(500);

if (mode==1)
{
mode=2;
val1RevertTo= val1avg;
val2RevertTo= val2avg;
val3RevertTo= val3avg;
val4RevertTo= val4avg;
Serial.println("MAKING ");
}
else if (mode==2) /// if the mode is one, make it two. If two, make one
{

mode=1;
goGraduallyTowards(&val1avg,val1RevertTo);
goGraduallyTowards(&val2avg,val2RevertTo);
goGraduallyTowards(&val3avg, val3RevertTo);
goGraduallyTowards(&val4avg,val4RevertTo);
myservo1.write(val1avg); // sets the servo position according to the scaled value
myservo2.write(val2avg);
myservo3.write(val3avg);
myservo4.write(val4avg);
Serial.println("MOVING BACK");

}
}
if (digitalRead(2)== true) // IF SWITCH IS PRESSED
{
delay(500);
// Serial.println("READ"); //print read
if (mode==1)
{
mode=2;
val1RevertTo= val1avg;
val2RevertTo= val2avg;
val3RevertTo= val3avg;
val4RevertTo= val4avg;
}
else if (mode==2 and (abs(val1avg-val1RevertTo)<5) ) /// if the mode is one, make it two. If two, make one
{
mode=1;
goGraduallyTowards(&val1avg,val1RevertTo);
goGraduallyTowards(&val2avg,val2RevertTo);
goGraduallyTowards(&val3avg, val3RevertTo);
goGraduallyTowards(&val4avg,val4RevertTo);
myservo1.write(val1avg); // sets the servo position according to the scaled value
myservo2.write(val2avg);
myservo3.write(val3avg);
myservo4.write(val4avg);

}
}

if (mode==2)
{
digitalWrite(8,true); // IF mode Two, turn on light
}
else if (mode==1)
{
digitalWrite(8,false);
setposition=0;
}// waits for the servo to get there
}
2nd Milestone: Code Arm To Work Autonomously
For my second milestone, I added an autonomous function to my 4 joint arm. In order to do this, I used an ultra-sonic sensor and mounted it on the top of the arm. When a user clicks the “change mode” button, the arm moves to a position where it is close to the ground, parallel to it, and at “3 O’ Clock”. In order to make this happen, I coded a function which gradually increments a value until it reaches the goal value. Once the arm reaches its starting position, the arm then rotates counter-clockwise, while the ultra-sonic sensor searches for an object within 20 cm. If the sensor detects an object. Ultra-sonic sensor has two “eyes,” one for sending waves and one for receiving them. The Arduino communicates to one of the eyes to send waves at a very high rate, and when a wave bounces off of an object and returns to the second eye, a pulse is given back to the arduino. The arduino measures the amount of time it took for the wave to come back, and determines a distance based on that. If the sensor detects an object, the forward and up motors are incremented forward, until the distance measured is less than 4 cm. At that point, the next sequence begins and the claws close, and then the object is lifted into the air. One set back I had when coding this process was in the “gradual move” function. This function takes in two parameters and increments the first value until it reaches the second. Several times, the value I wanted to increment was a global variable, which cannot be changed when it is a parameter of a function. In order to solve this, I learned about pointers. I learned how to reference a space in memory, and change its content. This will help me with engineering projects in the future.

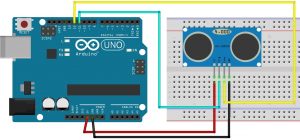
Ultra-sonic sensor
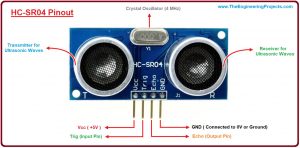
Ultra-sonic sensor attached to arduino
#include <Servo.h>

Servo myservo1; // create servo object to control a servo
Servo myservo2; // create servo object to control a servo
Servo myservo3; // create servo object to control a servo
Servo myservo4; // create servo object to control a servo

int potpin1 = 0; // analog pin used to connect the potentiometer
int potpin2= A1; // analog pin used to connect the potentiometer
int potpin3= A2; // analog pin used to connect the potentiometer
int potpin4= A3;// analog pin used to connect the potentiometer

int val1=0; // variable to read the value from the analog pin
int val1avg=0; // variable to read the value from the analog pin
int val1RevertTo; // variable that keeps value of potentiameter
int val2=0; // variable to read the value from the analog pin
int val2avg=0; // variable to read the value from the analog pin
int val2RevertTo; // variable that keeps value of potentiameter
int val3=0; // variable to read the value from the analog pin
int val3avg=0; // variable to read the value from the analog pin
int val3RevertTo ; // variable that keeps value of potentiameter
int val4=0; // variable to read the value from the analog pin
int val4avg=0;// variable to read the value from the analog pin
int val4RevertTo; // variable that keeps value of potentiameter
int timeslooped = 0; // variable to read the value from the analog pin

// For ultrasonic
const int trigPin = 13;
const int echoPin = 12;
// defines variables
long duration;
int distance;

int mode = 1; //Mode of either manual or autonomous
int setposition = 0;
int rotatingPosition = 1;
bool clockwise= true;
bool foundObject= false;
int endposition;

void setup() {
myservo1.attach(9); // attaches the servo1 on pin 9 to the servo object
myservo2.attach(10); // attaches the servo2 on pin 10 to the servo object
myservo3.attach(11); // attaches the servo3 on pin 11 to the servo object
myservo4.attach(3); // attaches the servo4 on pin 4 to the servo object

pinMode(2,INPUT); // attach button reader
pinMode(8, OUTPUT); // attach mode indicator LED

pinMode(trigPin, OUTPUT); // Sets the trigPin as an Output
pinMode(echoPin, INPUT); // Sets the echoPin as an Input
Serial.begin(9600);
}

void loop() {

checkForButton(); // function that checks if the button is pressed and if it is, changes modes

if (mode == 1) // if in manual mode
{

timeslooped=timeslooped + 1;
val1 = val1+analogRead(potpin1); // reads the value of the potentiometer (value between 0 and 1023) and makes the value, the sum of seven
val2 = val2+analogRead(potpin2); // this is to make it jitter less because it is an average
val3 = val3+analogRead(potpin3);
val4= val4+analogRead(potpin4);

if (timeslooped>=7) //if seven values have been added
{
val1avg= val1/7; // take an average
val2avg=val2/7;
val3avg=val3/7;
val4avg=val4/7;

val1avg = map(val1avg, 0, 1023, 0, 180); // scale it to use it with the servo (value between 0 and 180), using the average value
val2avg= map(val2avg,0,1023,60,180);
val3avg= map(val3avg,2,1023,0,90);
val4avg= map(val4avg,0,1023,60,180);

val1RevertTo= val1avg;
val2RevertTo= val2avg;
val3RevertTo= val3avg;
val4RevertTo= val4avg;

myservo1.write(val1avg); // sets the servo position according to the scaled value
myservo2.write(val2avg);
myservo3.write(val3avg);
myservo4.write(val4avg);
//
timeslooped=0; // reset loop
val1=0;
val2=0;
val3=0;
val4=0;
}
}
else if( mode == 2)
{

if (setposition<200) { // this variable ensures that all arms are in correct possition before starting to search
goGraduallyTowards(&val1avg,1); // function that gradually increments a value to another value
goGraduallyTowards(&val2avg,108);
goGraduallyTowards(&val3avg, 90);
goGraduallyTowards(&val4avg,60);
myservo1.write(val1avg); // sets the servo position according to the scaled value
myservo2.write(val2avg);
myservo3.write(val3avg);
myservo4.write(val4avg);
Serial.println("STILL SETTING");
}
else if (setposition >= 200 and foundObject==false) // if position is in start, and object is not yet found
{

goAround(); // function that sweeps arm across and searches for object in proximity

}

else if (setposition >= 200 and foundObject==true)
{

while (distance >4 and distance < 20) // if object is found, make the arm go forward(and up to stay at level) until 3 cm away from object
{
Ultrasonic();
val4avg=val4avg+4;
val2avg=val2avg+3;
// val4avg=val4avg+5;
delay(200);
myservo2.write(val2avg);
myservo4.write(val4avg);
Serial.println(distance);
}
while ((distance <=4) or (distance > 20)) // once within 3 (or the reading reads incorrect value because it is too close) close arms
{
if (val3avg>0){
val3avg--;
delay(30);
myservo3.write(val3avg);
}
else if (val3avg<70) //and (abs(val4avg-130)>5) and (abs(val2avg-90)>5)) // once arms are closed, move object back and up
{

goGraduallyTowards(&val4avg, 130);
goGraduallyTowards(&val2avg, 90);
myservo4.write(val4avg); //
myservo2.write(val2avg); //

if (digitalRead(2)== true) // IF SWITCH IS PRESSED
{
setposition = 0; // go back to mode one and reset variables
rotatingPosition = 1;
clockwise= true;
foundObject= false;
mode=1;

}
}

}

}

}

}

int goGraduallyTowards(int *x, int y)
{
Serial.println("GRADUAL");
if ( (abs(*x-y))<3)
{
setposition=setposition+1;
endposition= 1;
//
}
else if ( *x < y)
{
*x=*x+1;
Serial.println("value x up");
Serial.println(*x);
//delay(500);
}
else if ( *x > y)
{
*x=*x-1;
Serial.println(*x);
Serial.println("value x down");
// delay(500);
}

//return x;

}
//PROBLEM- – DOESNT RESET NUMBER OF INT X
//MODEL LIKE OTHER ONE

int goAround()
{

while (( rotatingPosition <180 ) and (clockwise == true) )
{
Ultrasonic();
rotatingPosition=rotatingPosition+3;
delay(200);
Serial.println( distance);
myservo1.write(rotatingPosition);

if (distance < 20)
{
foundObject=true;
return(distance);

}

}
while (( rotatingPosition>=180) and (clockwise ==true))
{
clockwise = false;
rotatingPosition=178;
myservo1.write(rotatingPosition);

return(rotatingPosition);

}
while (( rotatingPosition>1) and (clockwise==false))
{
rotatingPosition= rotatingPosition-3;
delay(30);
Serial.println( rotatingPosition);

myservo1.write(rotatingPosition);

}

while (( rotatingPosition<=1)and (clockwise==false))
{
rotatingPosition=1;
clockwise=true;
myservo1.write(rotatingPosition);
return(rotatingPosition);

}

}
int Ultrasonic()
{
digitalWrite(trigPin, LOW);
delayMicroseconds(2);
// Sets the trigPin on HIGH state for 10 micro seconds
digitalWrite(trigPin, HIGH);
delayMicroseconds(10);
digitalWrite(trigPin, LOW);
// Reads the echoPin, returns the sound wave travel time in microseconds
duration = pulseIn(echoPin, HIGH);
// Calculating the distance
distance= duration*0.034/2;
Serial.println(distance);
}

int checkForButton()
{

if (digitalRead(2)== true) // IF SWITCH IS PRESSED
{
delay(500);

if (mode==1)
{
mode=2;
val1RevertTo= val1avg;
val2RevertTo= val2avg;
val3RevertTo= val3avg;
val4RevertTo= val4avg;
Serial.println("MAKING ");
}
else if (mode==2) /// if the mode is one, make it two. If two, make one
{

mode=1;
goGraduallyTowards(&val1avg,val1RevertTo);
goGraduallyTowards(&val2avg,val2RevertTo);
goGraduallyTowards(&val3avg, val3RevertTo);
goGraduallyTowards(&val4avg,val4RevertTo);
myservo1.write(val1avg); // sets the servo position according to the scaled value
myservo2.write(val2avg);
myservo3.write(val3avg);
myservo4.write(val4avg);
Serial.println("MOVING BACK");

}
}
if (digitalRead(2)== true) // IF SWITCH IS PRESSED
{
delay(500);
// Serial.println("READ"); //print read
if (mode==1)
{
mode=2;
val1RevertTo= val1avg;
val2RevertTo= val2avg;
val3RevertTo= val3avg;
val4RevertTo= val4avg;
}
else if (mode==2 and (abs(val1avg-val1RevertTo)<5) ) /// if the mode is one, make it two. If two, make one
{
mode=1;
goGraduallyTowards(&val1avg,val1RevertTo);
goGraduallyTowards(&val2avg,val2RevertTo);
goGraduallyTowards(&val3avg, val3RevertTo);
goGraduallyTowards(&val4avg,val4RevertTo);
myservo1.write(val1avg); // sets the servo position according to the scaled value
myservo2.write(val2avg);
myservo3.write(val3avg);
myservo4.write(val4avg);

}
}

if (mode==2)
{
digitalWrite(8,true); // IF mode Two, turn on light
}
else if (mode==1)
{
digitalWrite(8,false);
setposition=0;
}// waits for the servo to get there
}
1st Milestone: Build structure and connect potentiometers
My name is Eytan and I am a rising senior at SAR High School. I chose to make a 4 joint robotic arm for my main project. I just completed my first milestone, finishing the structure of the arm, as well as making it controllable through 4 potentiometers and an arduino. A potentiometer is a three prong device that takes in power and ground, and lets out a certain amount of current. The way it does this is it acts as a variable resistor, allowing the user to choose how much current passes through. The current is connected to the arduino, and is read as a value between 0 and 1023. Next, the arduino converts this into a degree value (0-180) and communicates to the servo where to be. The robotic arm has 4 servos. There is a servo on the bottom that allows the arm base to move 180 degrees. The second servo allows the arm to move forwards and backwards. This allows it to reach out for the grab. A third servo controls vertical motion, and a last one allows for the claw to open and close. In my next milestones I hope to allow my robot to operate autonomously using ultra-sonic senors, as well as be controlled by an app.
Set Back
- The arm was shaking a lot and not staying still
- It glitched out often and would change positions rapidly and then come back rapidly
Solution
- I added code that instead of sending every value to the servo, the program added every seven values together and then sent the average of those numbers
- I also added code that if the command to the servo is 5 degrees more than a few milliseconds ago, it will cancel it as well
Diagram of potentiometer
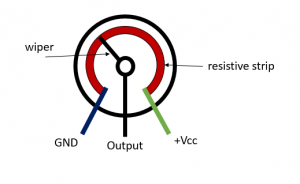
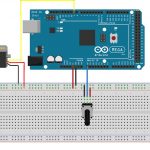
Diagram of Potentiometer connection to Arduino
#include <Servo.h>

Servo myservo1; // create servo object to control a servo
Servo myservo2; // create servo object to control a servo
Servo myservo3; // create servo object to control a servo
Servo myservo4; // create servo object to control a servo

int potpin1 = 0; // analog pin used to connect the potentiometer
int potpin2= A1; // analog pin used to connect the potentiometer
int potpin3= A2; // analog pin used to connect the potentiometer
int potpin4= A3;// analog pin used to connect the potentiometer

int val1=0; // variable to read the value from the analog pin
int val1avg=0; // variable to read the value from the analog pin
int val2=0; // variable to read the value from the analog pin
int val2avg=0; // variable to read the value from the analog pin
int val3=0; // variable to read the value from the analog pin
int val3avg=0; // variable to read the value from the analog pin
int val4=0; // variable to read the value from the analog pin
int val4avg=0;// variable to read the value from the analog pin
int timeslooped = 0; // variable to read the value from the analog pin

void setup() {
myservo1.attach(9); // attaches the servo1 on pin 9 to the servo object
myservo2.attach(10); // attaches the servo2 on pin 10 to the servo object
myservo3.attach(11); // attaches the servo3 on pin 11 to the servo object
myservo4.attach(3); // attaches the servo4 on pin 4 to the servo object

Serial.begin(9600);
}

void loop() {
timeslooped=timeslooped + 1;
val1 = val1+analogRead(potpin1); // reads the value of the potentiometer (value between 0 and 1023) and makes the value, the sum of seven
val2 = val2+analogRead(potpin2); // this is to make it jitter less because it is an average
val3 = val3+analogRead(potpin3);
val4= val4+analogRead(potpin4);
Serial.println(val1);
if (timeslooped>=7) //if seven values have been added
{
val1avg= val1/7; // take an average
val2avg=val2/7;
val3avg=val3/7;
val4avg=val4/7;

val1avg = map(val1avg, 0, 1023, 0, 180); // scale it to use it with the servo (value between 0 and 180), using the average value
val2avg= map(val2avg,0,1023,60,180);
val3avg= map(val3avg,2,1023,0,180);
val4avg= map(val4avg,0,1023,60,180);

myservo1.write(val1avg); // sets the servo position according to the scaled value
myservo2.write(val2avg);
myservo3.write(val3avg);
myservo4.write(val4avg);

timeslooped=0; // reset loop
val1=0;
val2=0;
val3=0;
val4=0;
}
}
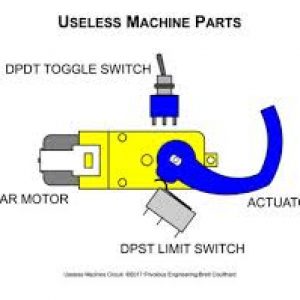
Starter Project: Useless Machine
My name is Eytan, and I am a Rising Senior at SAR High School. I just completed my starter project, the useless machine.
In making this project, I soldered many components, including two resistors, two switches, and a three prong LED. The first Switch, a toggle switch, is connected to power and ground, and based on the position of the switch, lets current flow in one of two directions.
The implications of this are twofold. First it determines the state of the LED. The LED I used is a three pronged LED with a middle ground. LED’s are non-polar, diodes, and therefore current can only flow in one direction. The LED contains two bulbs, and when current runs through the right prong, the green LED is lit, and when current runs through the left prong, the red LED is lit. As I stated before, the first switch determines the direction of the flow of the current. When the switch is in the on position, the current runs through the green LED, and it lights up. However, when the switch is switched to the opposite direction, the current is diverted and goes through the red LED.
The second effect of the switch is the direction of the motor. The motor is polar and based on the direction of the current running through it will run in the opposite direction. When the switch is on, the motor pushes the arm up. When the switch is then pushed off, the direction of current switches and the motor is reversed, bringing the arm down.
The last crucial part of the circuit is the snap switch. The snap switch has a lever that when pressed, opens the circuit, stopping the flow of current. This allows the arm to stop being lowered, and for the LED to not have current flow through it when the arm is in the down position.
Video Presentation of Starter Project
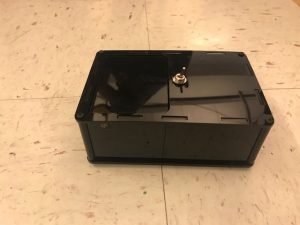
Useless Machine at rest

Useless Machine activated

Circuit
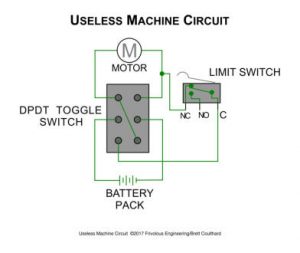
Diagram