
Intro- Hi my name’s Esteban! I go to Moore-haven high school in Florida, right now I’m going into 9th grade. The projects I chose were the minty-boost and Jasper. I chose the minty-boost as my starter project because it will be nice to have my own portable charger in my back pack or in my pocket. I chose Jasper as my main project because it is a voice interactive computer program. Jasper reminds a lot about Jarvis from Iron Man. And since I’m a Marvel fan so I’ll of course pick Jasper as my main project. These projects are fun after you finish building them. Jasper doesn’t require much hardware but requires a lot of software and coding. The minty-boost is just hardware and only takes an hour to make. 
Jasper B.O.M(bill of materials)
Raspberry Pi Model B
USB Microphone
4GB SD Card
Ethernet Cable
Airlink Mini-USB Adapter
Micro-USB Cable
USB Wall Charging Adapter
Speakers that work through the Raspberry pi audio jack
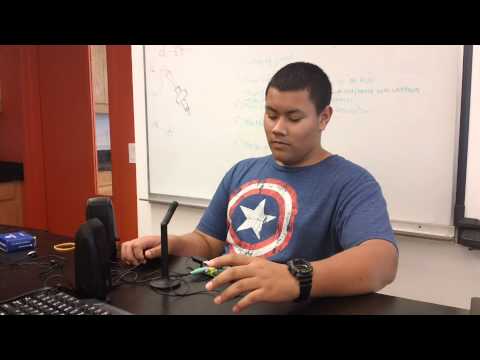
Jasper Final blog – Jasper is an open source platform that is always on and always listening to your voice. Jasper gives you the ability to control your apps with just your voice. All you have to say is “jasper” to activate and then say your command. To create Jasper I used a raspberry pi which is a credit card sized computer that you can connect a keyboard and mouse to. The raspberry pi runs on Linux based software. Before I reached a milestone in my project where I was able to connect the raspberry pi to the internet via Ethernet cable. Connecting the raspberry pi to the internet was the biggest problem I faced while creating Jasper. The WiFi still limits me from using Jasper and giving him commands. To fully get Jasper on the raspberry pi I had to burn the Jasper disk image on the SD card after that all I had to do was configure Jasper and get him running. Hopefully soon I can be able to get the WiFi connected to the raspberry pi and be able to use Jasper.
Jasper Milestone 1-My main project is Jasper which is an open source platform that gives you the ability to control your applications with your voice by giving it simple commands. Jasper is like Siri but much better because it is always on and always active. So you can Jasper a command from meters away at any time. The first milestone I reached is getting the raspberry pi up and running. Getting the WiFi on the raspberry was very difficult because for some reason it wasn’t picking up the network I wanted it to connect to. To fix this problem I had to manually connect it to the internet by using an Ethernet cable. With the internet working I have to install all the software I need to power Jasper. A problem I faced was trying to get in bash_profile which is file I need to edit before I begin downloading all the main software. This problem goes all the way back to the first step when I was beginning the project. I was supposed to burn the Raspbian image on an SD card and put it in the raspberry pi. This is what makes the Raspberry Pi work. Turns out I didn’t put the Raspbian image on the SD card the correct way. To make it work I had to use a certain command to burn the image on the SD card. After this step I had to re-download all the software. Now everything seems like its working

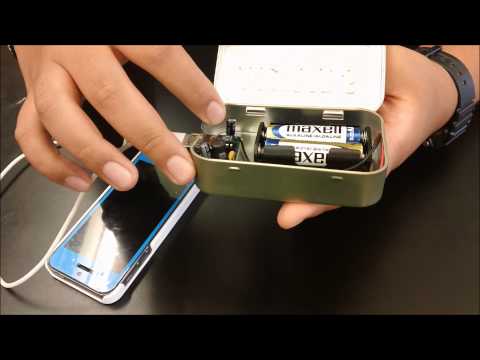
Minty-boost Blog For my starter project I decided to do the Minty-boost. The Minty-boost is a small but powerful portable USB charger for any gadget with a USB cable. The Minty-boost uses two AA batteries as a power source to charge your gadget. The Minty-boost has a 3.3K resistor, this resistor is used to help improve the high current capability of the boost converter chip. The Minty-boost also contains two ceramic capacitors. The first one helps stabilize the output voltage, and filters out high frequency noise so that the 5V output is nice and smooth. The second capacitor is used to stabilize the internal reference of the boost converter chip. This keeps the chip stable so that it will make a voltage good as possible. The next part the Minty-boost contains is the schottky diode, it is part of the boost converter. It used to make sure the power from the AA batteries is moved to the USB port. After that comes the power inductor, this is used by the converter chip to store and convert voltages from low to high. Next are two electrolytic capacitors, these help the input and output voltages to keep them stable. One difficulty I faced while building the Minty-boost was that I lost one of the ceramic capacitors which is very small and hard to find. Luckily there was a spare capacitor that Bluestamp has. Other than that minor difficulty I faced, everything went well!So those are all the parts contained in the Minty-boost, now I have my own portable USB charger! This starter project is easy, fun, and awesome to make!