Hi my name is Ervin and I am a rising junior at Sequoia High School. For my starter project I decided to build the Minipov which displays a message in the air through the use of LED lights. The programming can be changed so I can personalize the message displayed. For my main project I will be building an EKG heart rate monitor. Some of the next steps for my project that I have in mind is that is building a case for the EKG. Overall BlueStamp Engineering taught me about information that was extremely interesting. BlueStamp also helped me consider a degree and career in engineering. They also helped me realize that hard work can pay off in the end.
Main Project:
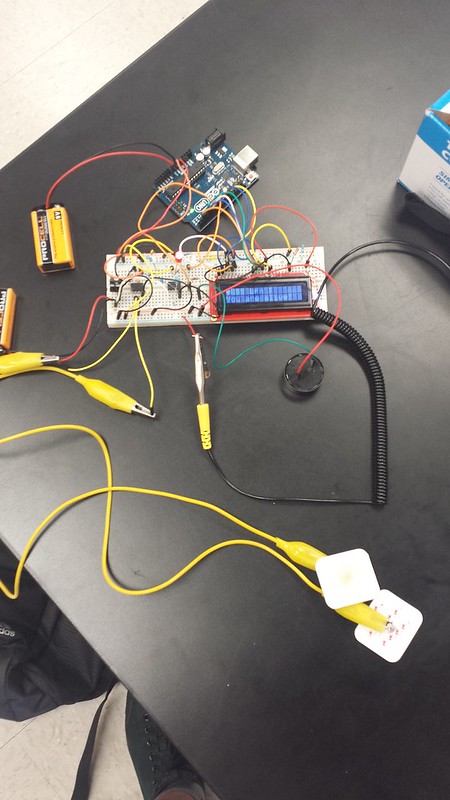
After my intensive project was completed it was functional. The parts that were a part of the EKG were all connected properly which allow it to receive a strong signal from the electrodes attached to the body. The EKG itself is powered by two nine volt batteries. The heartbeats are displayed on the LCD screen because of the coding contained in the Arduino. The code also directs the EKG to make the LED blink for each beep and the buzzer will make sound for each heartbeat.
Link To my Code : http://www.instructables.com/id/Electrocardiograph-Heart-Rate-Monitor/step3/Download-Code-on-the-Arduino/
Link To My BOM (Build of Materials): https://docs.google.com/spreadsheets/d/1cClIo5FQP11w7OYR2H-f9H73mjPO8F-hWRXVeIjwU-0/edit#gid=0
For my main project I decided to build an electrocardiogram (EKG) which can keep track of your heartbeats. The project is built on a breadboard which contains two integrated circuits. It is powered by two 9 volt batteries with connectors. One of the circuits amplifies the signals that is coming from the electrodes which then travel through the low pass filter. Then the other circuit works as a comparator which compares the amplified signal in its inputs. The outputs can be high or low when its high it means the EKG is reading the heartbeats properly. If the signal is low that means it does not detect a heartbeat which will display the person as “dead”. The Arduino is the part of the project that contains the code to control what is displayed on the LCD. There is a speaker that makes noise for every heartbeat and an LED that blinks for every heartbeat as well. Some of the problems that I ran into was that my breadboard was not working properly, so I had to change the breadboard. Another problem that I ran into was that some of the connections were wrong so it caused the EKG to not function. The last problem that I ran into was that the electrodes did not have a proper connection so the EKG was not picking up my heartbeats.
STARTER PROJECT:
For my starter project I decided to build the Minipov which displays a message in the air through the use of LED’s. The project uses AA batteries to power the circuit board. The microcontroller of the project uses an oscillator to signal the time of the movement of the Minipov. The resistors of the project reduce the flow of energy in the circuit board. The diodes make the energy flow in a forward direction, but it does not allow it to flow in a backward motion. The programming of the Minipov is inside the microcontroller which uses binary to customize the message. Some of the problems that I ran into was not having the wires properly soldered which caused them to fall off. Another problem that I ran into was the programming which caused my message to not be properly displayed.


I am building this project this year and I was wondering how you made your electrodes and what the wrist wrap is for.