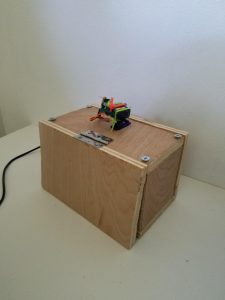
Laser Turret
This is an Arduino powered laser turret. It is coded with a program that decides the degree amount randomly then moves both micro servos incrementally then repeats itself. In each incremental rotation the Arduino fires of the laser and piezo buzzer.
Engineer
Elijah L
Area of Interest
Mechanical Engineer
School
Lick-Wilmerding
Grade
Senior
Final Milestone
My time at Blue stamp
I really enjoyed my time at BlueStamp, because I got the opportunity to experience what it would be like to be an engineer. This meant I got to build, plan and make video presentations. All for the most part on my own. I enjoyed trying the process of understanding the code as well as the process of making my enclosure for my laser turret. Throughout the process of making these two projects, I ran into some challenges that I would have to over come. The main problem I faced wasn’t actually in coding or building my projects but actually in my videos. At first explaining things to the camera was difficult for me and I actually had to retake videos a couple times. However, through this difficulty, I gained a more detailed knowledge of my project and also gained experience in presenting my project. The only other major difficulty was finishing the enclosure for my laser turret. In my last couple of days, time was not on my side, and I had to build an enclosure with plywood, a hand saw, a drill and some screws. This experience of a deadline was also a valuable experience in understanding what its like to be an engineer. Through this program, I have gotten a better understanding of the career of an engineer through the guest speakers and my own experience.
First Milestone
My first milestone was to complete the regular function of my laser turret. I got the regular function code, as well as most of the hardware construction from (http://www.makeuseof.com/tag/pew-pew-how-to-build-a-laser-turret-with-an-arduino/). The instruction for the code was fairly straightforward, however some of the pieces I got were not the same as the one in the in the instructions so I had to tweak the values of some variables a little.
I used an Arduino Uno for this project. At this moment in the project I am powering the Arduino as well as uploading the code through the usb component connecting to my computer. This sends the regular function code that I will explain later as well as charging the arduino with 5 volts.
The rest of the hardware that I am using is a piezo buzzer, 2 micro servos, a laser module.
The piezo buzzer is an electronic circuit that incorporates an oscillator and a piezoceramic disk. When this circuit is subjected to the electronic signal the oscillator creates mechanical oscillation movement in which the circuit can time itself. The piezoceramic disk is a man made material that when it comes in contact with the current it vibrates to the frequency of the electronic signal. This piece has two pins, one that inputs the digital signal and one going to ground.
My servos circuits have three main components. The first is the controller circuit which outputs the digital signal that it receives from the arduino micro controller. The second is the motor which magnetic field comes in contact with the current from the controller creates the magnetic moment rotating the 180 degree servo. The last component is the potentiometer that is connected to and turns with the motor. While potentiometers are usually used to add or subtract resistance from a circuit, in this case the controller circuit reads the resistance of the potentiometer and determines the degree value that the motor turned based on that. This piece has three pins, one that inputs the digital signal, one that goes to 5v to power it and, one that goes back to ground.
Finally I have my laser module. This laser module has similar components as an led. It has two pins, one for ground, and one for a current or a digital signal in this case. And it has a diode that emits light. The difference is that it has a resistor built into the module allowing it to be connected directly to ground. The way it emits light is different as well. Instead of emitting light with a large wave length like an led does, the laser module emits a more concentrated smaller wavelength of light.
A code that I based mine off of can be found here (https://pastebin.com/uheJZYMv). This code first inputs the servo library that arduino uses. It then defines the pins at which the laser and buzzer is at. Then in void set up, which is run once, defines the horizontal servo pin position and the vertical servo pin position. In void set up it also shows that the laser and the buzzer pins are only going to be used as outputs and aren’t going to be sending back information to the arduino. Then the code starts its void loop function. In this function if first defines all of its integer values which are the number of shots the laser shoots, the starting and ending position for the turret, and the time between the bursts and the time between the shots. To figure out how many degrees it has to rotate it first subtracts the ending position by the beginning position to find the total degree it rotates per burst. It then divides the total degree value by the number of shots per bursts to see how many degrees it has to rotate pershot.
Once all that math is done it starts a for loop that loops for the amount of shots in the burst. In this for loop it rotates the fractional degree shoots and buzzes then loops back. The buzzer and laser shooting is put in as a separate function called fire which turns them on and off. Once the for loop is looped through it then loops back through the whole void loop again.
Starter Project
The tv b gone is my starter project. The hardware that I am using are four infrared leds, one electrolytic capacitor, one bypass capacitor, one button switch, one ceramic resonator, one precoded micro controller, three resistors and one indicator led. Finally this is how my circuit works. My capacitors are both connected directly to my power source, the two 1.5 volt aa batteries. They are both used to stabilize the voltage. The electrolytic capacitors charges when there are voltage spikes and releases its charge when there are voltage drops. The bypass capacitor filters out any high frequency noise that might cause voltage drops or spikes in the batteries. When the button is pressed the batteries are connected to the circuit and current powers on the micro controller. The microcontroller powers on the indicator but first has to go through the 1 k resistor. It also powers the resonator that keeps time for the micro controller which is very important because the signals it sends the tv have to be perfectly timed. It then sends digital signals through the 10 k resistor and to the pnp transistor which acts as a switch that when it gets enough current directs it to the npn transistors which then directs the current to the ir leds turning them on and off. These infra red leds cannot be seen by my eyes but can be read by a tv and seen by the camera. They send the same signals that your own remote sends to power off the tv.