
Hi, my name is Eliana and I am a rising sophomore at Yeshiva University High School for Girls. I joined this program because coming here I had very little knowledge in engineering and I wanted to learn more about it . Being here has been very eye opening and I am glad that I got to explore the world of engineering. Over the past six weeks in BSE I have created a starter project and a main project. My starter project is a Larson Scanner. The Larson Scanner is a light show that can be used to amplify costumes, sci-fi props and pumpkins. The Larson Scanner helped me gain a better understanding of engineering and helped become efficient in soldering. For my main project I did a Voice Controlled Lamp. The way the Voice Controlled works is I speak into my computer using BitVoicer and I tell it a sentence anagram.It then sends the message with the correct data type which is string and the command. The arduino is able to get the message because there is a BitVoicer library in the arduino code. I chose to do this as my project because I wanted to make something practical that I can use myself. The project also looked very interesting and I also wanted to do a project that has never been done before on BSE. I am glad to say that after these six weeks I changed the way I look at engineering. I have gained and learned so much like how to problem solve, and to be more independent also to never give up if you hit a bump in the road. Read on to learn more about my project!.
Voice Controlled Lamp


Final Milestone
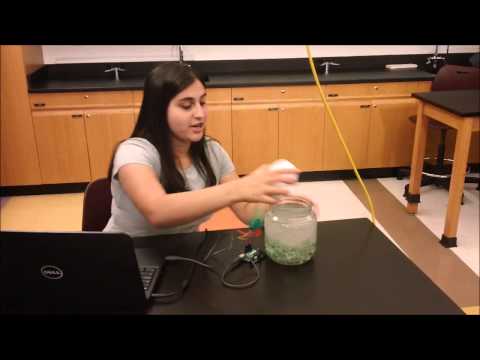
For my final milestone I accomplished putting my whole project together and getting every part to work. I started by buying a smaller jar.I then filled up my new jar with pebbles for a nice design.  After it was halfway full I added the gel wax. I melted the gel wax with a heat gun and did it in portions so it could melt nicely. I then let the jar cool off and waited for the gel wax to harden. The next part of my project was to solder everything onto the PCB, which stands for printed circuit board. I used an Adafruit breadboard pcb, so I didn’t have to make the connections I just had to solder everything down. I added seven more LEDs to my original circuit so that the light could be brighter. I placed my LEDs parallel to each other. I wanted to add more LEDs but there was no space to make them parallel. I tried putting the LED somewhere else on my circuit and make a connection but I didn’t connect it correctly.I then realized that I didn’t need that LED. In my circuit I have two rows of LEDs. I programed the two rows to work together, so that they could light up at the same time. I then ran into a problem where my two rows of lights wouldn’t turn on at the same time. So I checked my code and realized that in the if statements there was a delay so I took out all the delays and reloaded my code. I finished my circuit I had to put all of the components together. I decided to put the PCB in the lid so that the LEDs would directly shine through the gel wax. I took the lid off the jar and drilled wholes through it. I did that so I would be able to pull the wires through it and connect them to the Arduino.
Code:
BitVoicer:

Schematic:


Bill of Materials: Click Here
Link to Project: Click Here
First Milestone
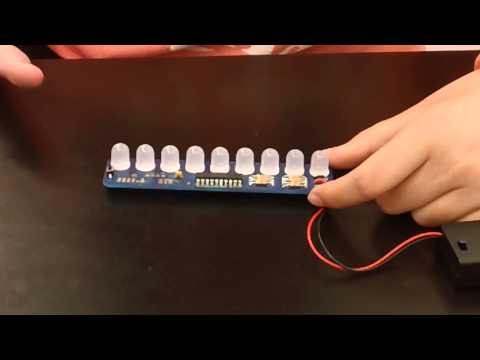
This week I accomplished my first big step. I got my BitVoicer working with my Arduino. I am now able to talk to my computer with BitVoicer. It is able to send a message to the Arduino. The Arduino then uploads the code to the LED. In the beginning, I was having trouble getting the BitVoicer working and I was getting a lot of errors on my Arduino code. The first thing I did to fix this problem was to try to understand each line of my code. I realized that the code wasn’t correct. I rewrote the code using analogwrite() and learned how to do the color changes with the integers 0 to 255. Zero was the brightest and two hundred and fifty five would shut off the light. I moved on to the next part of my problem, which was setting up the voice control. The voice control was not connecting to the Arduino and the LED. I then realized that I had to buy the correct version of BitVoicer in order to make it work. The next step was to put in the sentence anagrams. I would tell the BitVoicer a sentence anagram. Then, it sends the message with the correct data type, which is a String, and the command. The BitVoicer also has its own library in Arduino, which the Arduino uses to get the data from the BitVoicer. The Arduino reads the command and checks it against the if statements I added. As I was trying to change the colors in my RGB LED, I realized that the red color was very strong and overpowering the other colors. To fix this problem I added two more resistors and having three resistors helped fix my problem.
Starter Project- Larson Scanner
 The Larson Scanner is named after Glen A. Larson who produced both the Battlestar Galactica and Knight Rider. The Larson Scanner is like a light show and can be used to amplify all kinds sci-fi props, costumes, and pumpkins. In my scanner I used resistors to help resist the flow of current. This helps because too much current can damage the circuit and lead to a short circuit. I also used a capacitor which helps store the electrical energy in the circuit. I then took the battery box and pulled its wires through the circuit board. Afterwards I pulled any excess wire back through and made it made a loop. The loop is a strain relief for the wires which helps the wire not to break away from the plug. Next I put in the button switch . When you push the button it changes the flow of the light making it move faster or slower. I then put in the LEDs . The current in the LED flows from positive to negative .The positive is the anode and the negative is the cathode. The orientation of the cathode and anode matters because the diode will only allow the light to turn only if the current flows that way. The last thing I added was a microcontroller chip which was pre-programmed to make the LEDs go on and off in a sequence to create a pattern.