
INTRODUCTION
Hi, my name is Danny, and this is my first time in BlueStamp Engineering. I am a rising Freshman at UC Riverside. For my starter project, I chose the “BigTime Watch” because I wondered how a digital clock runs without gears. As for my main project, I chose the Omnidirectional Robot. I chose to do the Omnidirectional Robot because I wanted to make a drone and this was the next best thing.
I came into Bluestamp knowing little to nothing about engineering. I always was fascinated on how all things worked. This fascination led to my curiosity of how I can make things work. I wanted to explore engineering but, but it was a huge field to grasp. I did not know where to start. For Bluestamp I started out with the Arduino, the Arduino is a micro controller that you can program. At first, I was nervous and thought “How would I do this?” but after the first couple of days I thought ” This could actually happen” . I learned many things for Arduino. I learned how to make a Led blink and how to move a servo with code. This is how I started and how the foundation of the Omnidirectional Robot started. Bluestamp opened the door to many new opportunities for me to learn about engineering. It gave me options to choose what I feel fits my intrests and where to explore them. I introduce myself to HTML, JavaScript, Arduino code, and Photon Code. I had combined all I learned to make the Omnidirection Robot and below is the Final Product of my hard work!
FINAL PROJECT


Here is the link to download Danny’s Bill of Materials (BOM)
Here are the codes for the PhotonJoyStickCode and my OmniRoboJoyStickController HTML web page.
HTML Code: Photon button control TheOmniRoboButtonsControl
Photon Code: OmniRoboButtons
FINAL MILESTONE
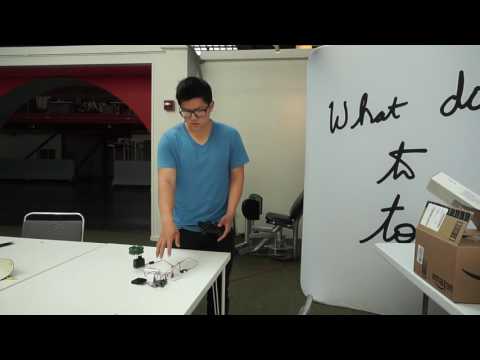
For my final milestone, I made the Omnidirectional Robot move through a Joystick App. I had a challenge of making it run off of the coordinates that I get from the App. I first made a HTML webpage that sends commands to the Photon. The Photon is the micro controller that controls the Omnidirectional Robot. First, I made the Omnidirectional Robot work with a HTML webpage that sends a command when a button is pressed. I made the button out of an HTML form, but it sent back feedback, and that was an inconvenience. I solved this by implementing JavaScript buttons. I made buttons which implement JavaScript, and these do not give feedback. After this I made the buttons: Forward, Left, Right, and Backward. I was still a step away from making it run off of a Joystick. I found a Joystick App that was made of JavaScript and used the JavaScript to send the coordinates to the Photon. Now I have a fully functional Joystick that moves the Omnidirectional Robot.
Here are the links I used to make this happen:
THIRD MILESTONE
For my third milestone, I made the Omnidirectional Robot move in all directions. I had a challenge with making it Omnidirectional. I was stuck: I could make it move forwards and backwards, but I was unable to make it move left and right. I saw that in the past, students used trigonometry to make it Omnidirectional. I learned how Cos, Sin, Tan, and ArcTan had to do with the way it moved. It was hard trying to understand how to make it move in all directions because I noticed that it would require all three wheels to move at different speeds. I prevailed and learned that you have to use the angle and the amount of distance each of the wheels are from the joystick location. This enables the code to understand how much speed each wheel is going to receive to move in that direction. I am now planning to try to transfer the controls from the PS2 controller to another controller using the Photon.
SECOND MILESTONE

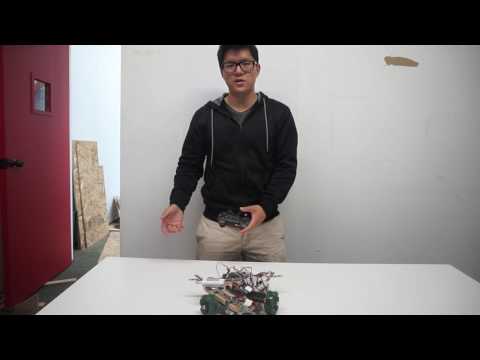
 For my second milestone, I made an MDF (Medium Density Fibreboard) base for the Omnidirectional Robot. I designed the base on SketchUp. With the help of the instructors, I used a CNC (Computer Numerical Control) Mill to cut the MDF. Using VEX bars and screws, I was able to form a base and put the motors in place. I attached all three wheels an equal distance from each other as a way to make it Omnidirectional. The position of the wheel makes it so that the Omnidirectional Robot can move in any direction without turning to face that path. I had trouble with making all the wheels function with the code. There was a problem with the second motor not working, but I changed the wiring and the code to use a PWM (Pulse Width Modulation) pin. This change made the wheels work. Then, I added the third wheel with no problems. My Omnidirectional robot can now rotate and move forwards and backwards, but I am still in the process of making it move left and right.


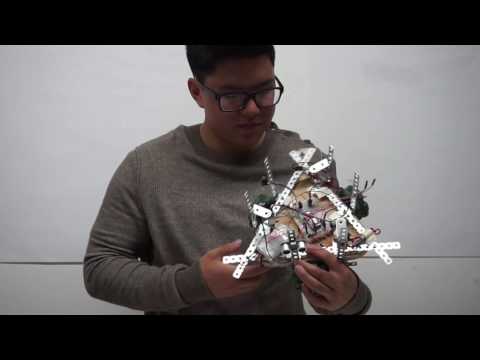
Electrical Schematic and Final Robot Chassis
FIRST MILESTONE
For my first milestone, I have made code that makes the wheel spin. Because I didn’t have much experience with Arduino, I had to research online to find out how to write code for the wheel to rotate. I learned that the motors use the writeMicroseconds function to set the speed of the motor. Using the 1000 Microseconds to 2000 Microseconds, I was able to make the wheels spin at a constant rate. I also figured out that 1500 Microseconds is where the wheels do a complete stop, while going 1250 Microseconds means it spins at the same rate in the opposite direction of 1750 Microseconds. After I realized what the wheels spin on, I wanted to control the wheels and not just set them at a constant rate. Using the PS2 controller, I had trouble figuring out how to connect it to the Arduino. I went through the code of the past BlueStamp students’ portfolios as reference to see how they got the controller to connect. I saw they used the PS2 code from Bill Porter, and I used his library to get the controller to connect. Now I can control one of my motor’s speed with the right analog stick on the PS2 Controller. If I move it to the far right, it will spin full speed clockwise, and if I move it to the far left it will spin full speed counter-clockwise. I completed a circuit that allows a 7.4v battery to power the Arduino and the motor at the same time instead of being connected to my computer. However, I realized I would need a base to make it move.

STARTER PROJECT

Hello, this is my starter project. I made the “BigTime Watch”. This watch is made from an ATMega328 pre-programmed chip, 4 Digit 7 segment display, 32kHz crystal, 10kOhm resistor, 2 0.1uF capacitors, button, and a battery. The watch works with the crystal which is basically the watch. The ATMega328 is programmed to count the time by the vibrations sensed from the crystal and display it on the LED display. The battery powers the ATMega328, and the 10kOhm resistor limits the current from the battery. The 0.1uF capacitors makes sure the current from the battery is smooth and does not dip below the minimum requirements and shut down. A challenge that I faced during the making of the project was the crystal not laying flat. This makes the casing for the watch unable to close correctly. It took time and creativity to bring the crystal down. The instructor helped me with the idea that there is enough wire that it could be placed down by pulling some wire up. There was also the issue of the solder going into 2 of the holes. This was fixed with the soldering wick. The wick takes some of the solder off the board. The start was easy, but near the end, the problems arose and were fixed. Overall the watch came together and works. This project was a success.
Code for HTML