Cristian J.

Hi, I’m Cristian and I am a rising senior at Central Park East High School. For my starter project, I decided to build the Binary Blaster by SparkFun. For my main project, I decided to build a Robot Tank. I chose this project since I got to try different fields in engineering like mechanical engineering, electronic engineering.

During my time at BlueStamp, I have learned valuable life lessons I can apply to everyday life. First, I learned that I am capable of much more than what I give myself credit for. I a student who has never utilized an Arduino managed to learn enough to actually create a robot tank that is wireless. Another lesson was getting comfortable with as well as understanding that something can and will go wrong no matter what, but, regardless of the struggle, it is always worth it. I can walk out of BlueStamp Engineering much more comfortable in my abilities but also with an engineering mindset. A mindset that can take me anywhere in the future as long as I work hard for such goal.

Engineer

Cristian J.

Area of Interest

Electrical Engineering, Mechanical Engineering

School

Central Park East High School

Grade

Incoming Senior

Final Project

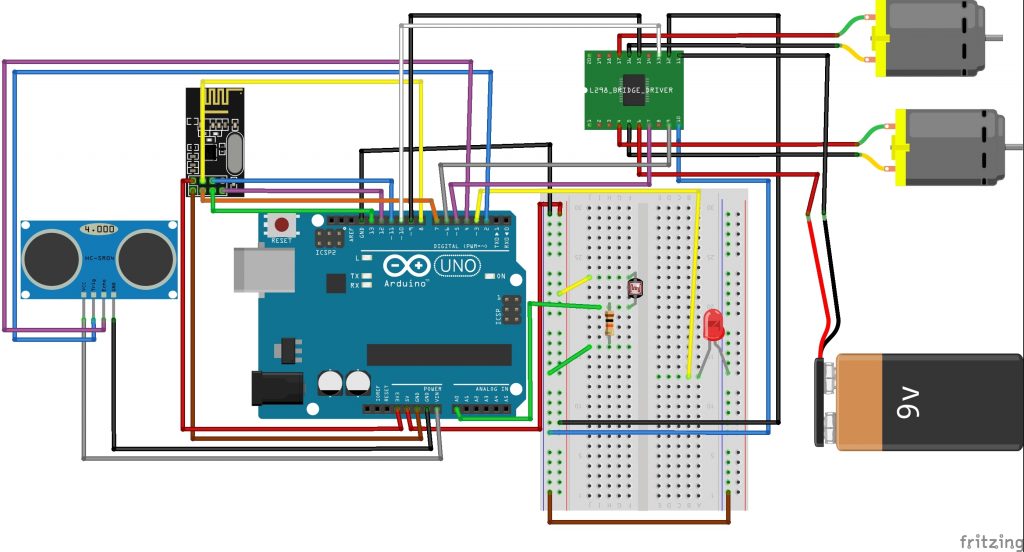
For my final milestone, I have added a photoresistor to the tank to connect with the tanks headlights and taillights. The Arduino reads the amount light through the photoresistor. Creating a map I can make the headlights turn on when it becomes dark enough but also turn off when there is enough light. The photoresistor basically works as a light sensor that can pick up the amount of light in a room and determine the brightness the of the headlights. This is useful since it makes the headlights much more efficient. In the future, I want to add a camera to the tank in order to be able to change my point of view. It will be a great modification as it will allow me to see the world from a completely different perspective, literally using google cardboard. With the headlights and the photoresistor, I will be able to see through the camera when there is less light. Another possible modification will be to use a game software to be able to play a video game with the tank while also controlling the tank in real life creating a course that can be visualized through google cardboard.

Tank

tank_bb

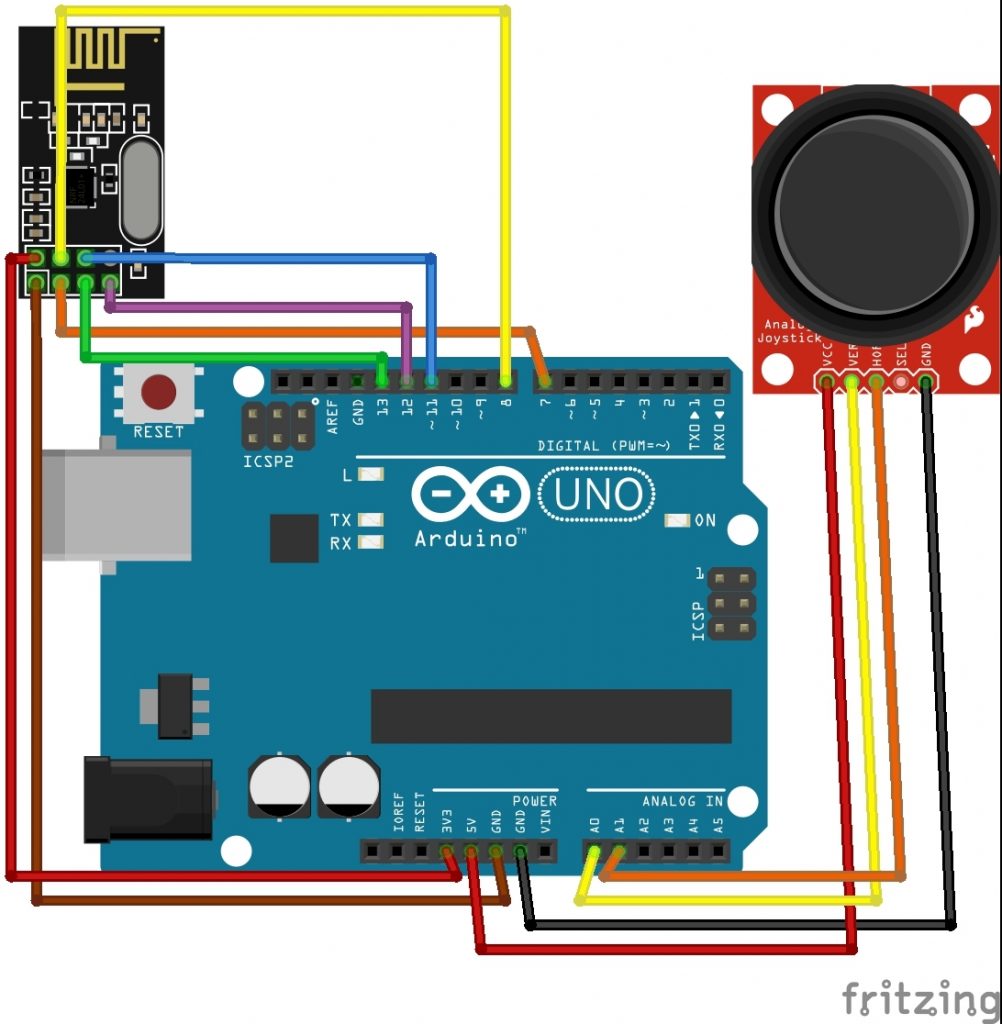
Controller

controller_bb

Bill of Materials

cristians-bill-of-materials

Code

Code

Third Milestone

For my third milestone, I created my own controller to control the Robot Tank using the NRF24L01 module and an analog stick. I have also replaced the Arduino motor shield and replaced it with an L298N to control the double gearbox. I replaced the motor shield since it allows me to have 2 more digital pins than before, allowing me to connect the NRF24L01. The NRF24L01 used with the controller works as a transmitter, while the NRF24L01 used in the tank acts as a receiver, receiving data sent from the analog stick. For an added modification I am interested in adding a camera to the front of the tank in which I can connect to my phone and utilize google cardboard to be able to control the tank without me having a line of sight of the tank. I am also interested in using a photoresistor with the headlights to make the headlights turn on and off automatically.

Second Milestone

For my second milestone, I attached the Arduino Uno to the double gearbox to keep the wiring neat. I also attached a distance sensor that sends and receives data. This can be used to measure the distance in millimeters. Using this to sense objects that are close I have created a code that allows the robot tank to stop and drive backward if there is an object is 10 mm or less from the tank. If no object is present, the tank will continue driving. This was a difficult process since I did not use delay but instead utilized the millis function of the Arduino to switch the distance sensor on and off. This meant I had to decrease the speed of the tank before it crashes into an object. I can then work on finding the correct time using millis that will work while the tank is moving at full speed.

First Milestone

For my first milestone, I have assembled the entire tank. Assembled the track and wheel set, assembled the double gearbox motors and put joined it together with the universal plate to create a basic robot tank. Using the Arduino Uno and the motor shield, I wired the motors that will make the track move. Since there are two motors each one has to be coded separately. Since the Arduino Uno is not able to supply enough power to the motors, an external 9V battery is used. This allows the Arduino to power both motors in unison. The code that was uploaded to the Arduino simply made the tank move forward at full speed and back.

Starter Project

For my starter project, I built the Binary Blaster. This build consisted of soldering different components onto a board that is powered by two batteries. The Binary Blaster teaches how to convert numbers into a binary format. By displaying a number with above 4 LED buttons that correspond to 0s and 1s. A lit up LED button is equivalent to a 1 while an unlit LED button corresponds to a 0. The Binary Blaster is also a game in which the goal of the game is to successfully convert all 15 numbers displayed into binary. There is also a hexadecimal mode in which the goal of the game is also to convert the hexadecimal form into binary. I learned a lot about the components and what they do in this project. The resistor allows the amount of current to maintain a consistent amount required. The capacitors stores charge that in order to prevent the LEDs from getting too much energy. And the microcontroller is programmed to allow the certain LEDs to light up based on its purpose of teaching a binary form of the number. An issue with building the Binary Blaster was the microcontroller potentially overheating, thus damaging the microcontroller and potentially lead to the Binary Blaster not working. This was fixed by taking my time to not overheat the microcontroller.

Leave a Comment

Start typing and press Enter to search

Bluestamp Engineering