CNC Project
Hello my name is Bryan, I go to Homestead High School. My main project is a CNC router which will cut parts out of wood and other stock materials. I am making several modifications to a kit, which has all the basic components. I am making the machine more accurate, sturdier, and have less faults with my changes and improvements. Here is a link to the kit if you want to make one yourself. CNC kit , z axis upgrade, dual y upgrade, dual x upgrade, 3D printed pen holder, 3D printed x axis joiner
Here is the technical drawing of the machine

Here is the B.O.M. for all of the parts i used in the build. B.O.M.
CNC Final Project
Here is the finished CNC machine along with a video of everything i have done, made, or learned over the course of the program. Overall this program was a good experience giving me and my parents more reason to believe I could tackle and complete more ambitious projects in the future. This program was a great jumping off point, along with showing my parents what I can accomplish with confidence in myself.Overall this program was a great experience for me. One thing I realized throughout the program is that some of the other students got bogged down halfway through. They got caught up with the coding aspect of the design which caused a bit of a stagnation. It seemed like the code did not help with the hands on learning. It is a necessary evil though as coding and circuits go hand in hand working together to create complex systems. Such as a CNC routing machine for instance. That is one thing that seemed to be a little bit of an issue with the program, but that may just be an issue with trying to learn engineering in general. Especially in such a small time frame and with such ambitious projects, they are trying to accomplish. This program was a fun six weeks and, it was great to spend my time up in San Francisco to see the sights. It was a bit of a difficult challenge through some parts of the program. When things did not work the first time or, when I had literally flipped parts 90 degrees in the wrong direction. Luckily my passion for working with engineering and building my machine, allowed me to persevere through all the challenges along the way.
CNC Milestone 4
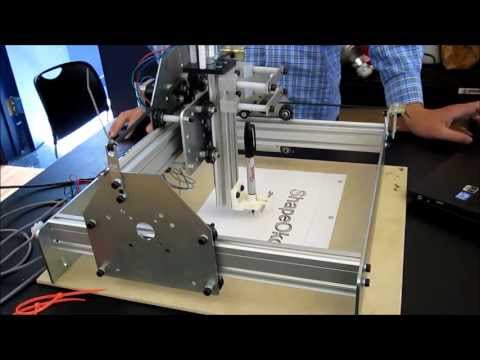
Here is the video for my software demo and explanation of how to create G-CODE files. In this video i use a 2D CAD program, called inkscape. This program allows you to draw vectors, bitmaps, and trace simple logos or other designs. Then once you are happy with your drawing you convert the object to a path. After that you upload your svg file to makercam which is a web based CAM program for converting design files to g code. This g code is what is actually sent to your machine which tells the motors which way to move and how far. The video is a demo of how to convert a logo and send it to the machine, while explaining the process. These free and open source programs are great for simple 2D milling and cutting but if you need to do anything in 3D it is recommended to get professional software. The software i choose to use for 3D CAM and CAD software, is solidworks for designing the files. Then using a solid-works plugin called solid-cam to automate the machining process. I want to give a big shout out to both of these companies, for giving me educational versions of their software for free. It was a great help and they are powerful tools that i could not live without. I want to thank the Paton group for providing the solid-works license and solidcam inc that provided the solid-cam license.
CNC Milestone 3
I got the new spindle working and made my workflow better, began designing and cutting my own parts. Designed an adapter for 29mm to 54 mm motor mounts for model rockets. Then cut it out for this video although i did have a couple of hiccups with it not centering in the correct place. Along with the circles not being perfectly round but, I can fine tune that later. Right now the machine is working as intended and everything is going smoothly. The next thing is to learn more about the software and explain the workflow process. The electronics seemed to have stopped overheating, since I have added the fan. Then i need to make better work-holding clamps, as the current ones i have made allow the material to slip a little when too much force is applied. The video shows the machines new router being put to the test when, I increased the feedrate or speed and depth of each cut.
CNC Milestone 2
I got the new spindle working today and tested it out. I had to engineer a way to mount it, as one of the mounts i cut broke. The spindle is a large upgrade over the dremel tool as it has a higher rpm and torque. It can handle larger bits as well, and can cut into new materials such as aluminum. I made a test cut with it, which was the BSE logo. This new tool is also much heavier and i had to double up on the x axis, to support its weight. Here is a video of the spindle mount and the spindle turning on.
![]()
CNC Build Log Pictures
Here are some pictures of the build log from my shapeoko+. These are pictures throughout the six week period, from the very first test “cut” to the logo i cut with my new spindle.
CNC First Milestone
This is my first milestone for my main project as i have added a large amount of modifications to the machine. Now I can reliably get normal cuts in different materials. My first real cut, was a mount for the new more powerful rotary tool. This new tool should allow me to cut metal, and then begin milling stronger parts, out of different materials. The accuracy is still not where I would like it, to be as the stepper motors need some more tuning. When i begin tuning, I will use a dial indicator to measure how many steps it really takes to move one centimeter. Then I can account for it in software and improve accuracy immensely. This is a major milestone as now I can cut my own parts. While I was learning how to set up the machine, I also got a handle on some cad software as well. To begin designing my own shapes to cut. Here is the machines demo cut:
CNC Machine Starter Project
Hello my name is Bryan, I go to Homestead High School. My starter project is a three axis CNC machine kit. It operates using a stepper motor shield on top of an arduino uno, which provides the brain of the machine. The stepper motors are the muscles of the machine, they move the gantry back and forth and the cutting tool up and down. The muscles and the brain are connected by the stepper motor cables and drivers. These provide current to the motors which allow them to move such as the body using energy to move. Then the nervous system of the machine would be the limit switches which stop the machine before it does something damaging to itself or the world around it. They act as a safeguard and make sure even if all precautions are taken there is still a fail-safe. The bones of the machine is the aluminum extrusions, and the aluminum plates which bolt the machine together. These keep the machine rigid and strong decreasing the slop or inaccuracy in a machine of this type. You design what you want to cut in any computer assisted design tool, and then you can take that file to the next step. The way you control this machine is by sending code that you create in a computer assisted machining program to the machine. The brain then interprets the code and tells the muscles how to move and in what direction to move. This project took the first week and a half of the program. I had several difficulties with the kit, such as the washers not being in the right tolerances so i had to, file them down and make do. I had other issues as well such as having to learn how to tap aluminum, along with troubleshooting the initial setup as some wires came loose. Now I am working on modifications and improvements of the base machine.