Final Project
For the completed project, I refined the Processing code to adapt to loud and quiet sounds, to display audio only above the minimum value, and to store values as a single byte of 0-255 (maximally efficient) rather than as an integer of 0-8 (an incredible waste of space). All that was needed was to enhance the Arduino code, making it able to take in a byte (say, 0x4a) and convert it into pixels (2 of 100% brightness and one of 33%) and apply this to every row for a far smoother visualization.
#include <Adafruit_NeoPixel.h>
#define PIN 6
Adafruit_NeoPixel strip = Adafruit_NeoPixel(256, PIN, NEO_GRB + NEO_KHZ800);
uint8_t val;
uint8_t i = 0;
void setup() {
Serial.begin(57600);
strip.begin();
strip.show();
}
void loop() {
while (i < 32) {
if (Serial.available()) {
val = Serial.read();
clearRow(31-i);
row255(31-i, val);
i++;
}
}
strip.show();
i = 0;
}
void clearRow(uint8_t num) {
int num8 = num*8;
for (uint8_t i = 0; i<8; i++) {
strip.setPixelColor(num8+i, 0);
}
}
void row255(uint8_t num, uint8_t cap) {
float G = max(min(pow(cap/255.0,2)*3,1),0);
uint8_t S = int(48*pow((cap % 32)/32.0,2));
uint8_t L = (cap – (cap % 32)) / 32;
if (num % 2 == 0) {
uint16_t num8 = num * 8;
uint8_t i = 0;
while (i<L) {
strip.setPixelColor(i+num8, strip.Color(0,48*G,48));
i++;
}
if (L != 8) {
strip.setPixelColor(i+num8,strip.Color(0,S*G,S));
}
} else {
uint16_t num8 = num * 8 + 7;
uint8_t i = 0;
while (i<L) {
strip.setPixelColor(num8-i, strip.Color(0,48*G,48));
i++;
}
if (L != 8) {
strip.setPixelColor(num8-i,strip.Color(0,S*G,S));
}
}
}
import processing.serial.*;
import processing.sound.*;
Serial usedPort;
FFT fft;
float scale = 1.0;
float minValue = 0.0;
int bands = 1 << 6;
int section = 1 << 5;
float[] sum = new float[bands];
float[] sec = new float[section];
float[] powr = new float[section];
public void setup() {
usedPort = new Serial(this, Serial.list()[1], 57600);
SoundFile sample = new SoundFile(this, “portal2.aiff”);
sample.loop();
fft = new FFT(this, bands);
fft.input(sample);
for (int i = 0; i < section; i++) {
powr[i] = 1+0.6*i; //1+2*i
}
delay(120);
}
void draw() {
sec = subset(sum, 0, section);
minValue = 0.75*min(sec);
scale = 240/max(max(sec)-minValue,0.05);
fft.analyze();
for (int i = 0; i < section; i++) {
sum[i] += (fft.spectrum[i]*powr[i] – sum[i]) * 0.1;
usedPort.write(byte(max(min(scale*(sum[i]-minValue),255),0)));
}
delay(17);
}
#include <Adafruit_NeoPixel.h>
#define PIN 6
Adafruit_NeoPixel strip = Adafruit_NeoPixel(256, PIN, NEO_GRB + NEO_KHZ800);
uint8_t val;
uint8_t i = 0;
uint32_t vol[] = {
strip.Color(0,0,0),
strip.Color(0,48,4),
strip.Color(0,48,0),
strip.Color(16,48,0),
strip.Color(32,48,0),
strip.Color(48,48,0),
strip.Color(48,32,0),
strip.Color(48,8,0),
strip.Color(48,0,0),
strip.Color(64,0,0)
};
void setup() {
Serial.begin(57600);
strip.begin();
strip.show();
}
void loop() {
while (i < 32) {
if (Serial.available())
{
val = Serial.read();
clearRow(31-i);
row8(31-i, val);
i++;
}
}
strip.show();
i = 0;
}
void clearRow(uint8_t num) {
int num8 = num*8;
for (uint8_t i = 0; i<8; i++) {
strip.setPixelColor(num8+i, 0);
}
}
void row8(uint8_t num, uint8_t cap) {
if (num % 2 == 0) {
int num8 = num*8;
for (uint8_t i = 0; i<cap; i++) {
strip.setPixelColor(i+num8, vol[cap]);
}
}
else {
int num8 = num * 8 + 7;
for (uint8_t i = 0; i<cap; i++) {
strip.setPixelColor(num8-i, vol[cap]);
}
}
}
import processing.serial.*;
import processing.sound.*;
Serial usedPort;
FFT fft;
float scale = 1.0;
float minValue = 0.0;
int bands = 1 << 5;
float smoothingFactor = 0.1;
float[] sum = new float[bands];
public void setup() {
usedPort = new Serial(this, Serial.list()[1], 57600);
SoundFile sample = new SoundFile(this, “dvorak.aiff”);
sample.loop();
fft = new FFT(this, bands);
fft.input(sample);
}
void draw() {
fft.analyze();
for (int i = 0; i < bands; i++) {
sum[i] += (fft.spectrum[i] – sum[i]) * smoothingFactor;
}
for (int i = 0; i < 32; i++) {
usedPort.write(byte(max(min(50*sum[i]*(1+i),8),0)));
}
delay(16);
}
First Milestone
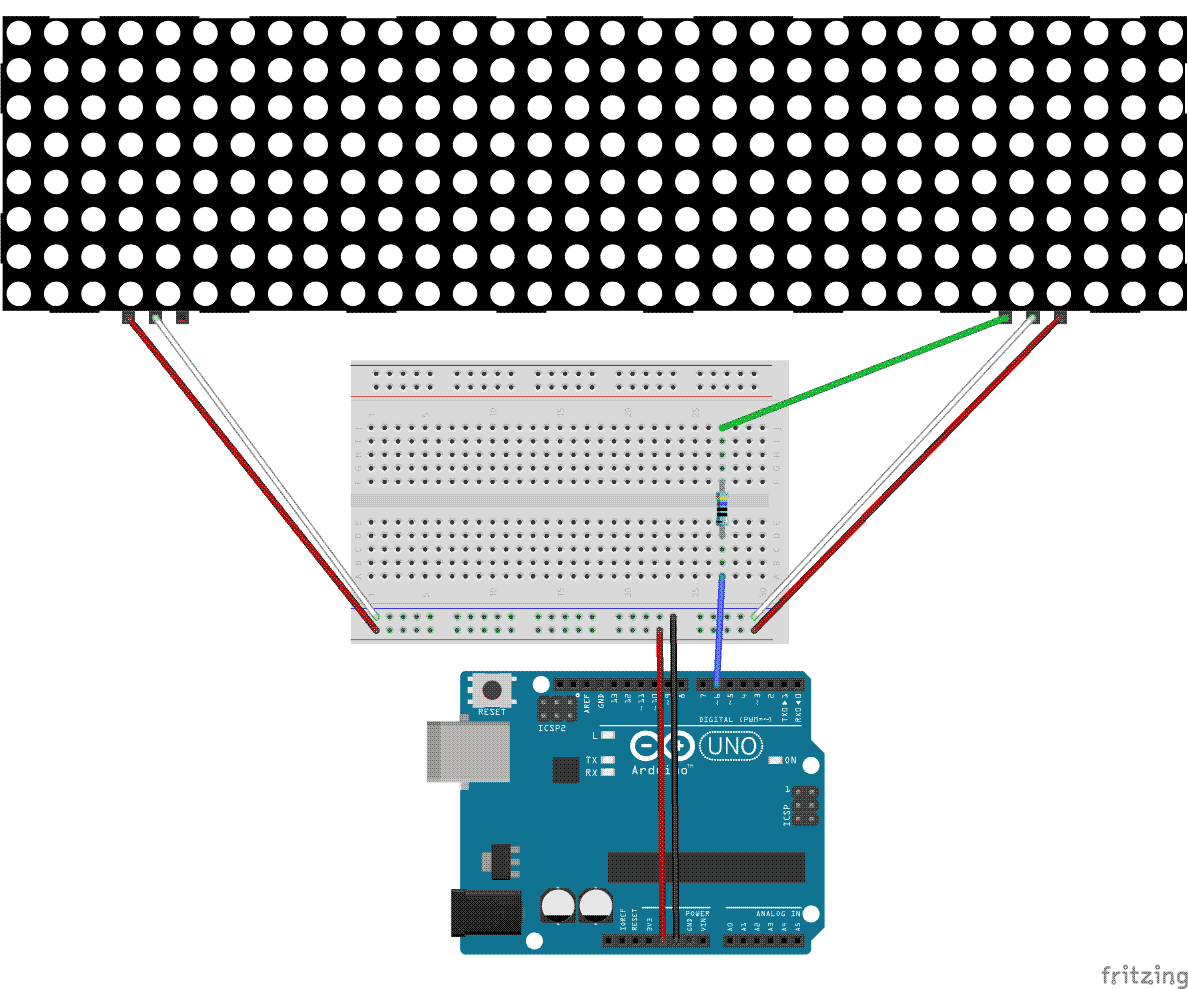
My first milestone for this project was the connection of the LED matrix to the Arduino. I wrote two functions to light up certain rows of the matrix to a certain heights and colors. To the left is the fruit of these labors.
#include <Adafruit_NeoPixel.h>
#define PIN 6
Adafruit_NeoPixel strip = Adafruit_NeoPixel(256, PIN, NEO_GRB + NEO_KHZ800);
int red[] = {
8, 7, 6, 5, 4, 3, 2, 1,
0, 8, 8, 7, 3, 5, 4, 4,
0, 1, 2, 3, 4, 5, 6, 7,
4, 8, 3, 7, 2, 6, 1, 5
};
void setup() {
strip.begin();
strip.show();
}
void loop() {
for (uint16_t i = 0; i<32; i++) {
red[i] = i % 8;
clearRow(i);
row(i, red[i]);
strip.show();
delay(10);
}
for (uint16_t i = 0; i<32; i++) {
red[i] = i % 9;
clearRow(i+1);
rowc(i, red[i]);
strip.show();
delay(10);
}
}
uint32_t vol[] = {
strip.Color(0,48,4),
strip.Color(0,48,0),
strip.Color(16,48,0),
strip.Color(32,48,0),
strip.Color(48,48,0),
strip.Color(48,32,0),
strip.Color(48,8,0),
strip.Color(48,0,0)
};
void clearRow(uint8_t num) {
int num8 = num*8;
for (uint16_t i = 0; i<8; i++) {
strip.setPixelColor(num8+i, strip.Color(0,0,0));
}
}
void row(uint8_t num, uint8_t cap) {
if (num % 2 == 0) {
int num8 = num*8;
for (uint16_t i = 0; i<cap; i++) {
strip.setPixelColor(i+num8, vol[i]);
}
} else {
int num8 = num * 8 + 7;
for (uint16_t i = 0; i<cap; i++) {
strip.setPixelColor(num8-i, vol[i]);
}
}
}
void rowc(uint8_t num, uint8_t cap) {
if (num % 2 == 0) {
int num8 = num*8;
for (uint16_t i = 0; i<cap; i++) {
strip.setPixelColor(i+num8, vol[cap]);
}
} else {
int num8 = num * 8 + 7;
for (uint16_t i = 0; i<cap; i++) {
strip.setPixelColor(num8-i, vol[cap]);
}
}
}


