Magic Mirror – Arunim A.

My main project is the Magic Mirror, which gives the illusion of text or other information such as the time appearing on a mirror. This effect is reached by placing a 2-way mirror on a monitor and making the background of the text black and making the text white. Where there is black behind the mirror, it acts as a normal mirror, but you can still see the text where it is white.

ENGINEER

Arunim A.

AREA OF INTEREST

Mechanical Engineering

SCHOOL

Henry M. Gunn High School

GRADE

Incoming Sophomore

My Experience at BlueStamp

In my time at BlueStamp I learned an incredible amount of engineering. This was partly due to the fact that this was my first time taking a step into the field of electric engineering. I definitely learned technical information about my project and even a little bit of technical knowledge relating to the projects of my peers. However, I feel that my biggest takeaway from my time at this camp was my confidence in being able to learn things on my own. With just a little time and effort, I know that I can figure out things that may seem impossibly complicated at first.

Demo Night

Build Plan

In the Build Plan, I outlined how I wanted to progress though the project and where I would have my milestones. This helped me plan my goals for each day as well as be strategic. If I couldn’t do one of the steps, I could skip ahead and do something that I would be doing soon after. This allowed me to be more efficient with my time.


Major Steps to complete the project:

  1. Make sure all parts have arrived as planned
  2. Install Raspbian to the Pi
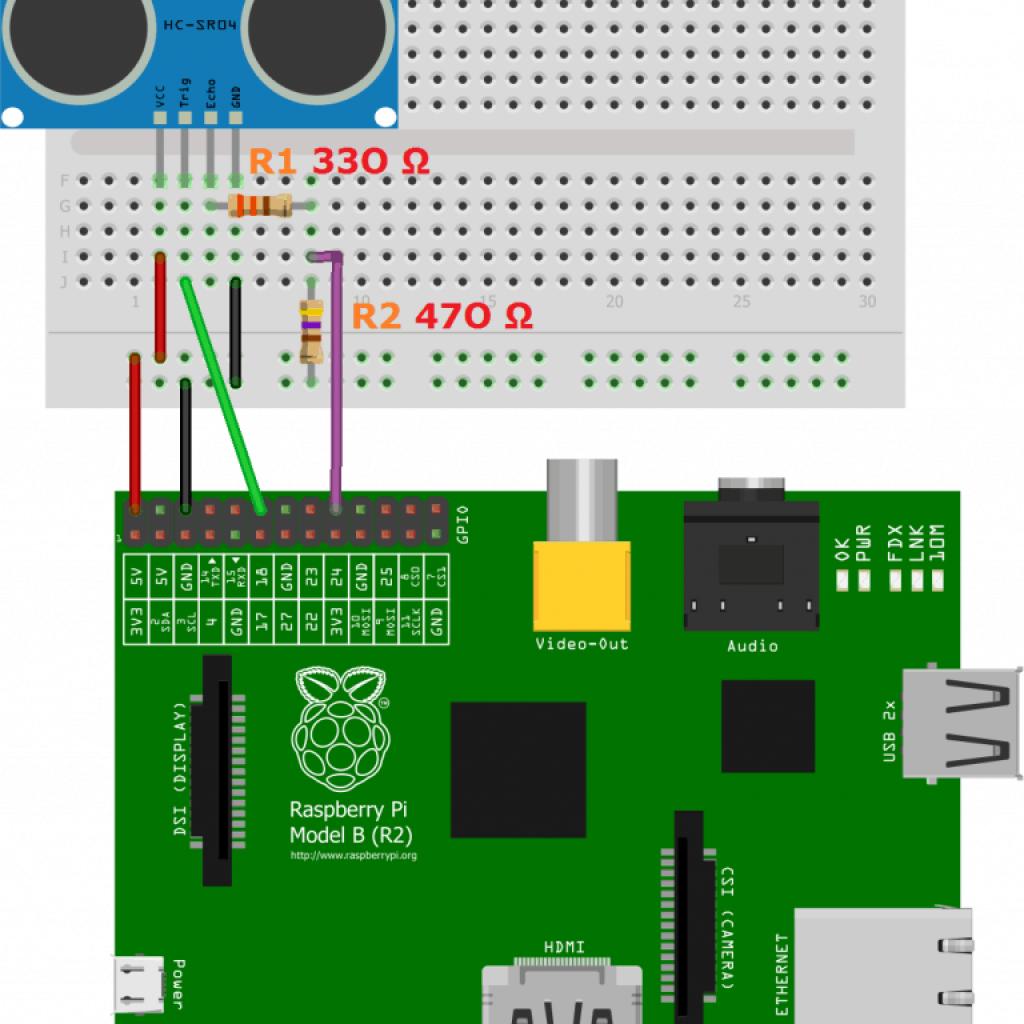
  3. Set up the Pi, get familiar with the Pi and terminal. This is a milestone. Save all design files, record a video, and post to the website.
  4. Download the Magic Mirror from github
  5. Start configuring the magic mirror
    1. Clock
    2. Weather
    3. Calendar
  6. Remove base of monitor, make sure that it takes up as little space as possible. This is a milestone. Save all design files, record a video, and post to the website.
  7. Create a rectangular frame around it using the 1″ x 2″ wood. (Don’t glue)
  8. Layout where the raspberry pi and acrylic mirror will go and figure out how it will be wired and where the power wires will leave the frame.
  9. Cut slots for power wires to go out of and then glue up the frame.
  10. Create the sides of the frame such that it covers up the bezel using the 1″ x 3″ wood (Don’t glue). This is a milestone. Save all design files, record a video, and post to the website.
  11. Turn on the raspberry pi and monitor. Add modifications. This is a milestone. Save all design files, record a video, and post to the website.
  12. Create full documentation, write a blog post describing the system, and post everything on your webpage.


Potential Modifications:

  1. Allow for wireless mirroring from a laptop.
    1. Allows for changing the code easily
  2. Add an interactive functionality.
    1. Turns off after 5 minutes without movement.
    2. Respond to simple voice commands.
Bill Of Materials

For the Bill of Materials, the biggest part was the monitor. The monitor that I used was 64 dollars, which was a pretty decent price. Luckily, the rest of the materials weren’t as expensive. The Raspberry Pi is the main part of the piece and it controls what is displayed on the monitor. The acrylic works to provide the “magic mirror” effect, and the wireless keyboard/mouse are used to configure the Pi.


Item # Description Vendor Qty Unit Cost Total Cost
1 Raspberry Pi 3 Model B Motherboard Amazon 1 $36.98 $36.98
2 Sceptre E205W-1600 20″ Amazon 1 $66.49 $66.49
3 Cable Matters Right Angle HDMI Cable Amazon 1 $6.99 $6.99
4 12″ x 24″ Acrylic See-Through Mirror Amazon 1 $29.99 $29.99
5 12 ft 1×3 Wood Plank The Home Depot 1 $14.26 $14.26
6 12 ft 1×2 Wood Plank The Home Depot 1 $9.92 $9.92
7 Sandisk Ultra 16GB Micro SD Card Amazon 1 $8.70 $8.70
8 Logitech Wireless Keyboard/Mouse Amazon 1 $19.98 $19.98
9 Gorilla Wood Glue 8 oz. Amazon 1 $3.59 $3.59
Total: $196.90

Modifications

The final step for my magic mirror project was to add modifications to the project. For my modifications, I included an ultrasonic sensor that can turn the display on/off and allowing Siri to add events to the calendars that appear on the mirror. For the ultrasonic sensor, I essentially had a python program that printed a command to the terminal depending on how far away something was. If it was too far away, the command would turn the display off, but the program would keep running. Then, when an object gets closer than 125 cm, the command turns the display back on. I didn’t know the right way to get the program to print into the terminal, but a little bit of research did the trick. Next, to get Siri to control the calendar, all I had to do was add my Apple Calendar to the mirror and increase the refresh rate. Then, within 2 seconds of Siri creating the event, the calendar would refresh and the event would show up.

Final Milestone – Frame and Mirror

My third and final milestone was to construct the frame around the monitor and cables. The front frame needed to be better looking and was harder to make, so I made sure to be careful and plan out each step. The side frame wasn’t as complicated, as it just used butt joints instead of miter joints. This frame also wasn’t going to be as visible and just needed to cover the cables and monitor from view and provide a way to hang the mirror. Once I had the frame constructed, I was able to insert the 2-way mirror in between the monitor and the frame. I made sure to secure all of the components in place with tape and wood, so that there won’t be many problems in the future with things becoming dislodged or unconnected. During this process, however, I had trouble with creating the 45 degree joints. It was difficult due to the cuts being imprecise. After cleaning up the cuts, I was able to fix most of the joints.

Second Milestone – Clock, Calendar, and Weather

My second milestone was to create the clock and the weather forecast. I found these modules on GitHub and then modified them to make them better looking and fitting in the mirror. The clock was straightforward; all I had to do was decide whether I wanted analog, digital, or both, set the timezone, and change the colors. The weather forecast was much more difficult for me to get done. For this, I had to get an API and a location ID from openweathermap.com. To get the API key, I created an account on the website. Next, to get the location ID of my area, I downloaded a file with a list of location ID’s along with the location they coded for. Since the name of my city wasn’t in this list, I had to search through the list for coordinates that were nearby to where I lived, in order to get an accurate forecast. Opening the file from the website took a  long time because I misidentified the type of file and had been trying to open the file in the wrong format. Even when I finally opened the file, it took me while to find the nearest location. In the end, however, I got both of these modules to work. I also added a calendar that connects to my Google calendar, and can show upcoming events. For this module, I downloaded some code from GitHub and then included the webcal address from my Google calendar to show it.

First Milestone – Creating a Webpage with the Raspberry Pi

My first milestone was to set up a web page using the Raspberry Pi. I first downloaded NOOBS to a micro SD card which I then put into the Raspberry Pi. This allowed me to start using the Raspberry Pi on the monitor. I then installed an application called Apache 2, which by default creates a web page for using the IP address of the Pi. I created a .php file that was called index.php into the folder for this web page from the terminal. This allowed me to edit the web page and display what I wanted using html. In this file, I reversed the background color and text color so that only the things that I want to be displayed are visible and the rest acts like a mirror.

I had some trouble finding out what went wrong when I couldn’t connect to the web page. At first, I thought that it was a problem with the internet connection. I also tried to delete and recreate the index.php file, but it wouldn’t allow me to do that unless I did it from the terminal. In order to remedy this, I tried to repeat what I had done to get the web page initially working, and I got to the step where I looked up the IP address of the Pi. Finally, I realized that the IP address had changed, and the web page was still working, just with a different IP address. After troubleshooting and retracing my steps, I got the web page to work.

Images – Main

Starter Project – Rainbow Light Show

Starter Project Video - Arunim A.

Images – Starter

My starter project is a motion controlled LED strip. With a wave of your hand, you cause a chain of LED’s of various colors to chase each other. Infrared (IR) sensors are able to detect the movement or presence of objects in front of them. The light show uses 3 IR sensors (one for red, green, and blue) to detect motion and display color dependent on the combination of motion in front of each IR sensor. For example, if there was a hand in front of the blue sensor and the red sensor, the output on the LED strip would be purple. The integrated circuit took in what the IR sensors sensed and then using that, sent a signal to the LED strip to change the colors. Some challenges I faced while doing this project involved soldering all the components. At first, I found it difficult to keep all of the solders in the correct location, but I took my time and eventually got it all right. One of the things that I constantly ended up doing is double checking that all of the solders were in good condition and often redoing them. In addition, I used resistors, which lower current, and capacitors, which store charge. Overall, I think that this was a good introduction to working with electronics.

Bibliography

https://tutorials-raspberrypi.com/raspberry-pi-ultrasonic-sensor-hc-sr04/

Leave a Comment

Start typing and press Enter to search

Bluestamp Engineering