Laser Tank
My project consists of a plastic tank chassis with an Arduino and a H-driver attached to it. There is connection to PS2 controller receiver for movement with controller. The movements are controlled with the d-pad and the laser servos are controlled with the square, circle, triangle, and x buttons. The battery pack is attached to the top of the motor. Further button inputs can be reprogrammed with the Ardunio.
Engineer
Andrew L
Area of Interest
Robotics/ Environmental Engineering
School
Glen Ridge High School
Grade
Rising Sophomore
Final Milestone
#include <Servo.h>
#include <L298N.h>
#include <PS2X_lib.h> //for v1.6
PS2X ps2x; // create PS2 Controller Class
//pin definition
#define ENA 3
#define IN1 4
#define IN2 2
#define IN3 7
#define IN4 8
#define ENB 5
int error = 0;
byte type = 0;
byte vibrate = 0;
//create a motor instance
L298N motorleft(ENA, IN1, IN2);
L298N motorright(ENB, IN3, IN4);
Servo servo1,servo2; // create servo object to control a servo
// twelve servo objects can be created on most boards
int pos = 90;
int pos2 = 90;
void setup() {
servo1.attach(9); // attaches the servo on pin 9 to the servo object
servo2.attach(6);
servo1.write(pos);
servo2.write(pos2);
//used for display information
Serial.begin(57600);
error = ps2x.config_gamepad(13,11,10,12, true, true); //setup pins and settings: GamePad(clock, command, attention, data, Pressures?, Rumble?) check for error
if(error == 0){
Serial.println(“Found Controller, configured successful”);
Serial.println(“Try out all the buttons, X will vibrate the controller, faster as you press harder;”);
Serial.println(“holding L1 or R1 will print out the analog stick values.”);
Serial.println(“Go to www.billporter.info for updates and to report bugs.”);
}
else if(error == 1)
Serial.println(“No controller found, check wiring, see readme.txt to enable debug. visit www.billporter.info for troubleshooting tips”);
else if(error == 2)
Serial.println(“Controller found but not accepting commands. see readme.txt to enable debug. Visit www.billporter.info for troubleshooting tips”);
else if(error == 3)
Serial.println(“Controller refusing to enter Pressures mode, may not support it. “);
//Serial.print(ps2x.Analog(1), HEX);
type = ps2x.readType();
switch(type) {
case 0:
Serial.println(“Unknown Controller type”);
break;
case 1:
Serial.println(“DualShock Controller Found”);
break;
case 2:
Serial.println(“GuitarHero Controller Found”);
break;
}
motorleft.setSpeed(100); // an integer between 0 and /-
motorright.setSpeed(100);
}
void loop() {
//while(6556){
// int et = 0;
// et++;
// et–;
//}
if(error == 1) //skip loop if no controller found
return;
if(type == 2){
Serial.println(“Guitar hero controller”);
}
else { //DualShock Controller
ps2x.read_gamepad(false, vibrate); //read controller and set large motor to spin at ‘vibrate’ speed
if(ps2x.Button(PSB_PAD_UP)) { //will be TRUE as long as button is pressed
// Serial.print(“Up held this hard: “);
// Serial.println(ps2x.Analog(PSAB_PAD_UP), DEC);
//tell the motor to go forward (may depend by your wiring)
// Serial.print(“forward = “);
motorleft.forward();
motorright.forward();
delay(200);
// motorleft.stop();
// motorright.stop();
// delay(100);
}
if(ps2x.Button(PSB_PAD_RIGHT)){
// Serial.print(“Right held this hard: “);
// Serial.println(ps2x.Analog(PSAB_PAD_RIGHT), DEC);
// Serial.print(“right = “);
motorleft.forward();
motorright.backward();
delay(200);
// motorleft.stop();
// motorright.stop();
//delay(100);
}
if(ps2x.Button(PSB_PAD_LEFT)){
// Serial.print(“LEFT held this hard: “);
// Serial.println(ps2x.Analog(PSAB_PAD_LEFT), DEC);
// Serial.print(“left = “);
motorleft.backward();
motorright.forward();
delay(200);
// motorleft.stop();
// motorright.stop();
// delay(100);
}
if(ps2x.Button(PSB_PAD_DOWN)){
// Serial.print(“DOWN held this hard: “);
// Serial.println(ps2x.Analog(PSAB_PAD_DOWN), DEC);
// Serial.print(“backward = “);
motorleft.backward();
motorright.backward();
delay(200);
// motorleft.stop();
// motorright.stop();
// delay(100);
}
}
// if (ps2x.NewButtonState()) { //will be TRUE if any button changes state (on to off, or off to on)
if(ps2x.ButtonPressed(PSB_RED)) { //will be TRUE if button was JUST pressed
// Serial.println(“Circle just pressed”);
// for (int pos = 90; pos <= 120; pos += 1) { // goes from 0 degrees to 180 degrees
// in steps of 1 degree
if(pos > 10){
pos-=10;
servo2.write(pos); // tell servo to go to position in variable ‘pos’
delay(15); // waits 15ms for the servo to reach the position
}
}
if(ps2x.ButtonReleased(PSB_PINK))
{//will be TRUE if button was JUST released
// Serial.println(“Square just released”);
// for (pos = 90; pos <= 60; pos -= 1) { // goes from 0 degrees to 180 degrees
// in steps of 1 degree
if(pos < 170){
pos+=10;
servo2.write(pos); // tell servo to go to position in variable ‘pos’
delay(15); // waits 15ms for the servo to reach the position
}
}
if(ps2x.NewButtonState(PSB_BLUE)) { //will be TRUE if button was JUST pressed OR released
Serial.println(“X just changed”);
// for (pos = 90; pos <= 60; pos += 1) { // goes from 0 degrees to 180 degrees
// // in steps of 1 degree
// servo1.write(pos); // tell servo to go to position in variable ‘pos’
// delay(15); // waits 15ms for the servo to reach the position
// }
if(pos2 > 10){
pos2-=10;
servo1.write(pos2); // tell servo to go to position in variable ‘pos’
delay(15); // waits 15ms for the servo to reach the position
}
}
if(ps2x.Button(PSB_GREEN)) {
Serial.println(“Triangle pressed”);
// for (pos = 90; pos <= 60; pos -= 1) { // goes from 0 degrees to 180 degrees
// // in steps of 1 degree
// servo1.write(pos); // tell servo to go to position in variable ‘pos’
// delay(15); // waits 15ms for the servo to reach the position
// }
if(pos2 > 10){
pos2-=10;
servo1.write(pos2); // tell servo to go to position in variable ‘pos’
delay(15); // waits 15ms for the servo to reach the position
}
{
// if(ps2x.0intln(“R2 pressed”);
}
}
motorleft.stop();
motorright.stop();
delay(50);
// delay(3000);
//
//
//
// delay(3000);
//
//motorleft.stop();
//motorright.stop();
//
//
// delay(3000);
//
// //stop running
// motorleft.stop();
// motorright.stop();
//
//
// delay(3000);
//
// //change the initial speed
//
//
// //tell the motor to go back (may depend by your wiring)
//
//
//
// delay(3000);
//
// //stop running
// motorleft.stop();
//
// motorright.stop();
//
//
//
// //change the initial speed
//
// delay(3000);
// }
Laser pointer with Servo assistance for height and rotation
This is my first and final modification for my main project the tank. My modification consisted of adding a laser attached to two servos that corresponded to elevation and direction. Connecting the servos and laser were slightly difficult as the Arduino was running out of space for places to put pins in. After I added the servos and made sure that both the servos and laser were powered correctly, I uploaded test code to test how the servos worked. After confirming it worked, I added it to my main code and adapted it to move 10 degrees in each direction with the triangle circle, square and x buttons on the controller. There was some difficulty with getting it to work at first but I eventually fixed it and made the code more streamlined.
Second Milestone
#include <L298N.h>
#include <PS2X_lib.h> //for v1.6
PS2X ps2x; // create PS2 Controller Class
//pin definition
#define ENA 3
#define IN1 4
#define IN2 2
#define IN3 7
#define IN4 8
#define ENB 5
int error = 0;
byte type = 0;
byte vibrate = 0;
//create a motor instance
L298N motorleft(ENA, IN1, IN2);
L298N motorright(ENB, IN3, IN4);
void setup() {
//used for display information
Serial.begin(57600);
error = ps2x.config_gamepad(13,11,10,12, true, true); //setup pins and settings: GamePad(clock, command, attention, data, Pressures?, Rumble?) check for error
if(error == 0){
Serial.println(“Found Controller, configured successful”);
Serial.println(“Try out all the buttons, X will vibrate the controller, faster as you press harder;”);
Serial.println(“holding L1 or R1 will print out the analog stick values.”);
Serial.println(“Go to www.billporter.info for updates and to report bugs.”);
}
else if(error == 1)
Serial.println(“No controller found, check wiring, see readme.txt to enable debug. visit www.billporter.info for troubleshooting tips”);
else if(error == 2)
Serial.println(“Controller found but not accepting commands. see readme.txt to enable debug. Visit www.billporter.info for troubleshooting tips”);
else if(error == 3)
Serial.println(“Controller refusing to enter Pressures mode, may not support it. “);
//Serial.print(ps2x.Analog(1), HEX);
type = ps2x.readType();
switch(type) {
case 0:
Serial.println(“Unknown Controller type”);
break;
case 1:
Serial.println(“DualShock Controller Found”);
break;
case 2:
Serial.println(“GuitarHero Controller Found”);
break;
}
motorleft.setSpeed(100); // an integer between 0 and /-
motorright.setSpeed(100);
}
void loop() {
if(error == 1) //skip loop if no controller found
return;
if(type == 2){
Serial.println(“Guitar hero controller”);
}
else { //DualShock Controller
ps2x.read_gamepad(false, vibrate); //read controller and set large motor to spin at ‘vibrate’ speed
if(ps2x.Button(PSB_PAD_UP)) { //will be TRUE as long as button is pressed
// Serial.print(“Up held this hard: “);
// Serial.println(ps2x.Analog(PSAB_PAD_UP), DEC);
//tell the motor to go forward (may depend by your wiring)
// Serial.print(“forward = “);
motorleft.forward();
motorright.forward();
delay(250);
// motorleft.stop();
// motorright.stop();
// delay(100);
}
if(ps2x.Button(PSB_PAD_RIGHT)){
//Serial.print(“Right held this hard: “);
//Serial.println(ps2x.Analog(PSAB_PAD_RIGHT), DEC);
// Serial.print(“right = “);
motorleft.forward();
motorright.backward();
delay(250);
// motorleft.stop();
// motorright.stop();
//delay(100);
}
if(ps2x.Button(PSB_PAD_LEFT)){
//Serial.print(“LEFT held this hard: “);
//Serial.println(ps2x.Analog(PSAB_PAD_LEFT), DEC);
// Serial.print(“left = “);
motorleft.backward();
motorright.forward();
delay(250);
// motorleft.stop();
// motorright.stop();
// delay(100);
}
if(ps2x.Button(PSB_PAD_DOWN)){
//Serial.print(“DOWN held this hard: “);
//Serial.println(ps2x.Analog(PSAB_PAD_DOWN), DEC);
// Serial.print(“backward = “);
motorleft.backward();
motorright.backward();
delay(250);
// motorleft.stop();
// motorright.stop();
// delay(100);
}
}
motorleft.stop();
motorright.stop();
delay(50);
// delay(3000);
//
//
//
// delay(3000);
//
//motorleft.stop();
//motorright.stop();
//
//
// delay(3000);
//
// //stop running
// motorleft.stop();
// motorright.stop();
//
//
// delay(3000);
//
// //change the initial speed
//
//
// //tell the motor to go back (may depend by your wiring)
//
//
//
// delay(3000);
//
// //stop running
// motorleft.stop();
//
// motorright.stop();
//
//
//
// //change the initial speed
//
// delay(3000);
}
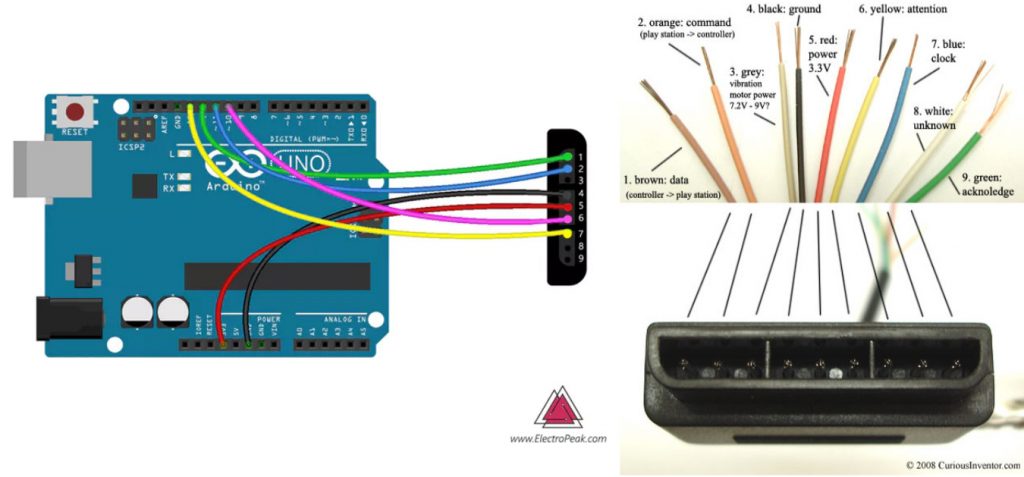
For my Second Milestone, it consisted of modifications to the receiver to connect it to the controller. After connecting the receiver to the Arduino and testing the motor again, I started uploading code to correspond actions with button inputs. With this I sought to control the motor with the controller more effectively. I programmed the movements to the track-pad on the PS2. Up on the track-pad moves the tank forwards, down on the track-pad moves the tank back, and left and right rotate the tank in each direction. I got this working and then I ran into a problem with the weight balancing after securing the battery and receiver. I fixed this by attaching the receiver to the back and the battery to the top of the motor. The Arduino communicates to the controller through the receiver through the 6 connections to the Arduino. Each connection controls a different thing for the controller including button interaction, control itself, and broadcasting to the controller.
First Milestone
For my First Milestone, it consisted of attaching the Arduino and the H-driver to the chassis. Assembling the chassis was pretty straight forward aside from some difficulty in getting the motors themselves to spin with the other gears. I used nylon spacers and screws to secure the Arduino to the chassis and attached the H-driver to the top of the Arduino. Then I reconnected and soldered the Arduino to the motor and uploaded example code to the Arduino. The H-driver itself helps to regulate and give more power to the motor through the Arduino. The Arduino itself can control the motor but cannot do this with that much precision. The H-Driver helps the Arduino to relay instructions correctly and more efficiently to the motors. I tested both motors with the test code and I assigned additional definitions for each of the added variables for the second motor. After this I modified the test code to move both motors at the same time.
Starter Project
My Starter Project is the Mini POV 4, a fully customizable light painting kit. When you wave the POV in front of a camera on long exposure, it displays an image that appears to be floating. I enjoyed this project because I learned about the different electrical components and their roles in this circuit as well as how to properly solder.
Demonstration
How it works
The Mini POV 4 is powered by a 4.5V source. The 100μF and 0.1μ F capacitors work together to stabilize the current and filter out noise. The potentiometer, also known as a variable resistor, controls the amount of current that flows to the micro-controller. When the dial is turned, the input to the micro controller changes, which changes the output (the LED’s blinking speed). The 2.2k resistors limit current flowing to the 3 transistors. Because the micro controller’s signal is not strong enough to communicate with the LED’s, the transistors amplify the signal. Each LED has it’s own 47 ohm resistor that prevents the LED from overheating. In between the resistors is a ceramic resonator which acts as the board’s metronome and makes sure that the LED’s blink at a consistent rate. The board also has two diodes to make sure electrostatic discharge does not occur. Electrostatic discharge is when static electricity is released when two objects come into contact. The diodes also ensure that the data being transferred from a computer to the POV does not get interrupted. Last of all, there is the USB type B port that allows the user to customize the image on a computer by using the Mini POV 4 software. Users are able to draw their own 8 pixel tall image and download it to their POV.
Mini POV Schematic