Solar Power Pi
Hello my name is Adam. My main project is a solar powered Raspberry Pi. This Device will power a camera that will take a time lapse. It uses a solar panel as a source of energy to power my device.
Engineer
Adam B
Area of Interest
Engineering
School
Berkeley Carroll
Grade
8th Grade
Final Milestone
what was achieved
For my second millstone I finished my project. I added my solar panel, a Pi Platter, and my Lithium Polymer battery.
how
I assembled my project which involved putting all of my parts in my enclosure, then dremeled a hole so that all my wires would come out and connect to my solar panel and breadboard, and then I placed my camera. The solar panel powers my device and my Pi Platter ensures that my Raspberry Pi would not be overwhelmed by the change in power from the solar panel. Next, I used a battery to store the power from the solar panel, then I used my camera to record. I also used a button to turn my camera on and off, and used my Raspberry Pi to process my code.
biggest challenges
My biggest challenge was probably trying to fit everything in my box. This was difficult because I had a lot of parts and I did not want my Pi Plater and my Raspberry Pi to touch. If the platter and my Raspberry Pi made contact it would have shorted my project. But my solution for this problem was to put the majority of my parts on the outside of my box.
reflection
Overall, I thought that I would not finish my project in time but I proved myself wrong. I also gained knowledge of coding and mechanical and electrical engineering that I did not have previously.
First Milestone
What was achived
For my first millstone, I completed the coding portion and setting up my camera module so that it would record video using a Raspberry Pi. My project is based off the following link:
https://projects.raspberrypi.org/en/projects/timelapse-setup
How
I did this by connecting the module to my Raspberry Pi three. A Raspberry Pi is the equivalent of a miniature computer, also it is cheap and versatile so it is commonly used in electronics projects such as this. Then I started to create code to use for my camera module. My code functioned by having my camera record for five seconds and then it would preview the footage that the Pi camera recorded. This code was the center of my project. After I got the camera to work I moved onto the next step. My goal was to have a button turn an LED light and then off. The button would turn the camera on then off. Then the LED would indicate whether the camera was on or off .
Biggest Challenge
Coding the button was probably the most difficult part of my project because it was very unpredictable but eventually I completed this difficult task. Then I combined these two separate projects so that when I pressed a button the camera would start to record.
Reflection
Overall coding the raspberry pi was difficult but in the end it was rewarding to see my hard work pay off. This part of my project also taught me a lot about coding a Raspberry Pi. Before this project, I did not know how to code a Raspberry Pi using Python, but now I have expanded my knowledge of coding.
camera.start_preview(alpha=200)
// Alpha changes the camera transparence
sleep(5)
camera.stop_preview()
sleep(1)
camera.start_preview()
camera.start_recording(‘/home/pi/Videos/test.h264’)
sleep(5)
camera.stop_recording()
camera.stop_preview()
while True:
//record the last state of the button
prevPress = pressed
if button.is_pressed == True:
pressed = True
else:
pressed = False
if pressed == True and prevPress == False:
i +=1
//Sets the variables values
print (“Pressed”)
print(i)
if on:
on = False
//prints the value of the variables
camera.stop_preview()
camera.stop_recording()
// tells it to stop or start recording
while True:
//record the last state of the button
prevPress = pressed
if button.is_pressed == True:
pressed = True
else:
pressed = False
if pressed == True and prevPress == False:
i +=1
Sets the value of the variables
print (“Pressed”)
print(i)
if on:
//prints the value of the variables
Starter Project
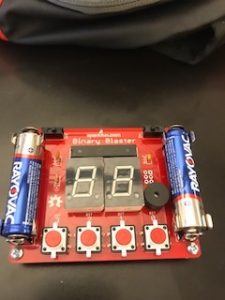
Binary and how it works: Binary is a counting system works by having no digit be greater than 1. To learn more about binary click this link: https://en.wikipedia.org/wiki/Binary_number. For example, 2 is represented in binary as 10, 3 is represented as 11, 4 is represented as 100, and so on. This binary blaster challenged me to become better at binary. I also learned how to solder which is much more difficult than it seems. Soldering is a common technique in building electronics. You have to be careful to not put too much soldering wire or else you have to remove it and if you put too much then you have to put more to make sure that it works.
Parts: This taught me that it takes of effort to make something simple work. I use a piezo buzzer for the sound, several buttons for the game. I used 1 resistor that was ten ohms so that it could resist the electrical current and not short circuit the device. I also used two switches: one to turn on the piezo buzzer on and the other to turn on the buttons and the screen. I used a ceramic capacitor to stabilize the circuit. A capacitor is a device which stores charge and in certain circumstances can release electrical current. In this project, the IC chip acts the brains of the device and did most of the processing. The seven segment display was the screen for the numbers.
Parts and how they work: In addition, I learned that an IC chip stands for an integrated circuit. I also learned that a piezo buzzer is different from a normal speaker because a piezo buzzer makes one sound compared to multiple sounds. A speaker makes multiple sounds to mimic an instrument or the sound of a person’s voice. I now know that ceramic capacitor stores the electrical current to stabilize the circuit.
Challenges: My biggest challenge was getting all of the buttons to work. It might seem like a simple thing but it was actually very difficult. I had to take the buttons in and out and for each button took five minutes. But after I was finished with this very tedious task I felt happy that I finally finished. Overall, this project was a lot of fun it was quick and I expanded my knowledge. I learned a lot of valuable skills like soldering, binary, and the many parts that made up my device.