Image Recognition – Emotion Guesser
Using OpenCV and Sci-kit, an industrial-grade library useful for building machine learning and deep learning classifiers, it is possible to construct software to detect a smiling face from a video stream. Going a step further with the help of libraries like keras, detection of a variety of emotions including joy, sadness, anger, disgust, and confusion can be implemented easily. Other multiclass classification additions might include age-estimation, gender guessing, and ethnicity guessing.
Engineer
Aaron S.
Area of Interest
Software Engineering – Computer Vision with Machine Learning and Deep Learning
School
Lynbrook High School
Grade
Rising Junior
Final Milestone with Modifications (with Video Demo)
Note that the demo above is not perfect, there are many misclassifications. There are several reasons for this, such as overfitting the model, insufficient training data, and the simplicity of the CNN model used. This was only an introductory project to machine learning and many mistakes were made in the learning process.
I initially set out to create, train, and test a classifier that works in realtime to recognize a smiling face from one that is not. However, since the last milestone, I have begun to expand the project, adding my own modifications. I have added a few convolutional neural networks(CNNs) to solve multiclass classification problems, rather than the previous single binary classification. Specifically, the software guesses emotion, age, gender, and ethnicity based on facial appearance.
But how does it work? This was implemented using deep learning. As a commonly heard buzzword, what is it really? And how is it different from any other machine learning method? Both utilize layered models with an input layer, several layers dedicated to the extraction of features, and a final output classifier layer. In past methods, the only parameters that were trained were located in the final layer. This “shallow” learning contrasts with deep learning where there are parameters on every layer that is trained, including the feature extraction layers.
Most cases of deep learning are neural networks that utilize backpropagation in order to train early layers by looking at the later outputs. Neural networks in general are built upon a base building block known as a perceptron, modelled upon the neurons in our brains. They take a number of inputs, usually represented as a matrix, multiplies them by another matrix of numbers. This matrix, referred to as the weights, is used to, well, weigh the inputs, because some values are more relevant and important than others in calculating the output. Combining hundreds and thousands of these basic perceptrons in layers can create a neural network that solves complex tasks.
Now that we know what deep learning and neural networks are, let’s take a closer look at the subcategory of what convolutional neural networks, or CNN’s really are. A convolutional neural network is a subcategory of these neural networks, being one that simply has one or more convolutional layer. These layers take an input array, usually an image, and passes a filter over different regions of this image. These filters are used to extract specific features from the region, discarding or making the rest of the region less important to the software. In other words, it highlights what is important in the input image.
After training this model on a training set, the model gradually learns what features are most important in the recognition of what an object is, and focuses on them. And because the filter looks at a region, the classifier can look at relations between pixels, also known as spatial interactions. CNN’s are one of the best methods for image recognition because it is fast, accuracte, and scalable to large sets of data. Yet, with the help of libraries like keras, anyone can implement one of these models.
The best way to learn something is always to try and build it for yourself. Machine learning is no different. I now know so much more about it and how it all works. I started off by following a Kaggle tutorial for the emotion guesser, but for the other three classifiers, I simply went off on what I had gained from the tutorial to create my own classifiers. However, the tutorial had several flaws which I did not notice at the time, but carried over to the other classifiers. After this project, I am fairly confident in being able to use CNN’s ro solve basic classification tasks.
From this phase of adding modifications, I definitely had a few struggles, mainly arising from the flaws I previously mentioned. One of the greatest hurdles I faced was the training of the models taking a huge amount of time. Because I ran the program on my own computer, I was basically unable to use the rest of my computer for several hours waiting for the training to finish. In retrospect, I definitely regret not trying out using a graphics processing unit instead to train my models. Not only would it be faster, it would take up less of my CPU’s memory because a GPU has a dedicated memory for the task. Another hurdle I had was that because of an oversight on my part, several of my classifiers were overfitted on the training data. I mistakenly thought that training longer almost always meant the performance was better. Fortunately, I kept track of my models accuracy through each training iteration so I quickly noticed its accuracy dropping after iterating eight or nine times across the training dataset. I definitely should have stored the model after each iteration or at least stored the last three, but at the time, I did not see the need to. Alternatively, I could have had my software check if the accuracy decreased after each iteration so it could automatically stop the training.
In the near future, I hope to take my newfound knowledge with machine learning to build an app with a group of friends that would utilize aspects of computer vision, semantics analysis and neural networks to solve a task that might benefit students like me, and submit the app to participate in competitions, such as the Congressional App Challenge.
Additional links:
- https://www.youtube.com/watch?v=Ircnzsnr-7Y&t=196s
- Despite slightly poor audio quality, the content very clearly explains the details of CNNs, describing recent breakthroughs in machine learning technology and contrasts the present with the past.
- https://www.kaggle.com/ashishpatel26/tutorial-facial-expression-classification-keras
- Links to the initial Kaggle tutorial I followed to give an idea of how to create and train a Keras CNN
- However, I strongly recommend looking into GPUs or TPUs in order to train a model faster and use less CPU memory
- When following the tutorial, be sure to save and checkpoint the model at every iteration through the training dataset. Alternatively, store only the last three iterations of the model and if the accuracy is dropping, stop the training and use the best of the last three models for the final product.
Standard Machine Learning vs Deep Learning
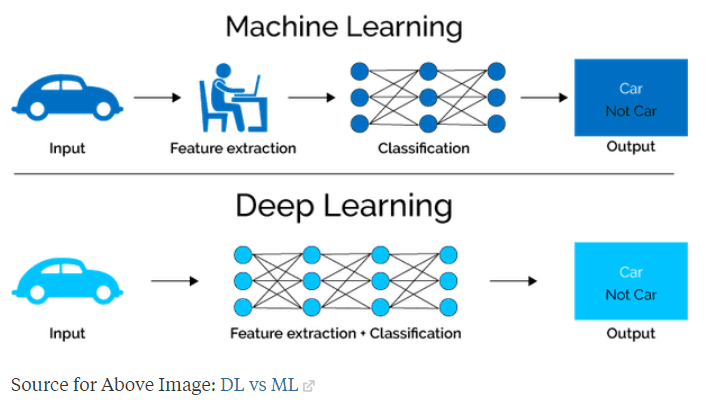
In deep learning, the model has parameters located in the feature extraction layers of the model. These parameters can be modified by the model itself while training on a training dataset. This way, the model can identify for itself what features are most important, unlike standard machine learning, where the parameters are all located in the last classification layers, while the feature extraction process is almost entirely hard-coded by a human. Image sourced from http://www.cs.unc.edu/~swetakar/images/Alzheimers_Research_Presentation.pdf
Age CNN Evaluation
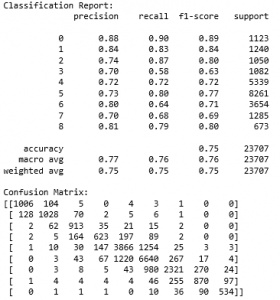
This is the classification report and the confusion matrix of the Age CNN classifier. The model’s accuracy was 75.09%. The classes were infant, toddler, grade-schooler, adolescent, young-adult, adult, middle-aged, senior, and elderly.
Gender CNN Evaluation
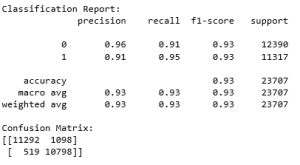
This is the Gender CNN classification report and confusion matrix. The model had an accuracy of 93.18%. The two classes were male and female for dataset purposes
Ethnicity CNN Evaluation
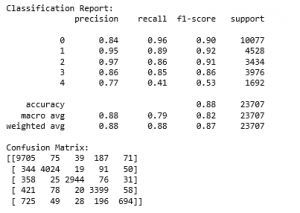
This is the classificaion report and confusion matrix for the Ethnicity CNN. The model’s accuracy was 87.59%. The 5 classes used were white, black, asian, indian, and other.
Final Milestone
For my main project, I set out to create, train, and test a classifier that works in realtime to recognize a smiling face from one that is not.
Compared to the first milestone, the only difference is the addition of a mere one or two words, yet the process of arriving to this point took far more effort than on the surface. Since the first milestone, I have taken the existing Olivetti face dataset, used jupyter notebook and the ipywidgets library to create a simple user interface to classify and store the data in a .xml file using the json library.
Then using this training data and the sklearn library, I created a classifier and estimated the model’s accuracy on general data, using a method called k-fold cross evaluation. In this process, the training data is split into k-number of groups and basically, several classifiers are made by using a different portion of the original training data as the training set. For each group, it is used once as testing data and k-1 times as training data. Then looking at the mean accuracy of these k-number of classifiers reveals how a classifier trained on the entire set will probably perform.
I also split the data using a command in the model_selection subset of the sklearn library known as train_test_split, which splits the training data into just two groups this time: training and testing data. Then using this split, I created a confusion matrix along with a classification report.
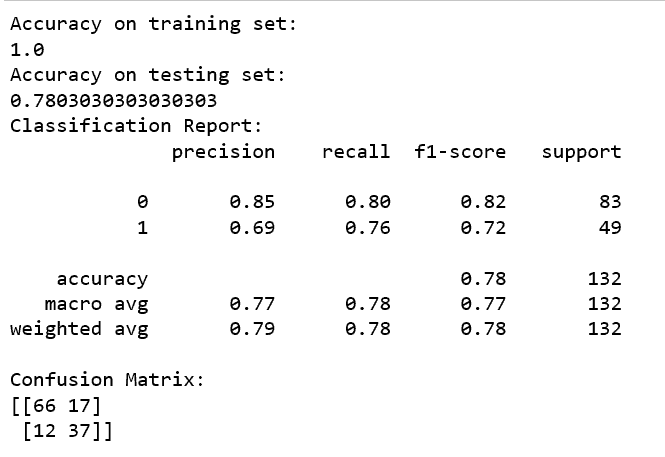
Though it seems like a jumble of decimals and numbers, it reveals very important information about how the classifier will perform on general data. There are two values that are particularly important: the recall and the precision.
If there is a high recall, but low precision, most of the positive examples are correctly recognized (low FN) but there are a lot of false positives. In layman’s terms, this means the classifier uses the label overly liberally, labelling not only the correct cases but also many incorrect cases with the same label.
On the other extreme, if there is Low recall, and high precision, we will miss a lot of positive examples (high FN) but those we predict as positive are indeed positive (low FP). In other words, the classifier uses the label sparingly but when it does it is almost always correct.
In a smile classifier, it is best to have a balance and not lean heavily towards either extreme. Next I combined this smile classifier with the Haar Cascade face detection classifier from the first milestone to isolate a face and classify it. Though this sounds simple, because the extraction of a face can stretch the image, I ran a mapping of the vertical stretch coefficient with respect to the horizontal stretch coefficient on two testing images. By doing so, I would be able to visually identify what coefficients would distort the image in a negative way (and the maps themselves look kinda cool). At this point, I was finally ready to combine it all and add the video from the webcam, with this being the end result.
I learned so much from this project, mostly regarding the various machine learning methods and libraries out there. I also learned how to read a confusion matrix, what recall and precision meant, what a k-fold cross evaluation was, how to create a .xml file, how to use the pickle library to store and load classifiers, how to send and load data using json information packets, how to use the json library to send data packets from jupyter notebook to Spyder python ide, among many others small gains in knowledge.
The greatest struggle I had was my lack of knowledge and experience with the plethora of commands and functions from all these different libraries. Online documentation was often out-of-date and led to many error messages. Another major setback was that after building a completed project, I found the classifier to be too inaccurate, and ended up attributing this to the initial classification of the Olivetti dataset. I ended up reclassifying the dataset twice more, creating a total of 3 completed, trained classifiers, with this being the last and best-performing one.
This was a rewarding experience that gave me my first concrete step into the door of machine learning. There is still so much out there to learn about, the various methods of detection and single-class classification and multi-class classification and the various theory behind them. My next goal will be to investigate another more powerful method of classification and apply it to a similar but more advanced multi-class problem.
This project was based on this outline on Frolian’s blog
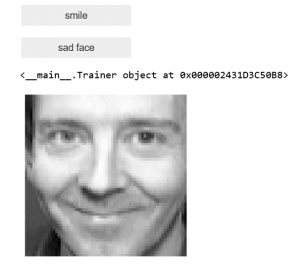
User Interface
Confusion Matrix + Classification Report
Face Extraction Stretch Coefficient Mapping

First Milestone
For my main project, I set out to create, train, and test a classifier that works in realtime to recognize a smiling face from one that is not. The first milestone towards the completion of this project is to isolate the face from each frame in a video.
This was implemented using the OpenCV Machine Learning Library, where CV stands for computer vision. This industry-level library makes this task fairly simple, with many pre-trained classifiers for face detection easily accessible. One thing to point out is the distinction between face detection and recognition. What I set out to do is expression recognition, which focuses on the recognition, rather than on detecting the face itself, which would have been an equally challenging task.
The method that the OpenCV face detection software uses is something called a Haar Cascade classifier, which uses an algorithm based on the proposed concept that some very simple features can be used to define and identify a particular object. For the case of a face, for instance, the area above the eyebrows are always distinctly brighter and lighter in color. Other examples are that the area under the eyes are also brighter than the eyesocket above or that the bridge of the nose is a vertical bright line like feature with the eyebrows and eyes on either side being a darker shade. The OpenCV Classifier is a highly optimized version of this classifier. It takes an image, decreases the resolution, and looks for these simple Haar features in order to detect objects, a method first proposed by Paul Viola and Michael Jones.
During this task, I struggled at length with the downloading of the OpenCV Library. The library through its updates, became incompatible with Python 3.7, with a missing dependency. After opening more than 50 tabs, investigating over 18 different methods, including but not limited to using PIP to download it, using Anaconda to download it, investigating downgrading python on my computer to python 2.7, investigating what dependencies were missing, investigating Christoph Gohlke’s unofficial site where these dependencies can be downloaded as binary wheels, investigating creating a virtual environment that would run a different version of python from the rest of my computer, and downgrading Python on just Anaconda to 2.7, until finally, I found a solution that worked for me, which was to create a new environment on Anaconda separate from the original. Through the process of filtering through mess of conflicting solutions, my most valuable lesson in the completion of this milestone was the ability to effectively troubleshoot and patience.
My next step would be to take an existing dataset of faces, such as the Olivetti dataset or the IMDB dataset, and manually classify them as smiling or not using a simple widget based user interface. Then using this training data, I would train a classifier and test it on a completely new dataset or a live webcam video feed.
Here is a video that helped me:
www.youtube.com/watch?v=88HdqNDQsEk
Check out some of his other videos for more help with machine learning!
Setting Everything Up
Before even beginning the project, the process of setting up OpenCV in and of itself is a huge hurdle for most people. From personal experience scavenging through online forums (stackoverflow, github, quora) discussing the downloading process of OpenCV, I have found that the solution varies depending on the system the user has.
The very first step is to consider what version of Python the project will be using. The main options up for consideration are Python 2.7, 3.6, and what ever is the newest version available at the time of reading this. Python 2.7 is the platform for many machine learning libraries, and many tutorials are also on this platform. However, over time, many of these libraries have begun to update and move towards newer versions of Python, including Tensorflow, Keras, OpenCV, and sci-kit, which are the libraries I used. Unfortunately, some of these libraries have not yet caught up to the newest version. At the time of writing this in July 2019, the newest version of Python available is Python 3.7. Unfortunately, Keras is incompatible with this version. As a result, 3.6 is a recent version of Python that seems to be the best for this project. Because I learned mostly through trial and error, I ended up creating the main intensive project in 3.7, and worked on modifications or improvements in Python 3.6. Fortunately, I only used the keras library in the modifications so this worked out until the completion of the project.
Because most users usually wish to use the most up-to-date Python version available for most of their coding projects, it is recommended to take the path of virtual environments for this project. Two options are most prevalent: the first, which I recommend, is to use Anaconda, while the second is to use virutal environments with Linux. Below is a description of the process I would recommend.
Before all else however, the most important piece of wisdom I can give to new machine learning users who wish to follow in my footsteps is this:
Before committing to the download, check the steps several times and look through forums for recommendations on the method of download.
Many of these softwares have several methods to be downloaded, including Pip, Pip3, Anaconda Prompt, and Miniconda. I am unable to provide much information regarding the differences in each method. I strongly recommend researching for yourself. This site is not meant to be a hand-held tutorial. Much will have to be researched for yourself.
Setting Up Libraries
- Download Anaconda
- Open a new environment in Python 3.6
- Download the various libraries necessary, sklearn (sci-kit), numpy, matplotlib, tensorflow, keras, opencv
- Open Spyder IDE or Jupyter Notebook or Jupyter Lab and start coding!
Many videos describing this downloading process exist on youtube, and here are a few articles and videos that helped me.
- https://inmachineswetrust.com/posts/deep-learning-setup/
- https://www.pugetsystems.com/labs/hpc/How-to-Install-TensorFlow-with-GPU-Support-on-Windows-10-Without-Installing-CUDA-UPDATED-1419/
- https://anaconda.org/conda-forge/opencv
- https://www.youtube.com/watch?v=5mDYijMfSzs
- https://medium.com/@margaretmz/anaconda-jupyter-notebook-tensorflow-and-keras-b91f381405f8
- And always check the official websites for Anaconda and all these libraries for help on installation
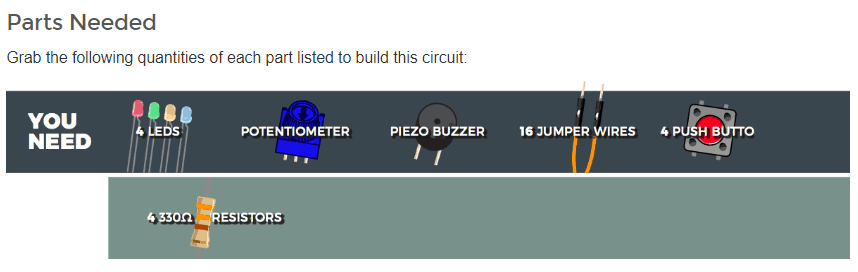
Starter Project/Warm Up – Simon Says
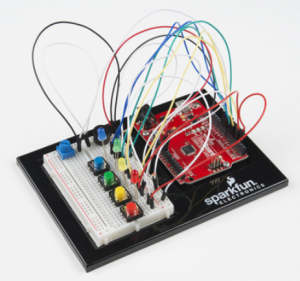
For my starter project, I chose Simon Says from the Sparkfun kit. I picked this project because it incorporated both electronic components and software components. I wanted to refresh myself with some light software coding, and I also thought the electronic side was interesting as it used a wide variety of electronic elements, with flashy lights and sounds.
This small device has 4 different colored LED lights, with 4 corresponding color-coded buttons. When each button is pressed there is a flash of light and a buzzer plays an accompanying note of different frequency for each button. When the game starts, the software manipulates the lights and the buzzer to play a sequence of notes accompanied by their respective colored leds. The user then replays the sequence using the buttons and for Each round of this cycle, the length of the sequence increases by one note. When the sequence reaches 10, the game ends and plays a jingle signifying a victory. For demonstration purposes I lowered it from 10 to 5 in the video. When a wrong note is played or there is too long of a delay, the game instead plays a losing tune, and ends the game.
I used pre-written code for the musical sequences and setting up the settings for the system with input and output channels. The core logic of the game, however, I re-programmed. From this starter project, I learned how to use a breadboard, how to strip wires, and refreshed my knowledge of programming in C. The greatest struggle of all was the functioning of the buttons. More often than not, the small metal strips on the button were too shallow to reach the metal strips of the breadboard, resulting in unresponsive activity. Attempting to debug code while simultaneously dealing with buttons popping out of the electronic was cumbersome.
- Link to official Sparkfun website with build instructions
Simon Says Schematic
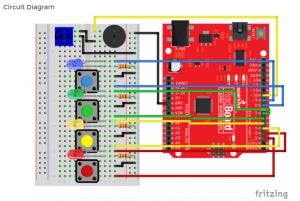
Simon Says Schematic
Simon Says Final Product