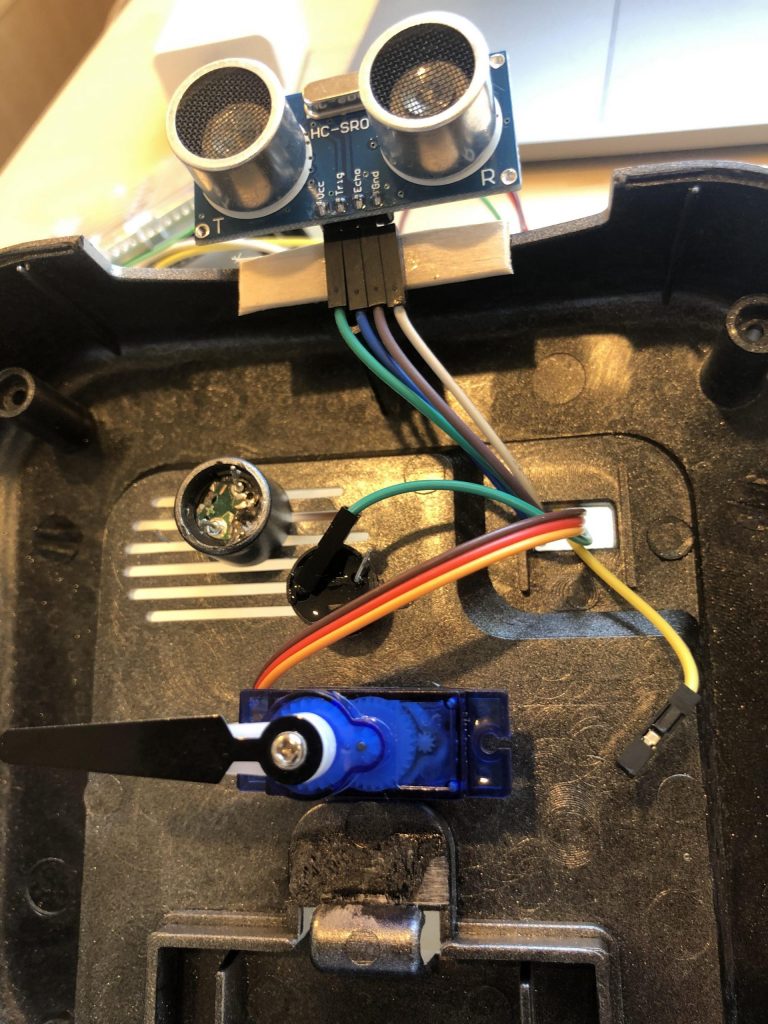
Third Milestone
For my third Milestone I used a dremel to cut open the back of the Alarm clock, so that I could remove the internal components. I then glued my servo, buzzer, and sensor to the inside of the Alarm clock housing, as well as made a display for the front. I then routed my wires out the back of the Alarm clock, where I connected them to my Arduino, as well as made some makeshift power rails using a mini breadboard. The Touchless Handwash Timer was now complete.
Second Milestone
For my second Milestone I modified source code I found online to make it work with a buzzer in order to signal the end of a hand wash cycle, as well as to make it compatible with the components I used in this build. After a few attempts I was able to get the components running smoothly.
First Milestone
My First Milestone for the touchless hand wash timer is to wire up the components on the breadboard, as well as to make sure the correct pins communicate with their corresponding pins on the arduino. The trigger pin on the ultrasonic sensor must be connected to pin 5, and the echo pin must be connected to pin 4, as defined in the software, and the Vcc (power) and ground pins must be connected to power and ground rails respectively. The leads on the buzzer must be connected to digital pin 2 and ground. The power rails are then connected to 5v and ground on the arduino uno.
How it works
The ultrasonic sensor, servo, and buzzer are powered by a 5v source, split along a breadboard, with corresponding ground pins. In addition to the power and ground pins, the Ultrasonic sensor has 2 pins labeled Trigger and Echo. When activated, the trigger pin, connected to digital pin 5 on the arduino, makes one end of the sensor project ultrasounds every 60 milliseconds. This sets the echo pin to HIGH, until it receives the reflected sound waves. It then sets back to LOW. This allows us to calculate the distance of an object from the sensor. The distance is found by the formula distance = (duration * 0.034 / 2), where 0.034 KM is the distance sound travels in 100 milliseconds. This formula gives us a value in centimeters. When this value is less than or equal to 25 cm, It triggers the code to run. This activates the servo – connected to an analog display, which I programmed to turn 180* in 20 seconds. In the last iteration, when the servo is at the 180 degree position, the buzzer goes off for two seconds, indicating the end of the wash cycle. Everything then resets to its original position.
Wearable Device to Prevent User From Touching Their Face
My second project is a wearable device that alerts the wearer when they are about to touch their face. It consists of a wristband which the user wears on a specific part of their arm, just above the elbow. An inertial measurement Unit, which is a combination of a Gyroscope and an accelerometer, transmits acceleration values to an arduino microcontroller and is mounted to this wristband. The arduino then outputs to a buzzer that beeps when it detects that the IMU acceleration values correspond with predetermined values that you get when you are about to touch your face, based on the position of your arm.
Third Milestone
My third and final milestone was to define the input pins from the IMU and the output pin to the buzzer in the code, and write a series of “if” statements to trigger the buzzer when a certain set of acceleration values are detected from the IMU. I also added some serial.print statements so that I could see the IMU values in real time, as well as see when the buzzer was activated. I then set the device flat on the table to calibrate it, and then wore it and touched my face in various positions. I then noted down the range of XY and Z values displayed on the serial monitor, and then put these values into the “if” statements in the code. The device was then complete.
Second Milestone
My second milestone was to figure out how to mount the IMU to a wristband. In order to do this, I soldered a set of pins to the ports on the front of the IMU, then pushed the pins through the wristband. I then soldered the female ends of the wires I previously prepared to the other side of the appropriate pins. I then insulated the exposed solder joints with electrical tape.
First Milestone

The First Milestone for my wearable device is to solder male and female connectors to the ends of four 6 foot long sections of wire. I then soldered the female ends of the wires to the 4 Pins on the IMU. The VIN pin on the IMU must be connected to the 5v port on the arduino microcontroller, and the GND pin must be connected to GND. I then connected the (SDA) Serial Data pin to analog pin 4, and the SCL (Serial Clock Line) pin to analog pin 5. The leads on the buzzer must be connected to digital pin 6 and ground.
Note:
The IMU has the capability to transmit both Acceleration values and Gyroscopic values, however, the reason I chose to use acceleration values in this build is because they are far more consistent and easy to calibrate then Gyroscopic readings.


