Hello! This is Jing-Chen, and I participated in the Bluestamp Engineering program in Silicon Valley in 2015. For my starter project, I chose to make the SparkFun Simon Says game, and for my more intense project I chose to make a three-wheeled omnidirectional robot. After participating in Bluestamp, I learned how to deal with problems in my project, as well as learning more about electronics and soldering.
Main Project:
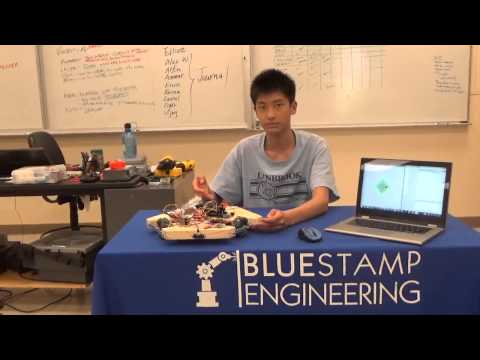
For my main project, I chose to make a three-wheeled omnidirectional robot that could move in any direction as well as turn on spot. I chose this project because I wanted to build an autonomous robot that could move and make some decisions on its own. I thought this would be interesting, especially writing the code for moving this robot, and it would be unique, because I saw many people building robots with controllers and I felt proud that I could make my robot work without any input from me after the code was started.
Final Milestone:
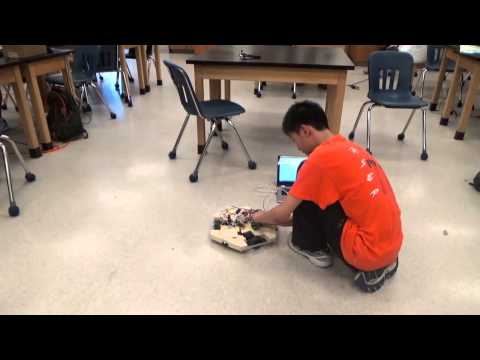
For my final milestone, I completed my mapping code by finally enabling the robot to properly detect, log, and avoid walls. The infrared sensors were finally be able to work properly when combined with my pathfinding/mapping code, allowing my robot to successfully identify and avoid walls. Now, the mapping functionality of my robot is fully complete, and I can use my robot to run around a room, exploring the areas around it.
While trying to finish this milestone, I encountered some mysterious electrical problems. First of all, the three IR sensors on my robot would sometimes fail to work properly, emitting either a permanent high or low signal, confusing my robot into crashing into objects it should have avoided or trying to avoid imaginary walls. Eventually, this problem was fixed, although I still do not know what caused this problem to occur.
The second problem encountered had to do with the battery. While in the middle of a run, my robot frequently lost power and sometimes rebooted. The motors would also occasionally lose power, an effect that was only noticeable when the Arduino was connected to and powered by my computer via a USB cable. I eventually tracked the source of the problem to some loose connections between my battery and my on/off switch. Once I removed the switch, the robot worked properly.
In the future, I plan to add encoders, which I still did not have time to add since my last milestone. I also want to solder on a switch, so that I can turn my robot on and off without worrying about loose connections.
libraries (You will need these arduino libraries to run my code. Please note: Some of these libraries are custom made, and cannot be found anywhere else on the web.)

Milestone 3:
For my third milestone, I programmed my robot to be able to pathfind across a known area as well as expand its known area. I wrote some simulation code in Java in order to find out how I would have to program my robot in order to let it move around its known area as well as explore new areas. The robot would have to be able to move around walls that it encounters while trying to get from point A to point B, which required that I use a pathfinding algorithm. I used breadth-first search for this purpose, because it was easy to implement and always found the shortest path. I also used breadth-first search for expanding my frontier used for mapping, because there was no specified target point to hit, which made other pathfinding algorithms such as best-first search useless. Breadth-first search was also easy to implement.
For those not familiar with search algorithms, a search algorithm is a method for finding a path from point A to point B. In the case of breadth-first search, the algorithm explores its surroundings by constantly expanding a “frontier” of unexplored areas, and then proceeding to explore each of these areas one at a time. Each time it explores a frontier, it finds any unexplored points around that frontier point and adds them to the list of points in the frontier. By slowly expanding and exploring the points, my robot is able to map its surroundings, one piece at a time.
After succeeding in writing my Java simulation/proof of concept, I started moving the code into my Arduino. This step was quite challenging, with many different problems popping up. First of all, I had to write my custom Point and List classes, because Arduino did not come with libraries that allowed the user to perform list operations and custom point operations. After failing to create a list of points this way, I realized that Arduino, whose programming language is based on C, had a different way of dealing with objects than Java. I had to learn how to use pointers to objects as well as reference and dereference operators to manipulate the various objects needed in the code.
After finally replicating the functionality of points and lists in C, I realized that my large pile of custom objects had completely filled up the Arduino’s RAM, rendering the code completely useless because the Arduino refused to execute code after it ran out of memory. To bypass this, I had to switch from my old Arduino UNO, with 2048 bytes of RAM, to an Arduino Mega, with 8192, or 4 times as many, bytes of RAM. I am currently using up 20% of the Mega’s RAM with just the global variables, and the local variables would add another 20% of memory consumed to that total, meaning that I would be occupying a total of 160% of the UNO’s memory.
After solving these problems, I finally was able to make a robot that could explore a 5x5 area around it, bit by bit. This 5x5, or 25 unit size is a limit set by memory restrictions: Any larger and I would be touching up against the limits of the Arduino Mega’s RAM, and risk a complete program failure during operation.
In addition to all the software upgrades, I enlarged the slots cut for the motors in my robot to accommodate for encoders that I plan to install onto my robot. Encoders are devices that can measure the rotation of a shaft, such as my motor shafts. These encoders would allow my robot to more accurately pinpoint its own position based on wheel movements, reducing the error that tends to accumulate when the robot is running, sometimes resulting the robot being up to 90 degrees skewed when it tries to move.
One last problem remains with this code: The fact that it is still unable to respond to any walls that it runs into. This is a problem because in the Java simulation that I wrote, the robot did not have to deal with physically moving from place to place, but instead was teleported at a speed of one block/tick. Using my robot, the code is required to instruct the robot to move over several ticks, causing a lot of trouble whenever the robot runs into a wall halfway through its motion.
Simulation executable JARs (100% Virus free)
Milestone 2:
For my second milestone, I programmed the robot to do some things that I think will be useful later when trying to make my robot autonomous. I started by adding three IR sensors to my robot, allowing it to detect its surroundings. I also wrote three separate Arduino sketches, one of which does not work.
The first sketch instructs the robot to move forward while spinning. This is done using the sin() and cos() functions built into Arduino to adjust the direction the robot is going relative to itself when it is spinning. Because of this, if the robot was not spinning along its axis when the program is run, the robot should move itself in a smooth circle without turning.
This was partially demonstrated by my second piece of code, which was almost identical to the first piece except without the turning. The robot on average moved in a circle while facing roughly the same direction, but it spun and wobbled while doing so. For some reason, even though this piece of code demonstrated that there was some (yet unknown) error with the way I was trying to move my robot, the first piece of code still worked. My guess is that the weird spins and wobbles, which are roughly symmetrical, cancel each other out when the robot is spinning on its axis.
The third sketch I wrote is a very basic obstacle avoidance program. It uses the robot’s three IR sensors as input to attempt not to crash into anything. IR sensors are sensors that emit and receive infrared light. It measures the time between the emission of a light pulse and the return of that light pulse, outputting that time in some form or another. Because it takes light longer to travel longer distances, by measuring the amount of time it took for the IR sensor to “ping” its target, the distance to the target can be determined. The current program executes in three separate, repeating, steps: Scan, Compute, and Move. First, the robot spins on the spot, scanning and taking in its surroundings. The code then determines which direction does not have any walls, and the robot then proceeds to move in that direction. This is extremely slow and inefficient, but it works. I plan to improve this code by using the method that allows the robot to spin while moving, essentially combining the two more time-consuming steps of this current sketch, scanning the surroundings of the robot while moving. I hope this will make my next obstacle avoidance code run much more smoothly.
Milestone 1:
For my first milestone, I got my robot built, programmed it in Arduino, and got it to move properly. My omnidirectional robot is able to move in all directions because of the way the wheels are positioned around the center: When you spin the wheels properly, the rotational force on the base cancels out, and motion in any direction can be achieved by using a bit of math.
The robot’s base is made out of wood, with spaces cut out for the motors and wheels. The motors are each controlled by a motor controller, and mounted to the wood base by metal bars. After cutting and assembling the robot, I wrote a program in Arduino that took my input key presses and turned them into basic commands for my robot, including operation of individual wheels, rotation of the robot, and motion in a straight line. Even though control through a keyboard is clumsy, it helped debug my robot and make sure everything worked.
The major problem I encountered when doing this was that for moving sideways, the math did not work out properly, so I had to use trial and error to find the correct values to move the motors at in order to achieve straight sideways motion.
Milestone 1
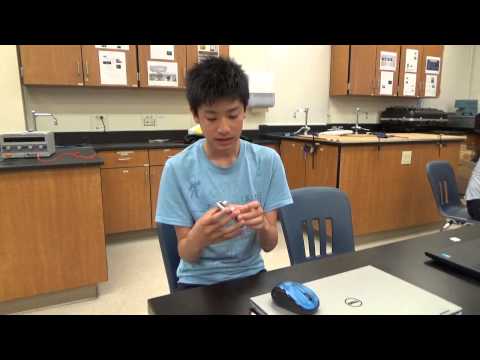
Simon Says Starter Project
When I first started making my starter project, I was a little confused because I had never done soldering before, and I had never really touched anything having to do with electronics. After I started soldering, I realized that the job itself was not nearly as intimidating as I thought it would be. I soldered all the components given in the kit onto the provided PCB, and amazingly the game actually worked! On my first day, I had fun putting things together and learning how to solder things together.
I also learned about what the components in the kits did. For example, the buttons were switches that closed, allowing current to flow whenever the player pressed a button.
Video for Simon Says Project: