Obstacle Avoiding Car
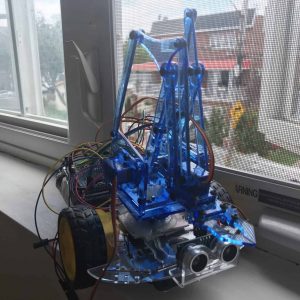
The obstacle-avoiding car is a car that utilizes an ultrasonic sensor to detect objects/walls in front of it. After it detects something within a set distance it will turn around and go the other direction. The car is programmed using an Arduino uno and an L298N motor driver. For my modifications, I added an nRF remote control made from two joysticks and a couple of pushbuttons. The remote controls the car’s movement as well as a robot arm that I added to the car.
Engineer
Dennis R
Area of Interest
Robotics/Electrical engineering
School
Avenues: The world school
Grade
Incoming junior
Third Milestone
Front view

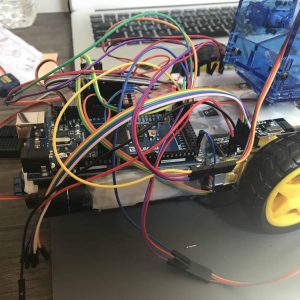
Side view

My second milestone was finishing my base project— the obstacle avoiding robot. In my first milestone, I had only just gotten my motors to work, making this a very big leap. The first milestone was relatively easy, as the code and wiring weren’t nearly as complex. In this version of the car, I had to extend the chassis using popsicle sticks, since there was no way I was fitting everything onto the car without doing so. I then had to add the ultrasonic sensor on a breadboard to be wired easier and increase the battery pack of the car from four to six to be able to support all of the components.
After I had everything organized, it was time to code the car with the sensor. This version of the code uses a library instead of manual commands to make things simpler and uses an if statement to decide whether or not to turn around the car in an attempt to avoid crashing. My code first sets the trigPin and echoPin to be an output and input, respectively. This is because the trigPin of an ultrasonic sensor transmits a high-pitched sound, which is then received by the echoPin as an input. The time that the sound takes to reach the echoPin is then converted into a distance through simple mathematics. The code then takes this number and runs it through the if statement to check if the distance is small or not. If the car detects that there is something ahead of it, it’s been programmed to stop, go back a bit, and turn to the right for a quarter of a second. Otherwise, the car will proceed to move forward in its original trajectory. In my next milestone, I plan to allow my car to be controlled by a remote controller using nrf modules.
Second Milestone
My second milestone was finishing my base project— the obstacle avoiding robot. In my first milestone, I had only just gotten my motors to work, making this a very big leap. The first milestone was relatively easy, as the code and wiring weren’t nearly as complex. In this version of the car, I had to extend the chassis using popsicle sticks, since there was no way I was fitting everything onto the car without doing so. I then had to add the ultrasonic sensor on a breadboard to be wired easier and increase the battery pack of the car from four to six to be able to support all of the components.
After I had everything organized, it was time to code the car with the sensor. This version of the code uses a library instead of manual commands to make things simpler and uses an if statement to decide whether or not to turn around the car in an attempt to avoid crashing. My code first sets the trigPin and echoPin to be an output and input, respectively. This is because the trigPin of an ultrasonic sensor transmits a high-pitched sound, which is then received by the echoPin as an input. The time that the sound takes to reach the echoPin is then converted into a distance through simple mathematics. The code then takes this number and runs it through the if statement to check if the distance is small or not. If the car detects that there is something ahead of it, it’s been programmed to stop, go back a bit, and turn to the right for a quarter of a second. Otherwise, the car will proceed to move forward in its original trajectory. In my next milestone, I plan to allow my car to be controlled by a remote controller using nrf modules.

First Milestone
Basic chassis
The chassis that I used— an Adafruit mini chassis. It’s a really simple, meaning that it can’t fit a whole lot on it. After I put my four pack battery on it and my Arduino, there almost wasn’t enough space for my motor driver.
Arduino Uno
The Arduino UNO is basically the brain of an Arduino-based robot. The board allows for open sourcing allowing various projects to be built off of it. It regulates inputs and outputs through analog and digital pins. One can simply insert code on a computer and upload the software to the Arduino using a cable and when inserted into a circuit, the board can carry out the given functions.
My first milestone for the obstacle-avoiding car was to get the motors working using simple HIGH, LOW commands. At first, I had no idea how to even begin to program/wire everything, but once I did a little research I found that it was really simple. I used a motor driver and an Arduino UNO to control the speed and direction that the motors went in. The gearbox motors take in two values that can be set to either HIGH or LOW. When one cable is HIGH and one is LOW, it will go forwards, and when they’re flipped it will go backward. Furthermore, when they are the same value, the car will turn left or right.
The hardest part was the wiring/assembly as the code was really straightforward. There were zero instructions or tutorials on the chassis that I got, which set me back a lot. I ended up using photos that I found of the fully built car to see where each part goes. All in all, I think that this was a very good start to the project. I learned a lot. My next milestone will probably be to wire and code the ultrasonic sensor to allow the car to detect objects and change its initial direction. I will most likely use an if else statement to let the car decide whether or not it should turn.
Motor Driver
The L298N DC Motor Driver essentially does exactly what its name indicates. Its main purpose is to control speed and rotation direction. The driver takes information sent by the Arduino and power from the battery pack, and then regulates the motors. There are two techniques on the driver, both for a different purpose. PWM is utilized for controlling speed by varying voltage input, and H-Bridge for controlling rotation direction by varying polarity of input voltage. This driver is an essential piece to the car as it’s needed to control the motors.


