Obstacle Avoiding Robot
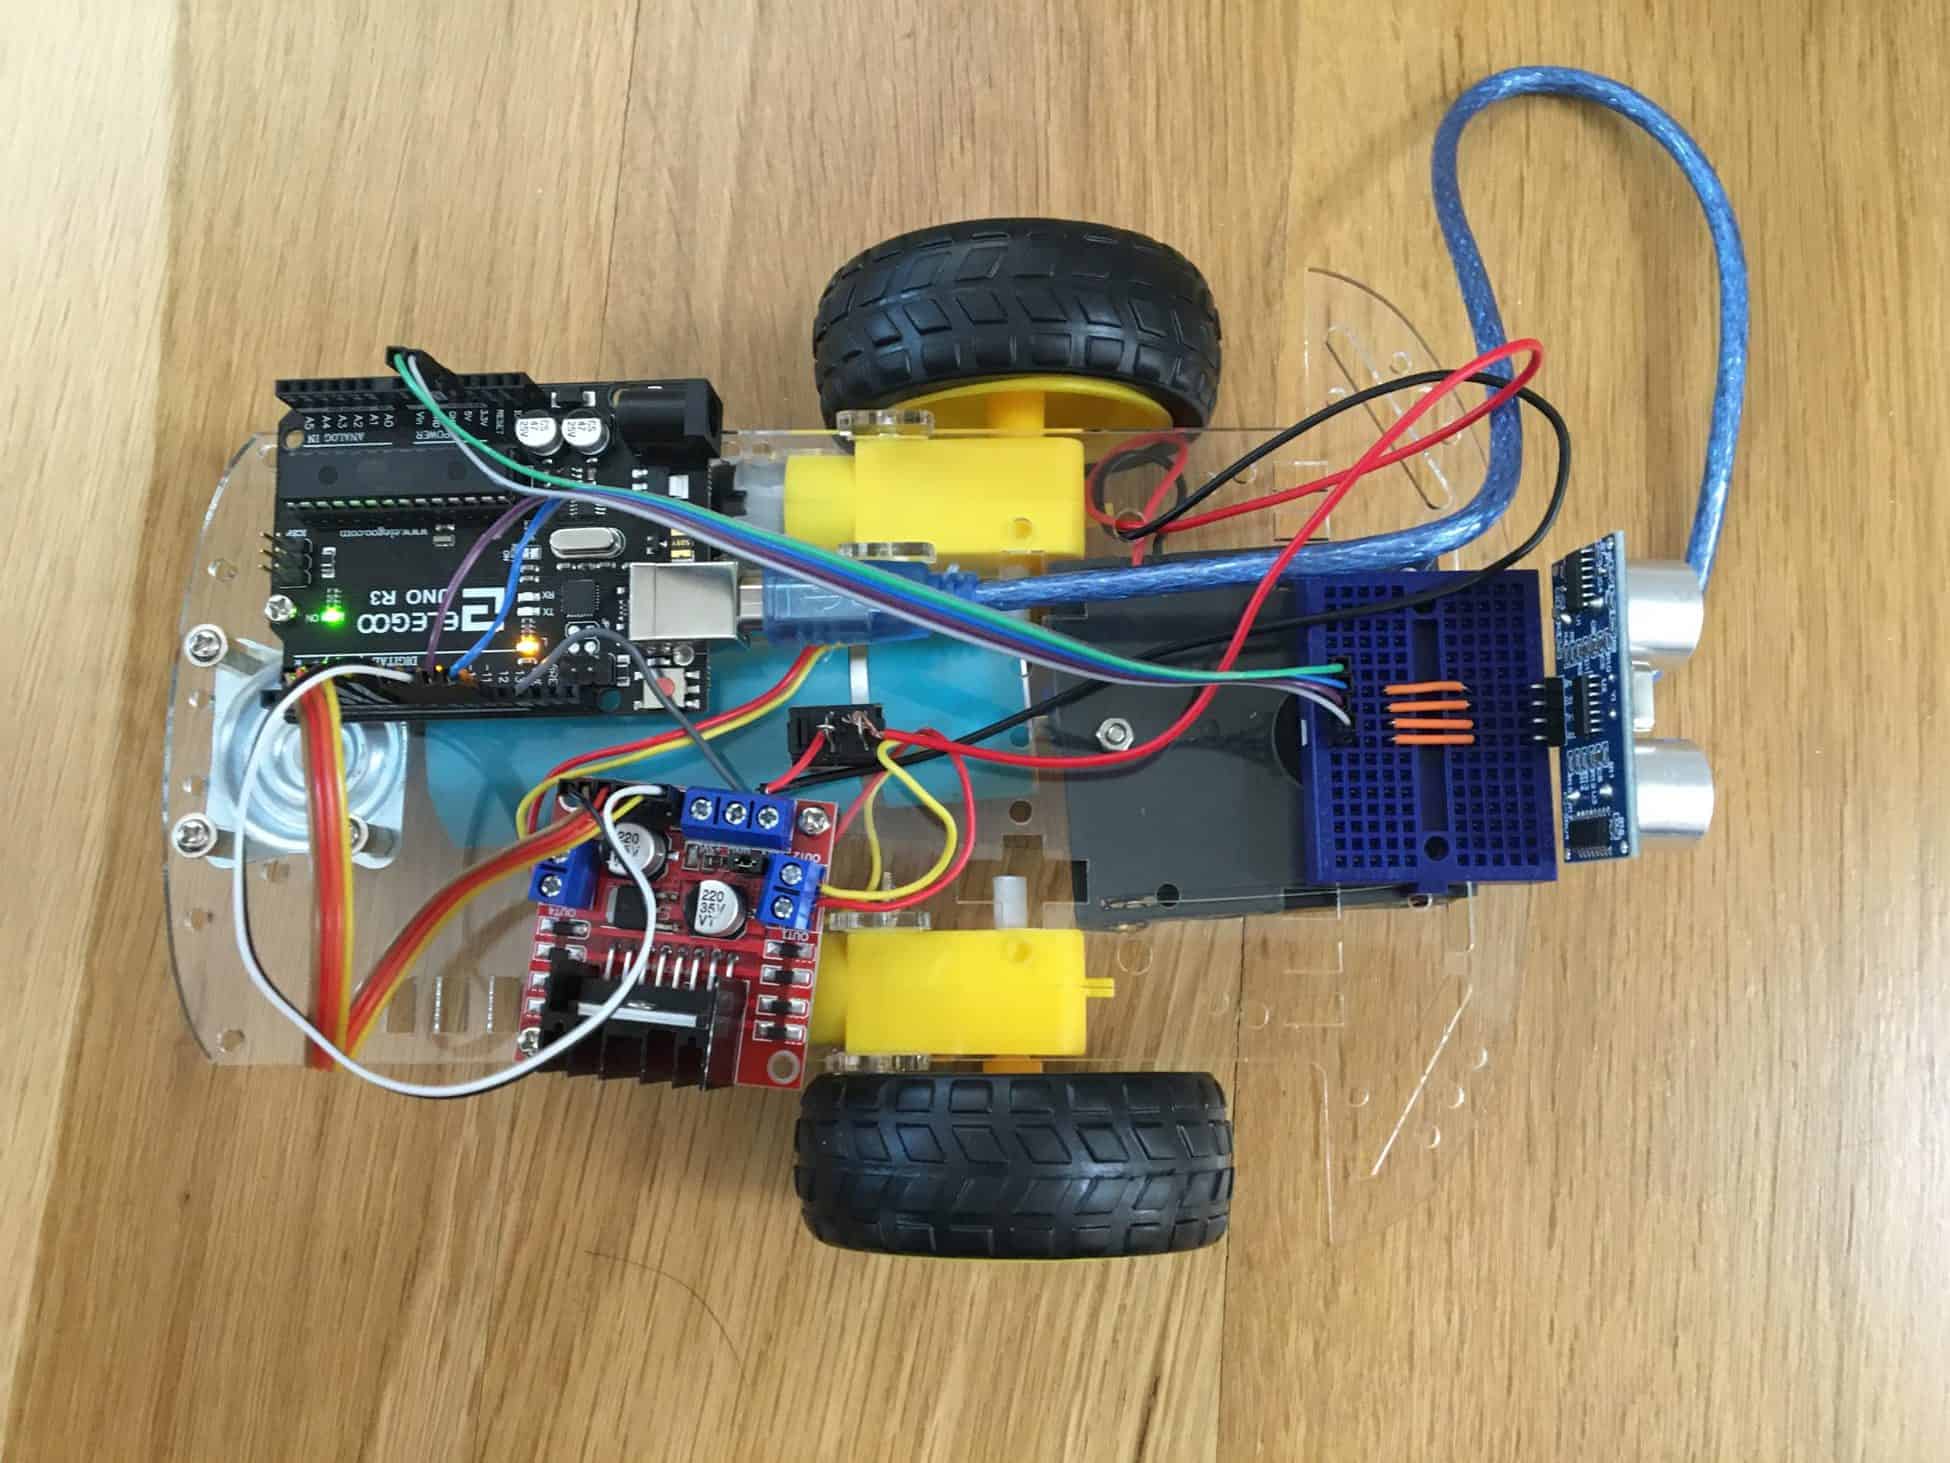
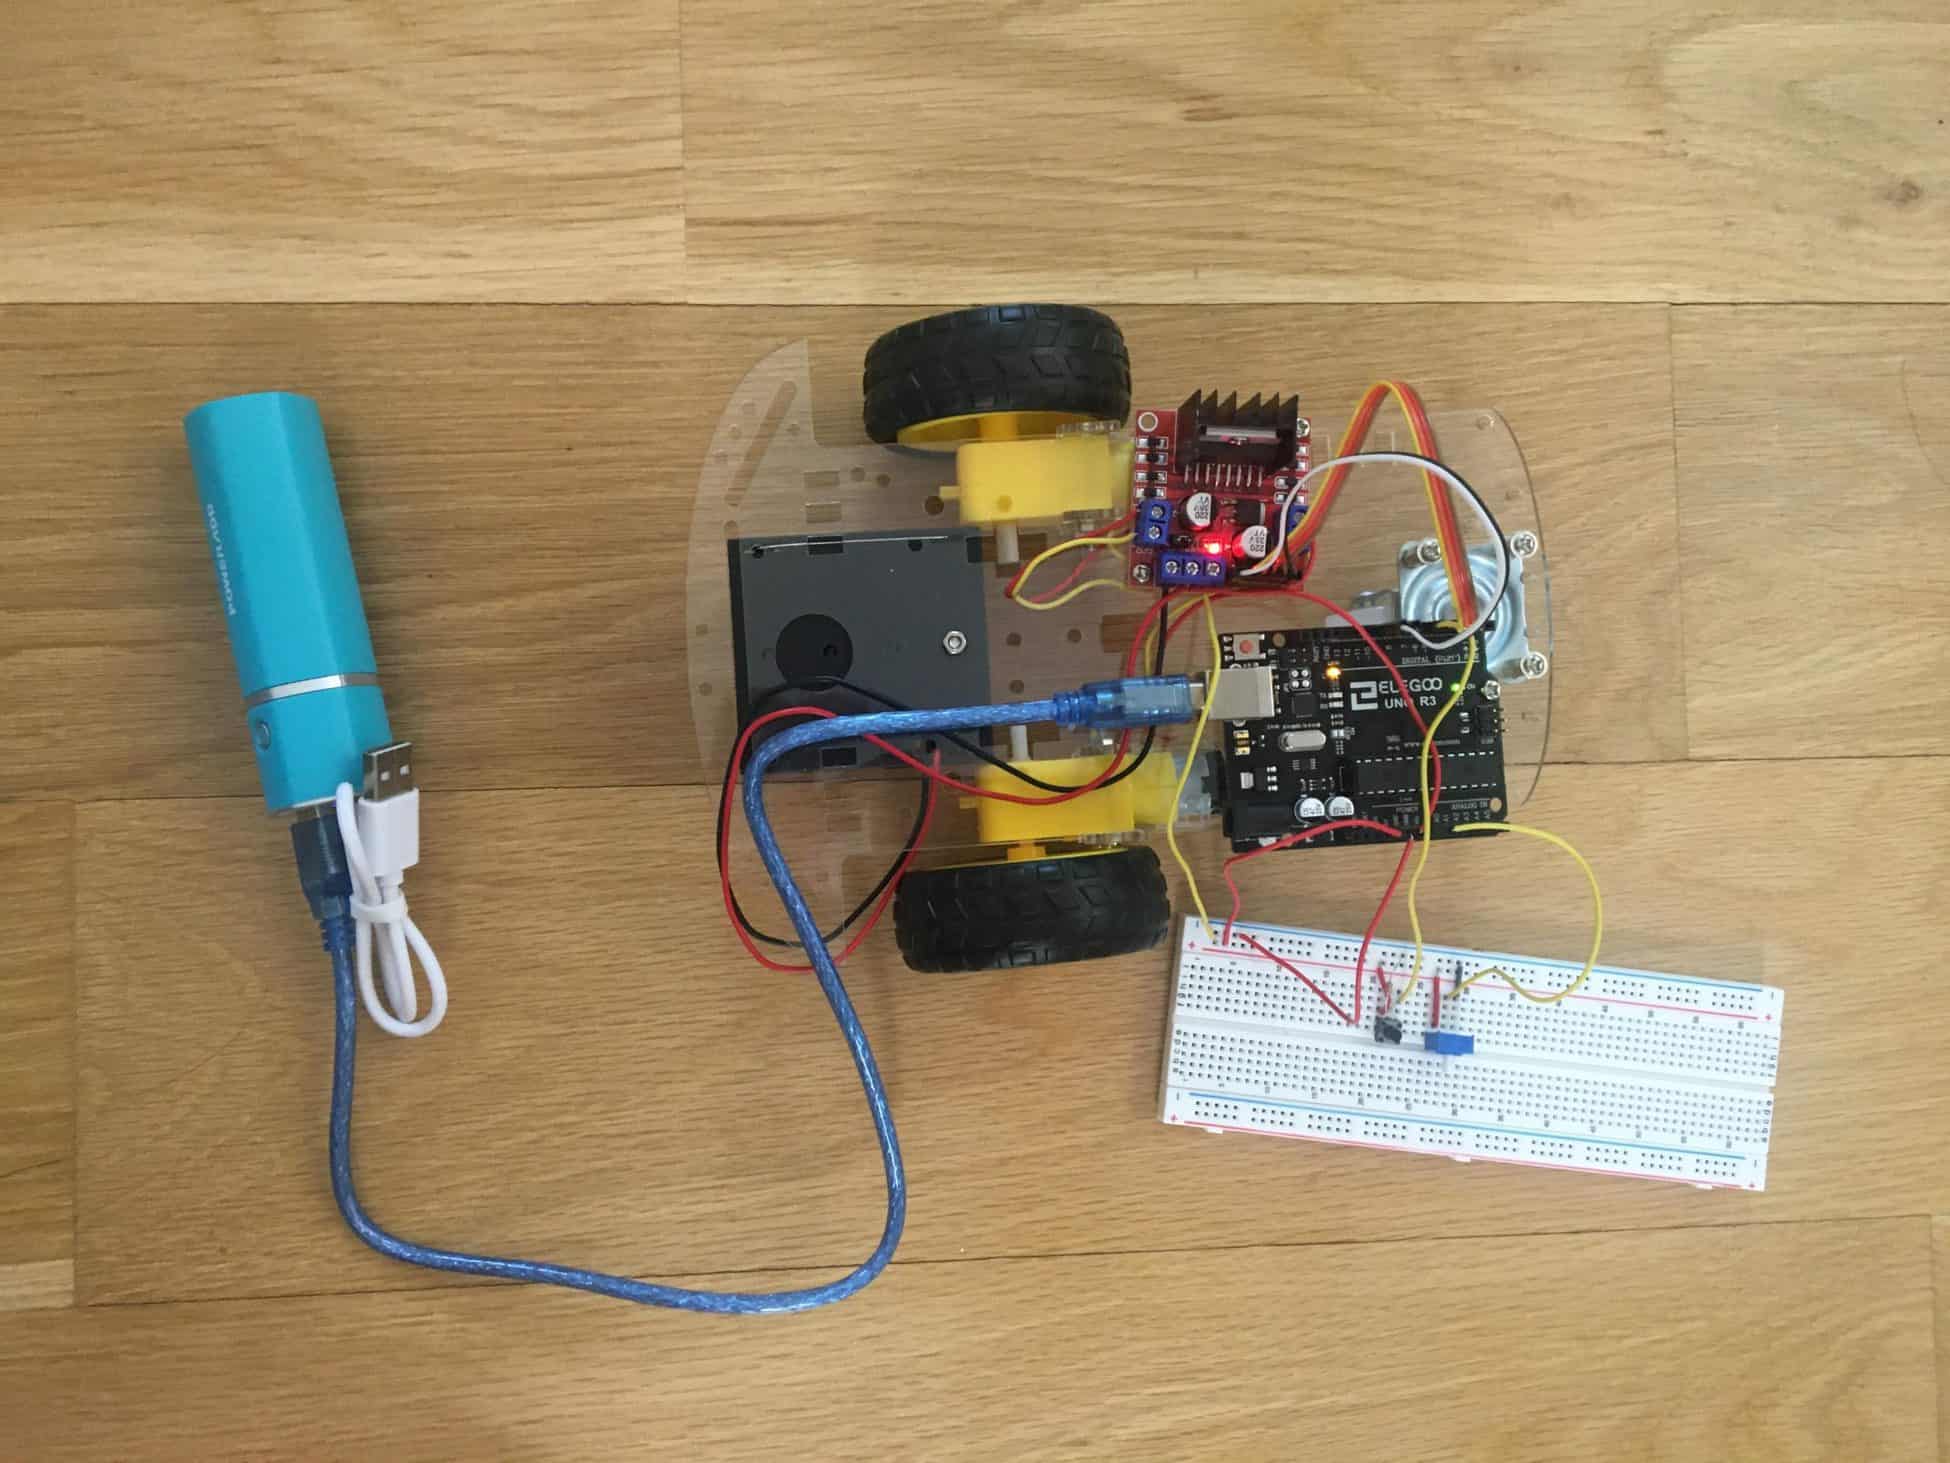
The Obstacle Avoiding Robot utilizes an Arduino microcontroller. It also uses an ultrasonic sensor to detect its distance from the closest object in front of it and control the robot’s motors accordingly.
Engineer
Ethan L
Area of Interest
Mechanical Engineering
School
Gunn High School
Grade
Rising Junior
Final Milestone
My final milestone consisted of mostly coding in which I made the two DC motors respond to the outputs of the HC-SR04 ultrasonic sensor. If the closest object is within 6 inches of the robot, the robot turns right; Otherwise it continues moving forward. I once again ran into problems of the ultrasonic sensor’s outputs not displaying properly and motors not spinning correctly, but I eventually fixed those problems. This was definitely the most difficult part of the whole project– not doing things the wrong way, but figuring out what I did wrong and how I should approach the solution to it. Some potential modifications I wish to include in my free time would be adding sensors on either side of the robot so it is able to determine which side to turn rather than always turning right as well as adding visual features like lights or cleaner wiring. Throughout this program, I was able to work with many things that I hadn’t worked with before like the Arduino and electrical engineering. This program has really been a memorable experience because it helped me explore some different fields of engineering that I wouldn’t have experienced otherwise. I was also able to work, with the help of a mentor, on a project that interested me because of the variety of concepts and skills it touched.
#define enA 10
#define enB 9
#define in1 7
#define in2 6
#define in3 5
#define in4 4
int trigPin = 11; // Trigger
int echoPin = 12; // Echo
long duration, cm, inches;

void setup() {
//Serial Port begin
Serial.begin(9600);
//Define inputs and outputs
pinMode(trigPin, OUTPUT);
pinMode(echoPin, INPUT);
pinMode(enA, OUTPUT);
pinMode(in1, OUTPUT);
pinMode(in2, OUTPUT);
pinMode(enB, OUTPUT);
pinMode(in3, OUTPUT);
pinMode(in4, OUTPUT);
// Set initial rotation direction
digitalWrite(in1, HIGH);
digitalWrite(in2, LOW);
digitalWrite(in3, LOW);
digitalWrite(in4, HIGH);
}

void loop() {
// The sensor is triggered by a HIGH pulse of 10 or more microseconds.
// Give a short LOW pulse beforehand to ensure a clean HIGH pulse:
digitalWrite(trigPin, LOW);
delayMicroseconds(5);
digitalWrite(trigPin, HIGH);
delayMicroseconds(10);
digitalWrite(trigPin, LOW);

// Read the signal from the sensor: a HIGH pulse whose
// duration is the time (in microseconds) from the sending
// of the ping to the reception of its echo off of an object.
pinMode(echoPin, INPUT);
duration = pulseIn(echoPin, HIGH);

// Convert the time into a distance
cm = (duration/2) / 29.1; // Divide by 29.1 or multiply by 0.0343
inches = (duration/2) / 74; // Divide by 74 or multiply by 0.0135

analogWrite(enA, 255); //Set motor speeds to max
analogWrite(enB, 255);
delay(200);

if (inches <= 6) { //Rotate Right
Serial.print(inches);
Serial.print("in, ");
Serial.print(cm);
Serial.print("cm");
Serial.println();
digitalWrite(in1, LOW);
digitalWrite(in2, HIGH);
digitalWrite(in3, LOW);
digitalWrite(in4, HIGH);
delay(1500);
}

digitalWrite(in1, HIGH);
digitalWrite(in2, LOW);
digitalWrite(in3, LOW);
digitalWrite(in4, HIGH);

Serial.print(inches);
Serial.print("in, ");
Serial.print(cm);
Serial.print("cm");
Serial.println();

delay(250);

}
Second Milestone
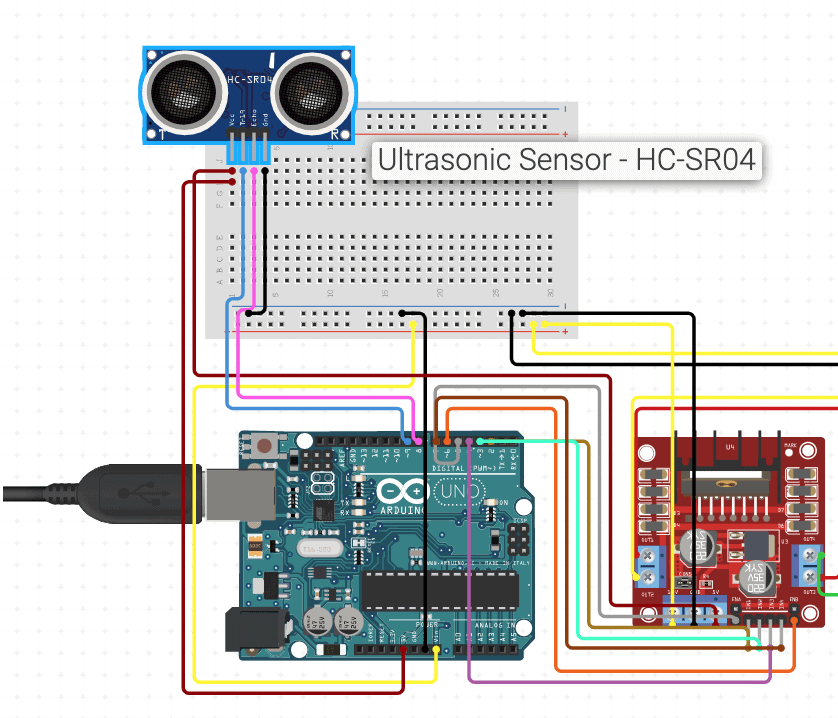
For my second milestone, I mainly experimented with the HC-SR04 ultrasonic sensor. The sensor allowed my robot to detect its distance from the closest object in front of it. Throughout this week, I ran into many problems with my code not properly uploading and my wiring for motors not working no matter how many times I rewired it. This caused problems like short circuiting and my batteries heating up a lot. Even though this set my progress back a bit, I learned that often, patience is necessary and as long as you persevere and power through something, you will eventually succeed.
int trigPin = 11;    // Trigger
int echoPin = 12;    // Echo
long duration, cm, inches;

void setup() {
  //Serial Port begin
  Serial.begin(9600);
  //Define inputs and outputs
  pinMode(trigPin, OUTPUT);
  pinMode(echoPin, INPUT);
}

void loop() {
  // The sensor is triggered by a HIGH pulse of 10 or more microseconds.
  // Give a short LOW pulse beforehand to ensure a clean HIGH pulse:
  digitalWrite(trigPin, LOW);
  delayMicroseconds(5);
  digitalWrite(trigPin, HIGH);
  delayMicroseconds(10);
  digitalWrite(trigPin, LOW);

  // Read the signal from the sensor: a HIGH pulse whose
  // duration is the time (in microseconds) from the sending
  // of the ping to the reception of its echo off of an object.
  pinMode(echoPin, INPUT);
  duration = pulseIn(echoPin, HIGH);

  // Convert the time into a distance
  cm = (duration/2) / 29.1;     // Divide by 29.1 or multiply by 0.0343
  inches = (duration/2) / 74;   // Divide by 74 or multiply by 0.0135

  Serial.print(inches);
  Serial.print("in, ");
  Serial.print(cm);
  Serial.print("cm");
  Serial.println();

  delay(250);
}
Serial Monitor Screenshot

First Milestone
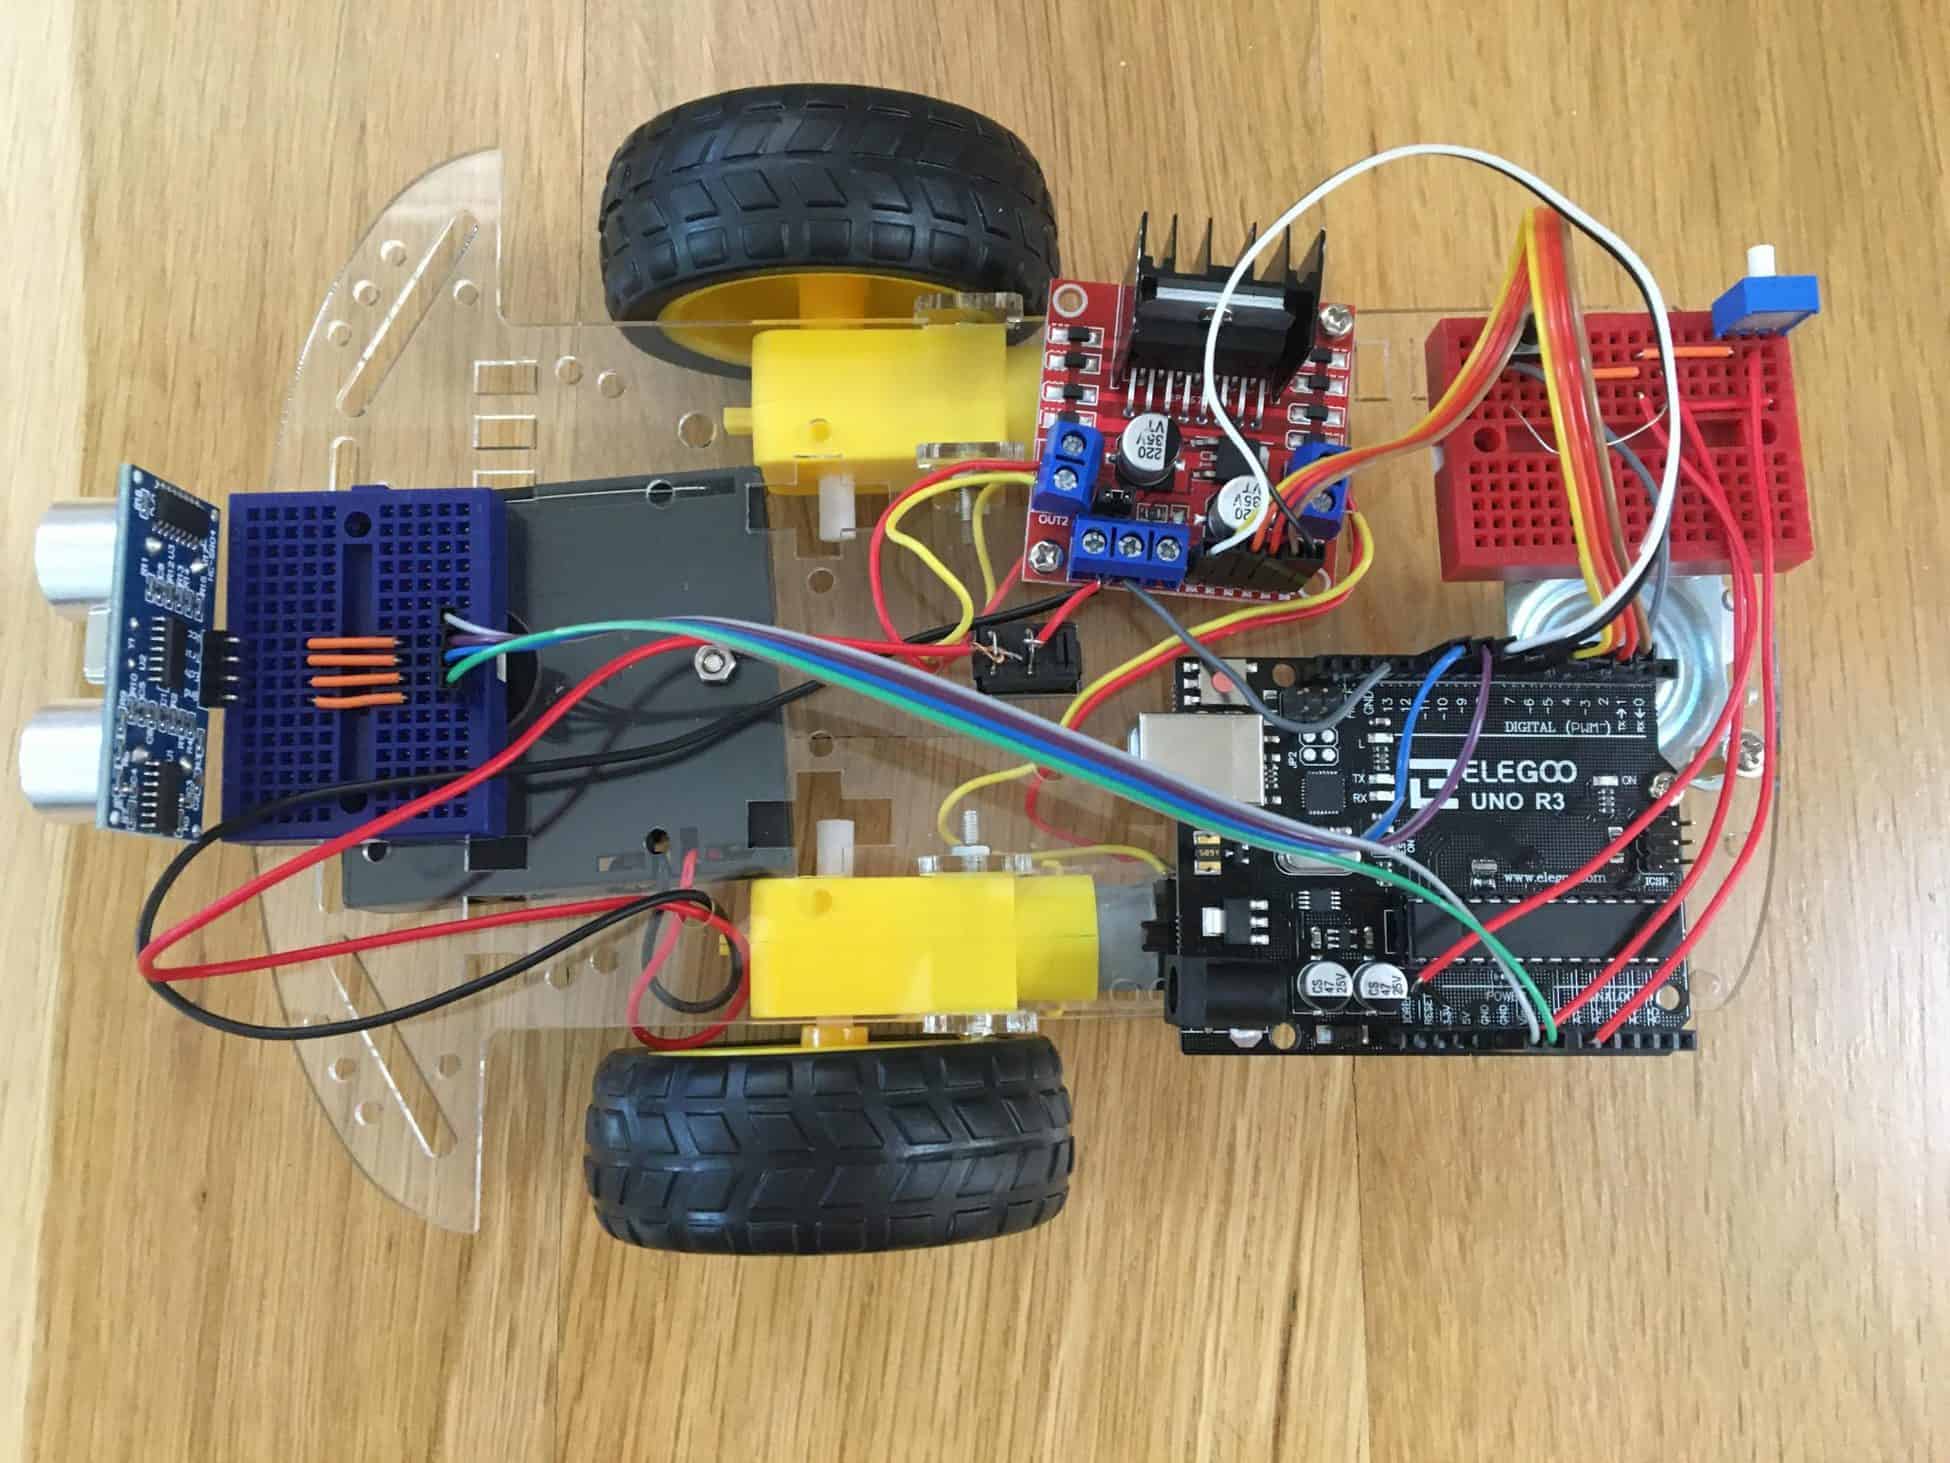
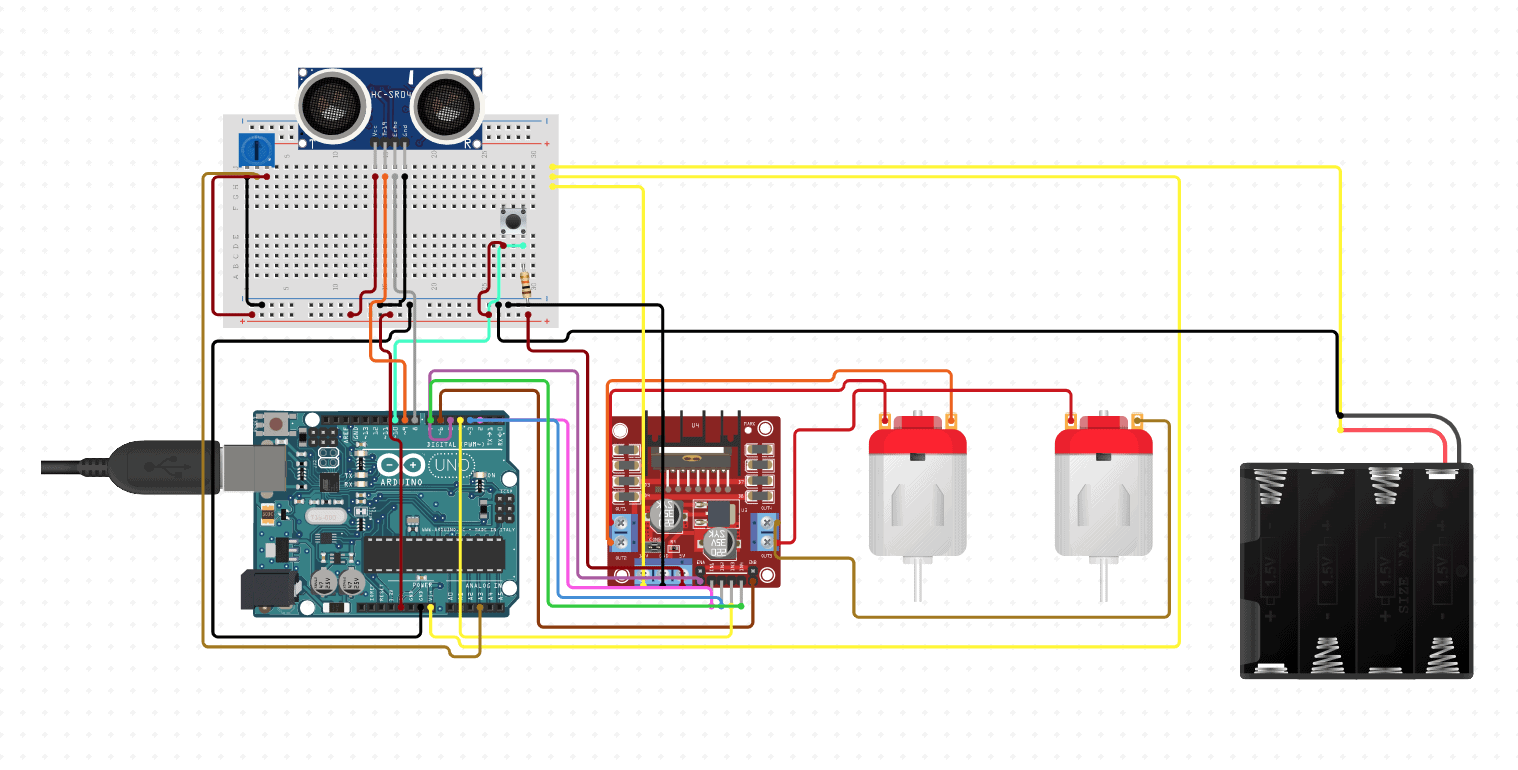
My First Milestone for the Obstacle Avoiding Robot was to make both the DC motors respond to a potentiometer and a push button. To make this work, I built the robot’s chassis, attaching the 2 DC motors, wheels, and a battery pack to the acrylic. I also attached an Arduino Uno microcontroller and L298N Motor Driver to control the motors. Using a breadboard, I was able to connect the push button and potentiometer to the rest of the robot, controlling the speed and direction of the motors.
#define enA 10
#define enB 9
#define in1 7
#define in2 6
#define in3 5
#define in4 4
#define button 2

int rotDirection = 0;
int pressed = false;

void setup() {
  pinMode(enA, OUTPUT);
  pinMode(in1, OUTPUT);
  pinMode(in2, OUTPUT);
  pinMode(enB, OUTPUT);
  pinMode(in3, OUTPUT);
  pinMode(in4, OUTPUT);
  pinMode(button, INPUT);
  // Set initial rotation direction
  digitalWrite(in1, HIGH);
  digitalWrite(in2, LOW);
  digitalWrite(in3, LOW);
  digitalWrite(in4, HIGH);
  Serial.begin(9600);
}

void loop() {
  int potValue = analogRead(A0); // Read potentiometer value
  int pwmOutput = map(potValue, 0, 1023, 0 , 255); // Map the potentiometer value from 0 to 255
  analogWrite(enA, pwmOutput); // Send PWM signal to L298N Enable pin
  analogWrite(enB, pwmOutput);
  Serial.println(digitalRead(button));
  delay(200);

  // Read button - Debounce
  if (digitalRead(button) == true) {
    pressed = !pressed;
  }
  while (digitalRead(button) == true);
  delay(20);

  // If button is pressed - change rotation direction
  if (pressed == true & rotDirection == 0) { //Spin left
    digitalWrite(in1, HIGH);
    digitalWrite(in2, LOW);
    digitalWrite(in3, LOW);
    digitalWrite(in4, HIGH);
    rotDirection = 1;
    delay(20);
  }
  // If button is pressed - change rotation direction
  if (pressed == false & rotDirection == 1) { //Spin right
    digitalWrite(in1, LOW);
    digitalWrite(in2, HIGH);
    digitalWrite(in3, HIGH);
    digitalWrite(in4, LOW);
    rotDirection = 0;
    delay(20);
  }
}


