Robotic hand

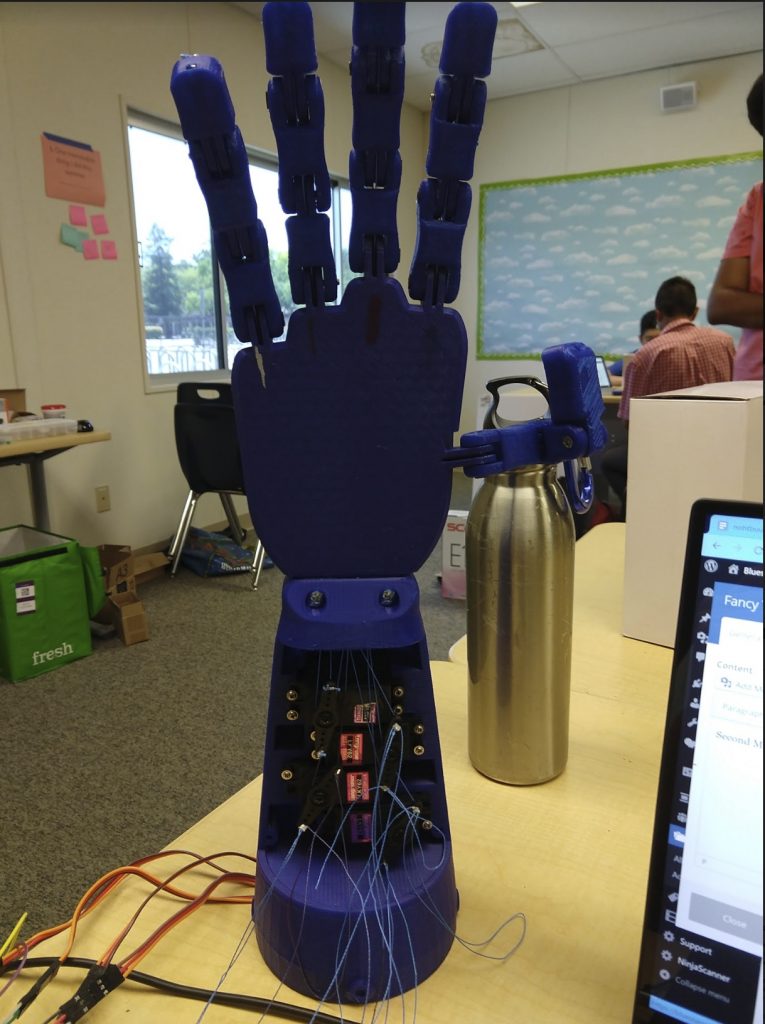
The robotic hand is a hand made out of 3d printed parts, which is connected to a glove. When someone puts on the glove and moves their fingers inside it, the robotic hand will also move its corresponding fingers. Link to parts list and code here! (https://github.com/vshen201/Bluestamp-RoboHand-2019.git)

Engineer

Vincent

Area of Interest

Software Engineering

School

Lynbrook

Grade

Incoming Senior

Final Milestone

For my final milestone, I added wireless functionality to my robotic hand by using the NRF24 modules. Now the glove doesn’t have to be physically connected to the hand itself, allowing for more flexibility in usage cases, since I don’t have to be right next to the hand anymore. Integrating the wireless modules into the project was a pretty difficult task for me initially, since I was working with something entirely new that I hadn’t ever worked with before. I wanted to make sure to test out the modules first, so I put together a circuit where the wireless modules would communicate with each other using the input values from an analog joystick. Once I confirmed that the modules could work with each other, I tried to integrate them into the rest of the project, and initially had a lot of trouble changing up the code so it could work properly with the sensors and servos. Once I realized which variable assignments to switch up, that process went much more smoothly and now it works properly.

Third Milestone

The third milestone of my project was making the glove for the sensors to go onto, and connecting it all together to the assembled hand. With this, now the fingers on the hand will respond to finger movements in the glove, and also act accordingly. Making the glove was a pretty big struggle, but once I realized I could attach the sensors easily by wrapping electrical tape around the sensors and fingers, I was able to completelly bypass the sewing that would have been the normal process. I then sewed a rectangular piece of fabric to the end of the glove, making an area to also attach the pcb where the sensors were soldered to the rest of the glove. I also ran into a few, albeit self-inflicted, problems when I went back to redo some of the fingers, since some weren’t going as straight as I would’ve liked. I ended up accidentally cutting some of the other strings, but every room was running really short on crimp tubes, so I was completely stuck for a while. Now everything works though, gotta hand it to myself.

Second Milestone

I reached my second milestone by having the 3d printed hand fully assembled, along with connecting all the fingers to motors, and reconnecting those servos to the circuits. Each finger of the hand has 3 joints, and they’re all connected with screws and nuts. In all the joints and the palms, there are two holes, which I put braided string through, so each finger has two strings controlling its movements. One of them flexes the finger, while the other one straightens the finger. By far the biggest struggle I had during the process of completing the second milestone was the connecting the fingers to the servos with the strings. It was both difficult and time consuming for me, since I had to get the string through four holes, all in separate joints (including the palm). Then I had to make sure the line that straightened the finger was pulled all the way through and completely taut before crimping it to the servo. If that line wasn’t fully tense, then the finger wouldn’t be straight at neutral position. I had to do a lot of redos for the first few fingers, and the ring finger was particularly uncooperative, as the line would get caught at the holes all the time, a problem I didn’t run into with any other finger. But after the arduous process, the fingers now move when their corresponding flex sensor is bent.

First Milestone

Diagrams 1 and 2 I reached my first milestone by having the sensor circuit effectively communicate with the servos. I used this link to guide my first steps in completing this project. There are three main components to the communication between the sensor circuit and the servos: Flex Sensors – These sensors change their resistance based off the bend radius of the sensor. The resistance gets higher as the radius gets smaller. Servos – The motors. They move a distance based off how far the flex sensors bend, and are powered by the batteries.  Arduino Uno – The sensor circuit and servo circuit plug into here, and it runs the code that allows them to perform their operations. My first milestone was successfully linking each of these components. The servos now move in correspondence to the bends of the flex sensor. I had a lot of struggles while trying to achieve this first milestone. The first struggle was soldering the jumper cables to the tips on the flex sensors. Another struggle was working with the breadboards, since the long breadboards were actually essentially two separate breadboards only joined together physically, so even after I had everything plugged in, it wouldn’t work properly. Once I had that sorted out I ended up just soldering the sensor circuit onto a separate pcb to run everthing off a single shorter breadboard without a cable management disaster. Soldering the sensors and resistors into the pcb was very difficult for me in the beginning, since I had to connect three things together each time. 

RBG Nightlight

My starter project, the RGB Nightlight works by using a photoresistor, which changes its resistance based off the surrounding brightness, and comparing that value to the integer value “threshold”, which determines whether the light turns on or off. If the value the photoresistor sends in is less than the threshold value, then the light will turn on. But if it’s greater, then the light won’t turn on. Because it’s meant to be a nightlight, it should only turn on when it’s dark enough. It has a potentiometer, which has a dial to adjust the resistance, and that allows it to change the color of the light by changing the red, green, and blue values..

STEM Summer Camps Coding & Robotics Classes For Kids San Francisco Coding & Robotics Classes For Kids New York Coding & Robotics Classes For Kids Denver Coding & Robotics Classes For Kids Palo Alto STEM Summer Camps For Kids in New York STEM Summer Camps For Kids in Palo Alto STEM Summer Camps For Kids San Francisco STEM Classes For Kids in New York STEM Classes For Kids in Palo Alto STEM Classes For Kids in San Francisco Code Classes For Kids Code Classes For Kids in New York Code Classes For Kids in Palo Alto Code Classes For Kids in San Francisco STEM Summer Camps For Kids

Leave a Comment

Start typing and press Enter to search

Bluestamp Engineering