
TABLE OF CONTENTS
Starter Project
Main Project
Milestone One
Milestone Two
Pictures
Hello! My name is Rishav, and I’m a rising Junior at Weston High School. I’ve been into engineering for over 5 years, so BlueStamp became an obvious decision for me when deciding what to do in the summer. I’ve been taking engineering courses at school and BlueStamp has given me a chance to expand my horizons under the broad spectrum of Engineering. Over my six weeks at BlueStamp, I got the chance to work on two different projects. My starter project, which took about one week to complete, was a Mini Theremin. My main project, which took me five weeks to complete, was a Remote Control Hovercraft.
Overall, my experience with BlueStamp has been fantastic. I’ve not only gotten to feel the highs of building something with your own hands, but also the low and difficult moments throughout the process. I’ve learned so much when it comes to Electrical Engineering and also in terms of design. I’m extremely grateful to have had this experience. And I hope it opens many doors in my future.
Finished Hovercraft 3D Rendering of the Hovercraft Body


Finished Base and Skirt of Hovercraft 3D Model of the Base


Electronics Block Diagram
This diagram shows how everything is hooked up in the rear bed of the hovercraft. Up front is the battery, which counteracts the weight of everything else placed in the back. That is connected to the two ESCs which are in turn connected to both motors and the receiver. The ESCs both receive signals from the receiver and also send power back to also control the servo.

MAIN PROJECT
My main project was the R/C Hovercraft. While I came into this program with a limited understanding of what exactly I was going to do, I still expected for the project to go by somewhat smoothly as it looked fairly straightforward on paper. As it turns out, I was horribly wrong. My first few days on this project were spent mostly on battery research(see comparison chart above). Over that period, I considered all aspects of the batteries I looked at, like capacity, discharge rating, weight, and price before finally settling on a certain battery. I ended up going with a 5.2 Ah Multistar battery thanks to its low weight and high capacity rating. I was able to gain a good understanding of what I was going to do and how I would accomplish it. Finally, I was able to get some physical work done. After spending about 2 days creating a 3D Model of the mechanical build(seen above) on Autodesk Inventor, I decided to instead create the electronic build before building a body around it. This lead to a series of issues that took me almost 2 weeks to overcome. I initially had issues with my Electronic Speed Controllers, then with my transmitters and receivers, and also with my motors. All together, I troubleshooted with 3 different transmitters/receivers, 4 different motors, 2 different power supplies, and 6 different ESCs. I spent most of the time in between attempts working on the mechanical build, creating the base(seen above) and skirt of the hovercraft. It took me a while, but once I got access to the right parts and I finished accidentally sparking my battery, I was able to get a lot done in the second half of BlueStamp.’
Final Milestone
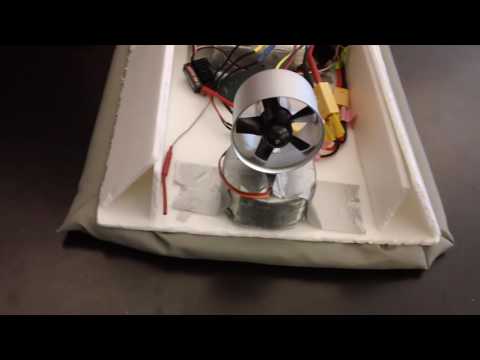
My 2nd and final milestone was to get all of the electronic components hooked up and to then to integrate them with the body I completed in the first milestone. After extensive testing, we decided to go with a set of EZRun ESCs rather than the HobbyKing ones I originally was going to use. I also was able to switch to a 6-channel R/C controller rather than the 3-channel one I was using before. I ran into several issues, mostly having to do with my not-so-great soldering skills, but this task proved much easier to complete as most of my research had been done in the first few weeks of BlueStamp. The lift motor, which lies in the center, is hooked up to one EZRun ESC, which is then connected to the receiver and the LiPo battery. The thrust fan is connected in a similar way except the fact that it sits on top of a servo motor to allow for steering. All of the electronics fit behind the lift motor to counteract the weight of the LiPo battery that sits in the front.
1st Milestone

My first milestone goal was to complete the mechanical build. After a lot of time spent considering different designs in CAD, I finally settled on one and got to work. The body is made out of depron, a thin and light material similar to foam. The design is a good combination of aesthetics and aerodynamics to allow for smooth movement when gliding. While the outer shell took a considerable amount of time to complete, most of the work was done behind the scenes. Underneath the main body is a base that takes air from the center placed lift fan and distributes it evenly into the skirt to allow for even lift on either side of the hovercraft. Weight distribution has also been thought out as the main lift fan lies in the center with all the electronics behind it and the heavy battery in front. The battery is held in a compartment under the front end which is held on with hinges and velcro. When the battery runs out of power, it’s quick and easy to take it out to charge. The back is an open bed for all the electronics and the thrust motor to fit. Holding everything up is the skirt which is made out of tent cloth. Since it’s naturally porous, there was no need for me to create any holes in the skirt except for a small one in the back to help with the balance.
STARTER PROJECT
My Starter Project was the Junior Theremin. A musical instrument controlled by the distance of your hand from an antenna. As a musician, this project was great for me as it was perfect mix between technology and music. To work, the antenna has a DC current working through it which is able to recognize the electromagnetic field from your hand. When your hand is recognized by the field, it send that new signal to the 555 timer. There, the signal is converted from DC to AC power so it can be read by the rest of the circuit. This converted signal is then sent to the microchip – the brain of the entire circuit – to tell the Piezo speaker what note to play and tell which LEDs to light up. It also receives inputs from the two buttons which are then translated by the microchip and sent to the speaker and LEDs. It was tricky to learn how to solder, but the hardest part of this project was understanding how everything worked together. That part alone took a few hours to complete. Overall, it was an enjoyable experience to get me warmed up for my next 5 ½ weeks of BSE!