Raspberry Pi Image Recognition
My main project is Raspberry Pi image recognition, which uses a camera and TensorFlow installed on a Raspberry Pi to automatically classify an image taken by the camera.
Engineer
Michael L
Area of Interest
Computer Science / Computer Engineering
School
The Abraham Joshua Heschel Highschool
Grade
Incoming Senior
How the project works
-
Start Program
Start the program classify_image.py in the terminal
-
Take Image
When the spacebar is pressed the Pi Camera takes an image
-
Feed Image Into Classification Program
Saves the image taken to the imagloc folder which is where the classification program imports the image from
-
Classifies Image
Classifies the image taken by the camera and displays the results in the terminal
Reflection
Coming into BlueStamp, I was already very interested in Computer Science and Engineering. I had taken a Computer Science class on JavaScript and was a member of the engineering club at my school. While I initially thought my two weeks here would be in a similar vein to those experiences, that was far from the case. At BlueStamp I was given much more freedom than I expected and was expected to solve problems primarily on my own. There was also more of a focus on documentation than I was used to.
My main project solidified my love of Computer Science and has inspired me to dive deeper into the topic of machine learning and neural networks. It also exposed me to Python, which I had not experienced before. I really enjoyed both my main project and my experience at BlueStamp and will continue to explore Engineering and Computer Science both now in high school and later in college.
Final Milestone
Camera Integration
I finished my final milestone which was to be able to capture an image with the Pi camera and have it automatically be classified by TensorFlow.
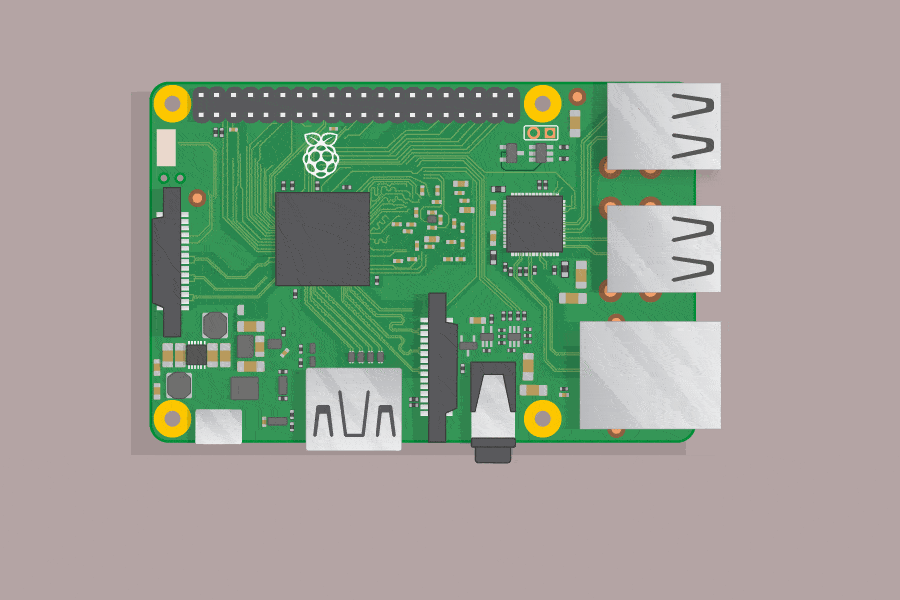
The first step was to attach the camera to the Raspberry Pi. On the Raspberry Pi there are two ribbon cable connection points; the one next to the HDMI port is for the camera, see figure 1.

Once connected, create a program in /home/pi/tf1/models/tutorials/image/imagenet called camera.py and paste the following code into it:
This code will launch the camera viewfinder, take a picture when the spacebar is pressed, and then save that image to the imageloc folder as image.jpeg. Refer to my second milestone for more information on the imageloc folder.
To test the code, navigate to the location of the program in the terminal by running cd /home/pi/tf1/models/tutorials/image/imagenet and then sudo python3 camera.py. The image viewfinder should appear and pressing space should take an image and close the viewfinder, refer to figure 2 for an example picture taken with webcam.
Editing The Classification Program
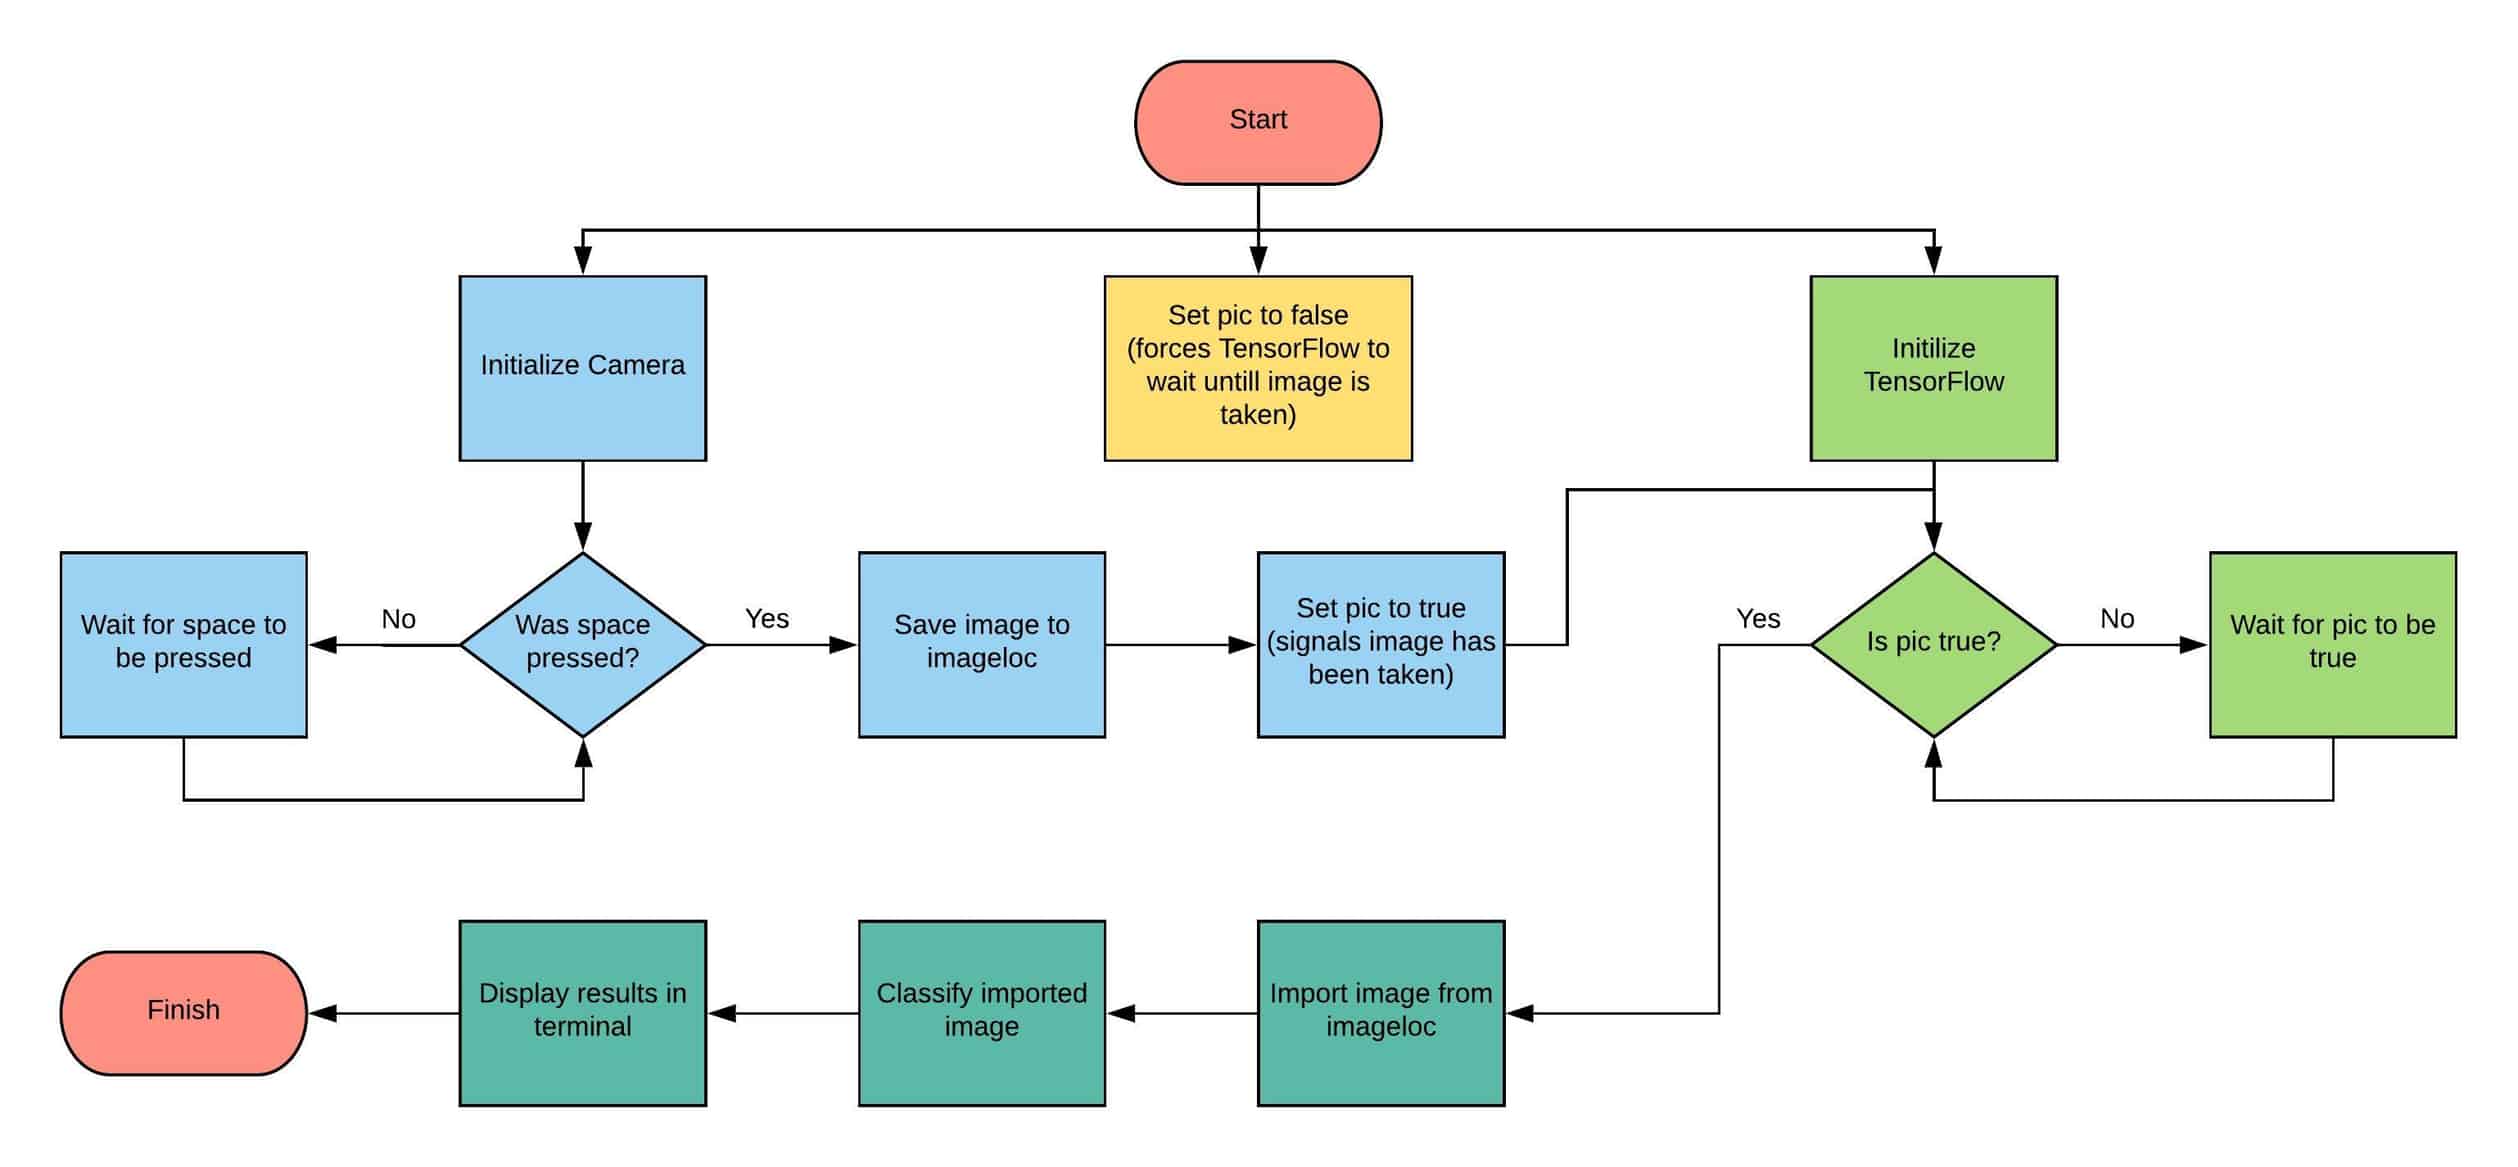
From there, the code from camera.py needs to be integrated into the image classifier program, called classify_image.py. Go to the imagenet folder in the file manager and open classify_image.py. Copy the first three lines of code from camera.py and paste them below from __future__ import print_function in classify_image.py. Then create a variable called pic and set it to false. This will be used later to prevent the image classification from running before an image is taken.
Next, copy the rest of the camera.py program and paste it below where you defined pic. Change the while condition from True to pic == False in-order to make sure the loop stops after taking a picture with the camera. Then, in the if function under camera.capture(‘/home/pi/imageloc/image.jpeg’), paste the following lines of code:
Setting pic to true will function as a flag to tell the image classification function that it is ok to start. The other two lines are needed to close the camera viewfinder after an image is taken.
Now scroll down and find the function labeled def main(_): which is responsible for importing the image and starting the image recognition. Here we will create a while loop that checks if pic is set to true and when pic is set to true starts the image classification. Make sure the def main(_): function contains the following code and then save the file:
The code under the if statement is what was originally in the function and now will only be run when pic is set to true. See figure 3 for a general overview of how the code works.
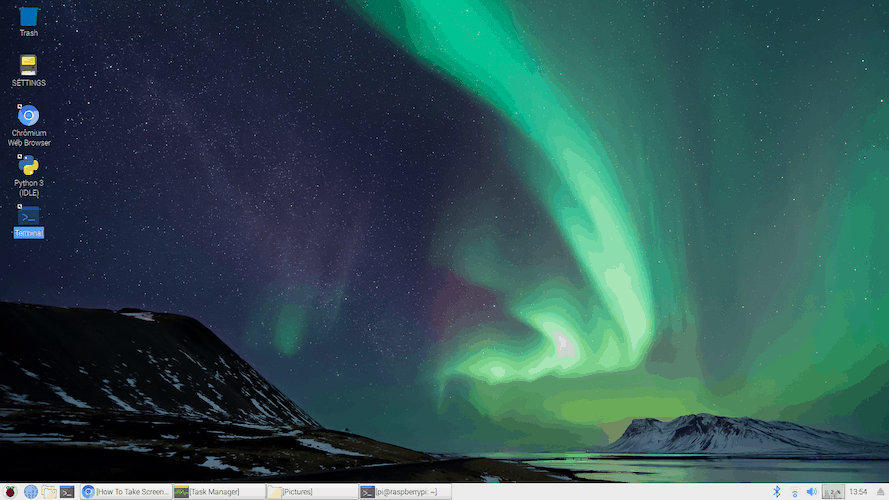
To run the program, open the terminal and run the command sudo python3 /home/pi/tf1/models/tutorials/image/imagenet/classify_image.py (this is slightly different to how we ran the program before as it removes the need to first navigate to the imagenet folder within terminal). After a few seconds, the camera viewfinder should open; to take a picture press the spacebar. The program will then classify the image you have taken and display the results in terminal, please refer to figure 4.

Problems Faced
I initially wanted to keep the camera code as its own program and simply have it call the image classification program; however, I kept running into both user privilege and TensorFlow errors forcing me to combine the two programs into one. I also ran into issues with the camera viewfinder closing too early which I fixed by using the pic variable to keep the image classification program from running before I took an image. I then ran into a problem where the viewfinder now refused to close, which needed two fixes. First, to access the keyboard the program needs root privileges so I needed to run the program using sudo. Second, while the program would now take an image it still would not close the viewfinder. To fix this, I added in the lines of code to force the viewfinder to close once an image had been taken. With these two fixes, the issue was solved.
What I Learned
This project taught me how to write if statements and while loops in Python, how to call a program from another program, how to address the Pi Camera, and how to use the terminal. I also learned about Python specific syntax and how to read the keyboard in python. This project has prepared me for future endeavors using a Raspberry Pi, image classification, and Python. It has also further kindled my interest in Computer Science and machine learning.
Second Milestone
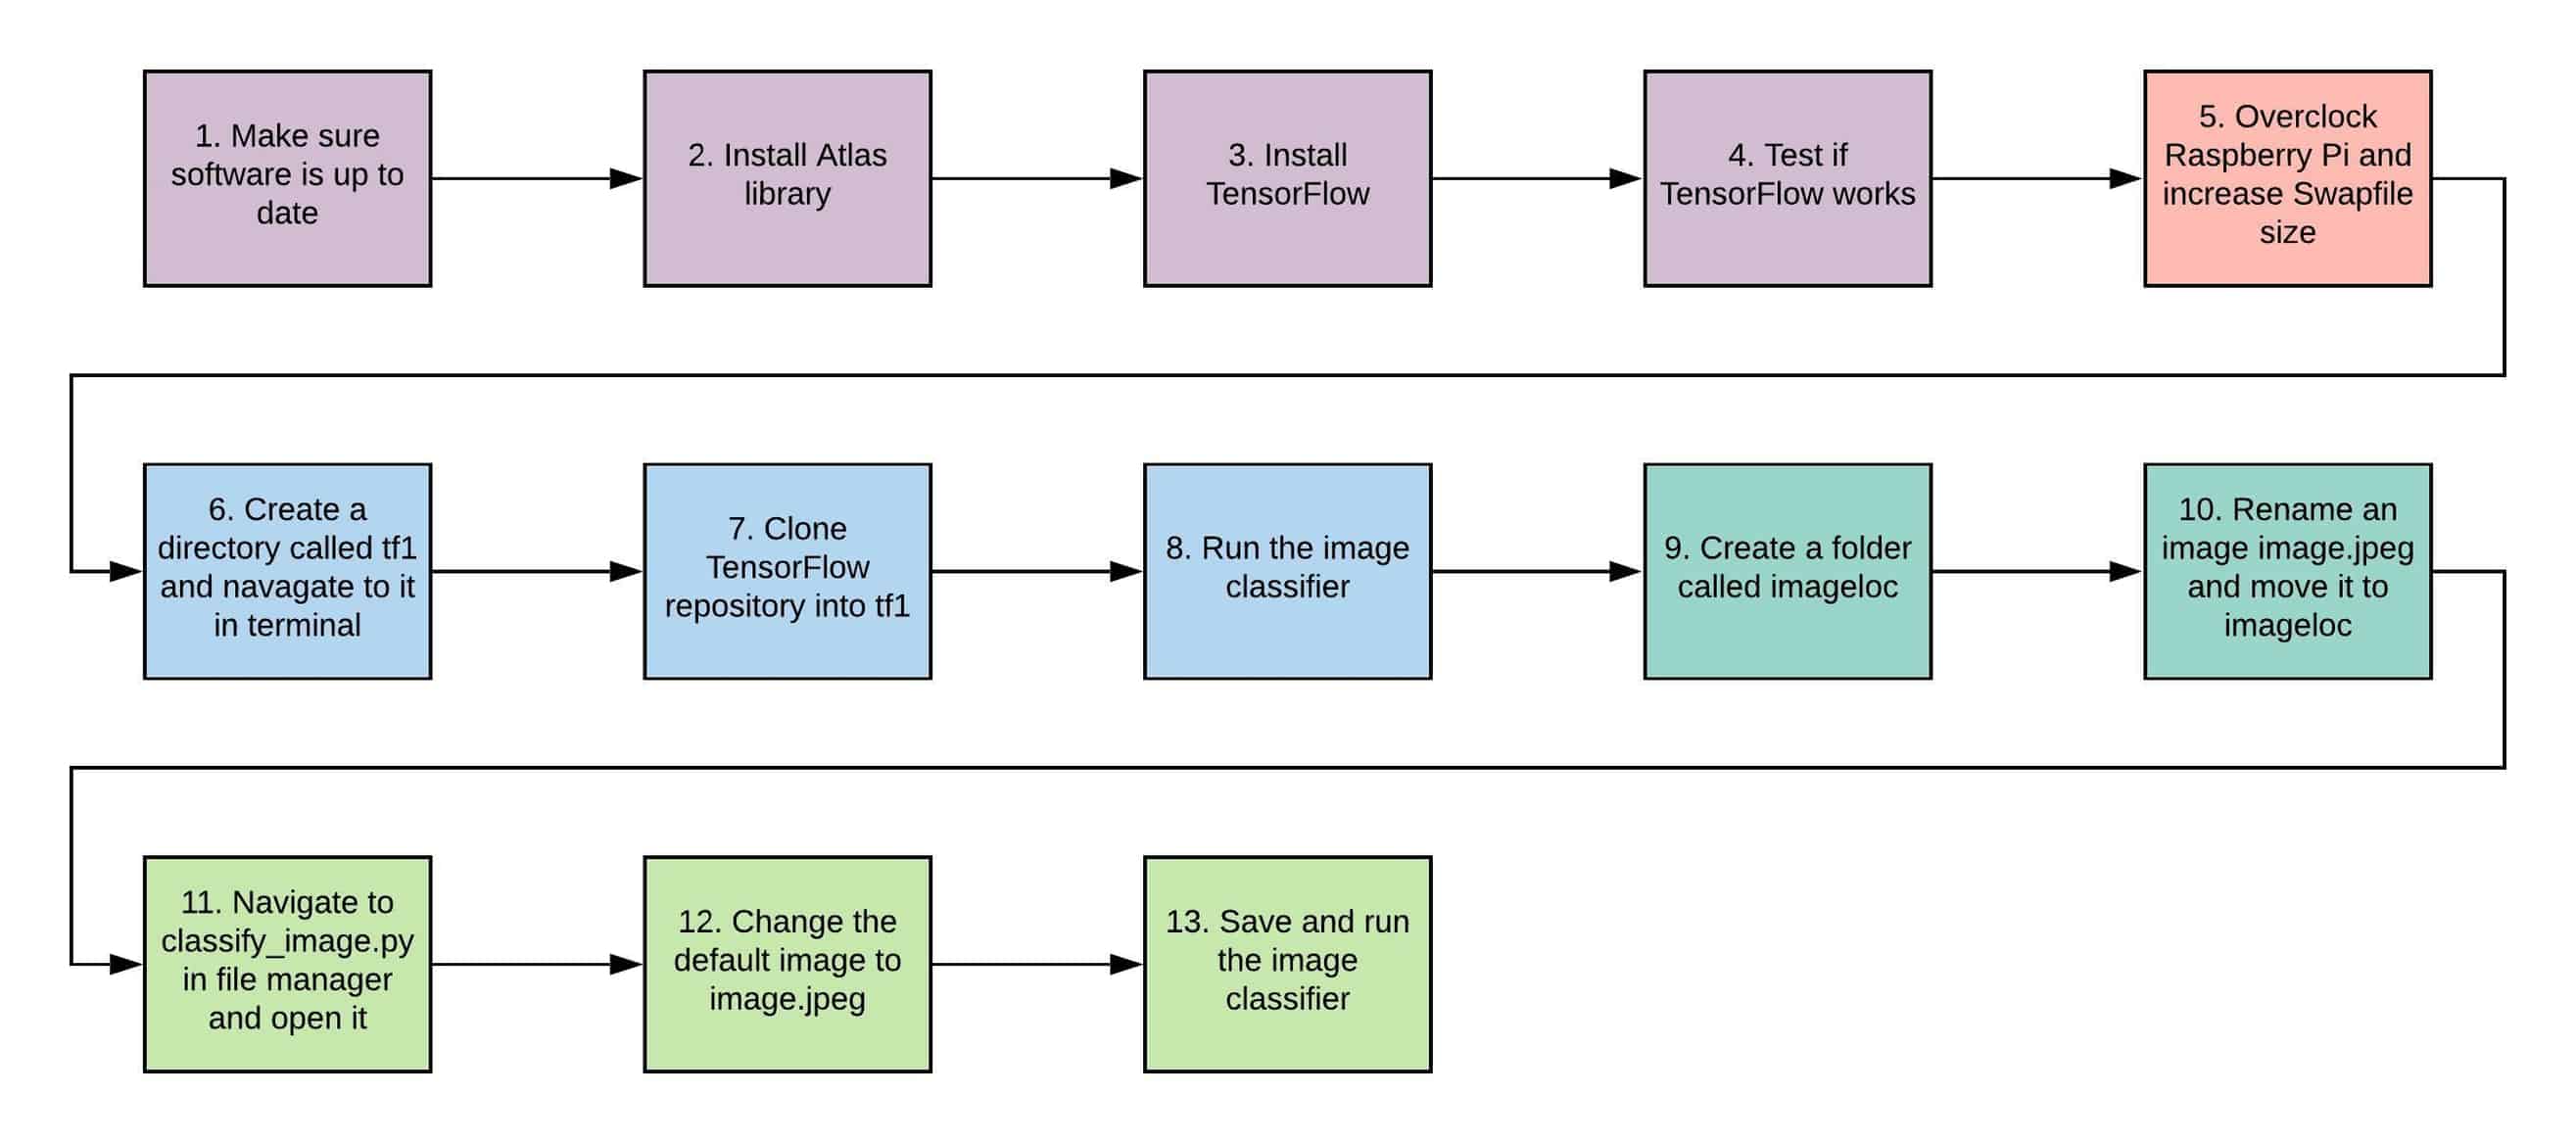
My second milestone is installing TensorFlow and running the image recognition program on the image of my choosing. The first step in this process is to make sure all of the Raspberry Pi software, including Python3 and pip3, are up-to-date. I ran sudo apt-get update in the terminal to ensure this. Python3 is the coding language and pip3 is a package manager for Python. Once the software is up-to-date run sudo apt install libatlas-base-dev in the terminal to install the Atlas library, an open source software library.
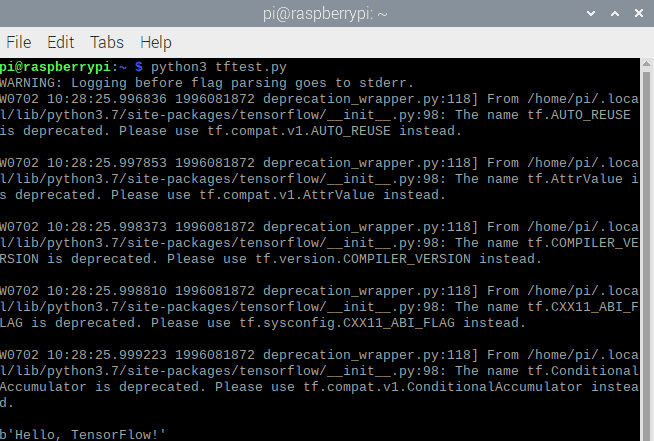
The next step is to install TensorFlow, a machine learning library, using the command pip3 install –user tensorflow. After TensorFlow is installed, make sure it works by running a “Hello, world!” program in TensorFlow. A “Hello, world!” program is a simple program that prints the statement “Hello, world!” or in this case “Hello, TensorFlow!” to the console. Create a new Python script by running sudo nano tftest.py. Then add the following lines of code to the document:
This code will initialize TensorFlow and print “Hello, TensorFlow!” to the terminal.
Once the code is added to the file save it by pressing Ctrl + X and then Y. The code can then be run by typing python3 tftest.py into the terminal. If TensorFlow is working you will see the statement “Hello, TensorFlow!” You may also encounter various runtime warnings. If so, please refer to figure 2. The warnings should be ignored as they are simply a byproduct of running TenserFlow with Python 3.5 or newer.
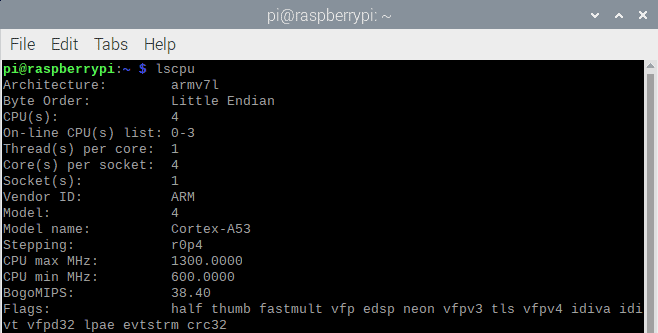
Before installing the image classification software, two settings on the Raspberry Pi need to be changed. The first change is to increase the CPU and GPU clock speeds, a process known as overclocking. TensorFlow is very resource intensive and so the Pi needs all the performance it can get. The steps to overclock vary depending on the model of Pi. These instructions will specifically be for the Raspberry Pi 3 Model B. The clock speed settings are located in /boot/config.txt which can be accessed by running sudo nano /boot/config.txt in the terminal.
Once config.txt is open, paste this code at the end of it:
core_freq=500 # GPU Frequency
arm_freq=1300 # CPU Frequency
over_voltage=4 #Electric power sent to CPU / GPU (4 = 1.3V)
disable_splash=1 # Disables the display of the electric alert screen
Save the file by pressing Ctrl + X and then Y. Then reboot the Pi by typing reboot into the terminal. To make sure that the overclock worked, run the command lscpu and check that the value for CPU max MHz is 1300 as seen in figure 3.
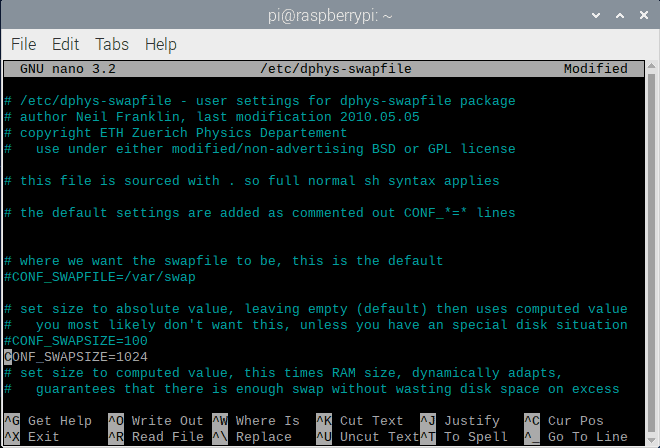
The other setting that needs to be changed is the size of the swapfile. The swapfile is an extension of the system’s memory, known as RAM, for when it overflows. Because the Pi only has 1GB of RAM, it is crucial that there is enough space for overflow in the swapfIle or the image recognition program will not run. To access the file that controls the size of the swapfile, run sudo nano /etc/dphys-swapfile in the terminal.
Find the value CONF_SWAPSIZE and change it from 100 to 1024 as shown in figure 4, and save the changes by pressing Ctrl + X and then Y. In order to make the changes take effect run sudo /etc/init.d/dphys-swapfile stop and then sudo /etc/init.d/dphys-swapfile start which will restart the service that manages the swapfile.
Find the value CONF_SWAPSIZE and change it from 100 to 1024 as shown in figure 4, and save the changes by pressing Ctrl + X and then Y. In order to make the changes take effect run sudo /etc/init.d/dphys-swapfile stop and then sudo /etc/init.d/dphys-swapfile start which will restart the service that manages the swapfile.
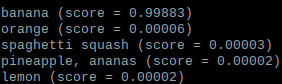
Now that the Pi is running at peak performance, it is time to install the TensorFlow image recognition software. Run the command mkdir tf1 to create a directory for the software and then navigate to that directory in the terminal by running cd tf1. From there, run git clone https://github.com/tensorflow/models.git to clone the TensorFlow git repository into the new directory. We are interested in the image classification program which is found at models/tutorials/image/imagenet. To navigate to that folder in the terminal run cd models/tutorials/image/imagenet. Run the image classifier on the default panda image by entering python3 classify_image.py in the terminal. If done correctly the program should return a list of options for what the image is along with their respective probabilities, please refer to figure 5.

Outlined in green is the probability of the image being a panda, very likely at 89.107 percent. Outlined in red is the probability of the image being an earthstar, very unlikely at 0.117 percent.
The next step is to change the default image of a panda to our own image. In the file manager create a folder called imageloc within /home/pi. Then download an image to be classified, I chose a banana, rename it to image.jpeg and put it into the imagloc folder. Now we have to modify the classify_image.py program, located at /home/pi/tf1/models/tutorials/image/imagenet.
Open the file and find the following section of code:
Open the file and find the following section of code:
Change cropped_panda.jpg to /home/pi/imageloc and save the file. Reopen terminal, navigate to tf1/models/tutorials/image/imagenet using cd tf1/models/tutorials/image/imagenet and run the image classifier again. It should now classify the image in the imageloc folder, as seen in figure 6.
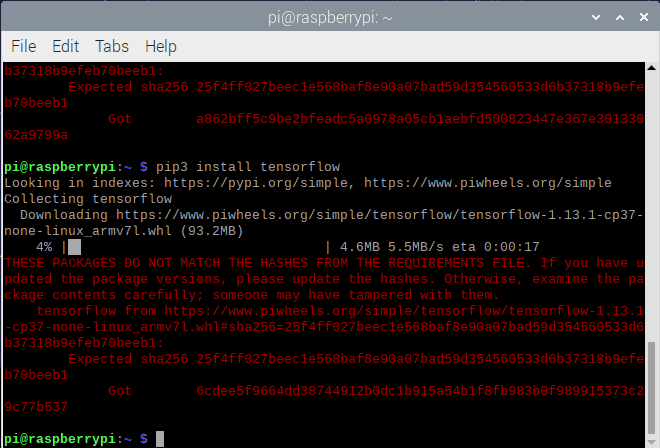
One problem I encountered was installing TensorFlow. No matter what I did when I tried to install TensorFlow it would error out as seen in figure 7. After many hours of troubleshooting and research, the error turned out to be an issue of a slow network connection. To fix this I found an ethernet cable and plugged to Raspberry Pi into ethernet. This solved the problem and TensorFlow installed.
Another problem I faced was that the Pi was constantly running out of RAM when running the image classifier, causing the Pi to lock up and become unresponsive. This is where the need to expand the swapfile came from. Once I did that everything ran smoothly.
With my second milestone complete, I am ready to move on the running images from the Raspberry Pi camera through TensorFlow. This experience taught me a variety of things, the most important thing is to never give up and persevere through errors and glitches.
With my second milestone complete, I am ready to move on the running images from the Raspberry Pi camera through TensorFlow. This experience taught me a variety of things, the most important thing is to never give up and persevere through errors and glitches.
First Milestone
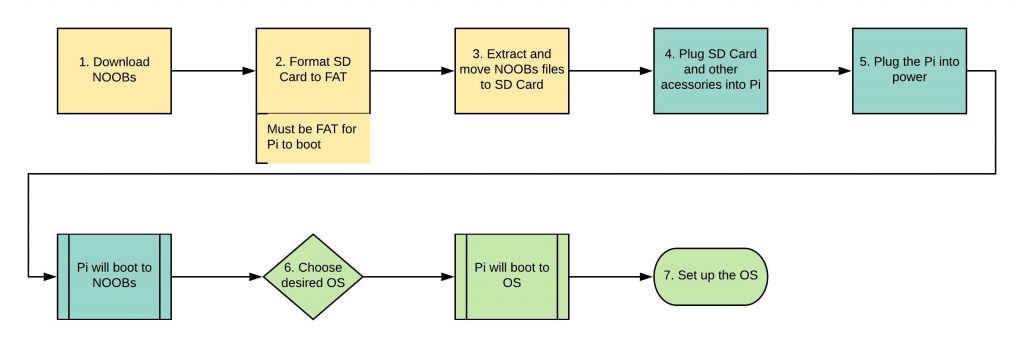
My first milestone is booting and setting up the Raspberry Pi, a single board computer; it’s a powerful and cheap prototyping platform.:
As seen in figure 1, setting up the Pi is a seven-step process:
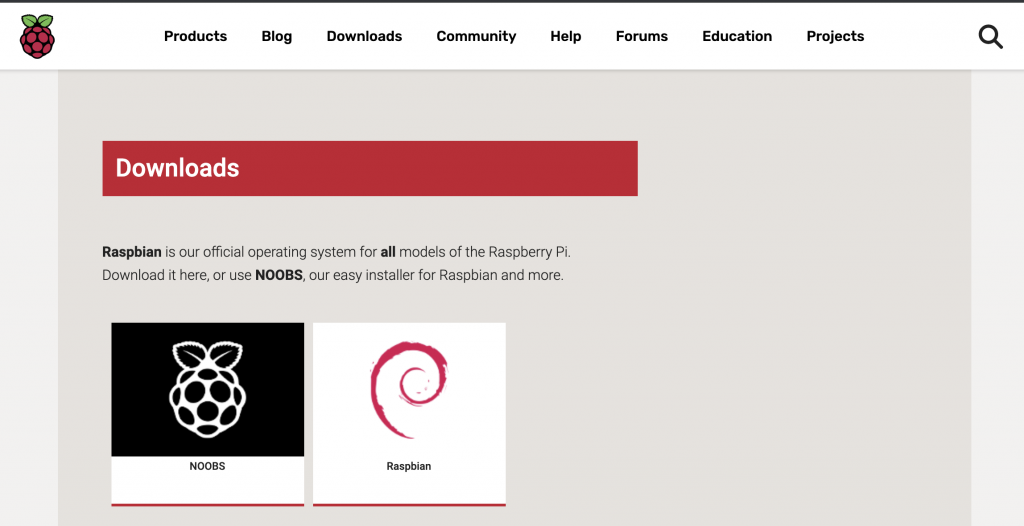
(1) Download Noobs, the operating system installer, from the Raspberry Pi Foundation’s website shown in figure 2.
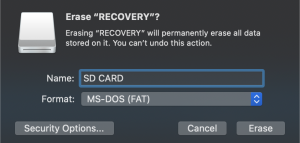
(2) Format the SD Card, the Pi’s main storage, and choose FAT for the filesystem from the dropdown menu. Please note that if the FAT filesystem is not used the Pi will not boot.
(3) Install the Noobs files onto the SD Card.
(3) Install the Noobs files onto the SD Card.
(4) Insert the card into the Pi and plug in the keyboard, mouse, and monitor, refer to figure 3.
(5) Plug the Raspberry Pi into power and it will boot to the NOOBS menu.
(5) Plug the Raspberry Pi into power and it will boot to the NOOBS menu.
(6) From that menu choose your desired operating system — I chose Raspbian Stretch. After a few minutes, the Pi will boot into the desktop seen in figure 4.
(7) Finish setting up the operating system by setting a password, logging into Wifi, and making sure the screen border is set correctly.
One problem I ran into was that I was formatting the SD Card in exFAT instead of FAT32. The Raspberry Pi only recognizes FAT SD Cards as bootable media and thus will not boot from a card formatted any other way. Once I realized this I was able to reformat the SD Card, shown in figure 5, which corrected the issue.
I am now really to utilize the Raspberry Pi for image recognition and to explore its capabilities.
Starter Project
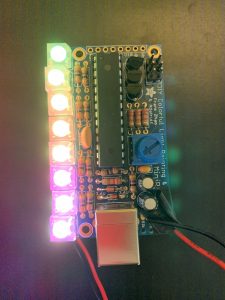
For my started project I made the MiniPOV 4 Kit, shown in figure 1. This device flashes eight light emitting diodes (LEDs) in a specific pattern, which when moved quickly, create an image of Pacman, letters, and Space Invaders aliens. These images are created by taking advantage of persistence of vision in order to form shapes and are best seen in a dark environment. A diode is a semiconductor with two terminals that allows current to flow in one direction only. An LED is a diode that produces light when electrons in the LED recombine with positively charged ions and release photons in the process. Because LEDs have a very specific and very low voltage drop, a resistor is needed to make sure the LED does not burn out.
For my started project I made the MiniPOV 4 Kit, shown in figure 1. This device flashes eight light emitting diodes (LEDs) in a specific pattern, which when moved quickly, create an image of Pacman, letters, and Space Invaders aliens. These images are created by taking advantage of persistence of vision in order to form shapes and are best seen in a dark environment. A diode is a semiconductor with two terminals that allows current to flow in one direction only. An LED is a diode that produces light when electrons in the LED recombine with positively charged ions and release photons in the process. Because LEDs have a very specific and very low voltage drop, a resistor is needed to make sure the LED does not burn out.
How it works
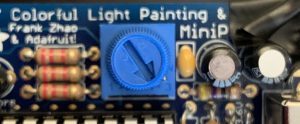
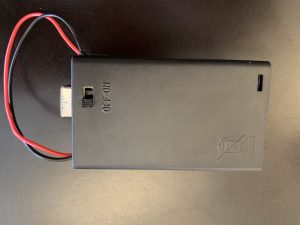
The MiniPOV 4 Kit uses a pre-programmed microcontroller to control a row of eight multicolor RGB LEDs. A microcontroller is a small single circuit computer. Power is provided by three AAA batteries housed in a battery compartment with an on/off switch, please refer to figure 2.
The speed of the LEDs can be changed by rotating a potentiometer, refer to figure 3, which serves as an input to the microcontroller. When oriented with the LEDs towards you, rotating the potentiometer clockwise will speed up the LEDs and rotating it counterclockwise will slow them down. A potentiometer is an adjustable resistor with three terminals. This happens because rotating the potentiometer changes its resistance and thus changes the amount of current flowing to the microcontroller; the microcontroller measures the change in current and adjusts the LEDs accordingly.