Kenji G.
Hello my name is Kenji and I am a rising freshman to Leland High School in Almaden. I chose the Useless Machine for my starter project because it looked really interesting and how it was able to teach me how to solder wires which will be very important. I also chose the RC Robot Tank for my main project which has a good combination of coding and engineering and will also fit into my 2 weeks time frame.
In my time during BlueStamp, I have learned the most about engineering than any thing I had done previously. I have only done an engineering course provided by my school and went to some coding class during the summer so going to BlueStamp really helped me out a lot. During this time, I learned how to code with an Arduino and build a robot with circuits and wires that I had never done before. I also learned many other important aspects and robotics that will help me greatly in the future.
Follow-up Milestone
During the camp, my main project was the RC Robot Tank in which I had built the chassis and had done the mechanical and coding aspects to let the robot work. After the camp, I decided to add a cannon onto the top of the robot which was a lot harder than I had expected it to be. In adding this modification to the robot, some of the bigger changes that were needed were: the chassis for the cannon; changing the motor driver to fit extra servos and adding a bigger power supply.
The first change that I had to make was to make the chassis of the cannon:
The first step of this change was to make the overall design of the cannon and after doing some research I came up with an idea. Looking at the previous projects that other students had made and also the projects that people have made online, I realized that the biggest problem that they face was that it is unable to fire more than one bullet. To combat this, I used a rubber band which is a much more versatile projectile that still hurts quite a lot and tied it to a long metal piece for support and a servo to allow it to shoot with my controller. As you can see at the servo on the back of the robot there are many hinges that are used for additional rubber bands to be able to fire up to three rounds. The assembly of the chassis was much easier than expected since the process was really similar to the tank itself and the materials needed were nearly identical. One problem that I faced was to angle the cannon with the controller which is the purpose of the servo at the front of the tank. However a problem occurred with the servo pins on the driver motor for that servo which prohibited the servo from receiving commands from the controller. I could replace the driver motor with newer one but I had already soldered the DC motors onto it since this happened really late into the project. Thus I had to give up on that idea since it would mess all of the other already completed stuff up and would take too much time.
The second change that I had to make was to change the driver motor to add extra servos and bigger power supply:
The driver motor that I had used during the camp was the L298 driver motor which allows allows me to connect, up to only 2 DC motors; to the Arduino; and an external power supply. This left no room for the additional two servos, which is why I switched to the L293D Adafruit driver motor that allowed me to do just that. However, this created three new problems: the new driver motor needed soldering and I had to buy one since I was out of the camp; add an entire new library for the driver motor; learn all the new code that is only compatible for the driver motor and the new library imported. While changing the motor driver I also found that I needed a bigger power supply to be able to power the stronger driver motor and the extra servos on top of the 2 DC motors controller and Arduino itself. I realized that individual batteries will be too hard to fit onto the complex tank and had to get power banks which were a more compact, lightweight and made better voltage and current. Overall other than the coding which took really long the rest were quite easy.

Main Project: RC Robot Tank
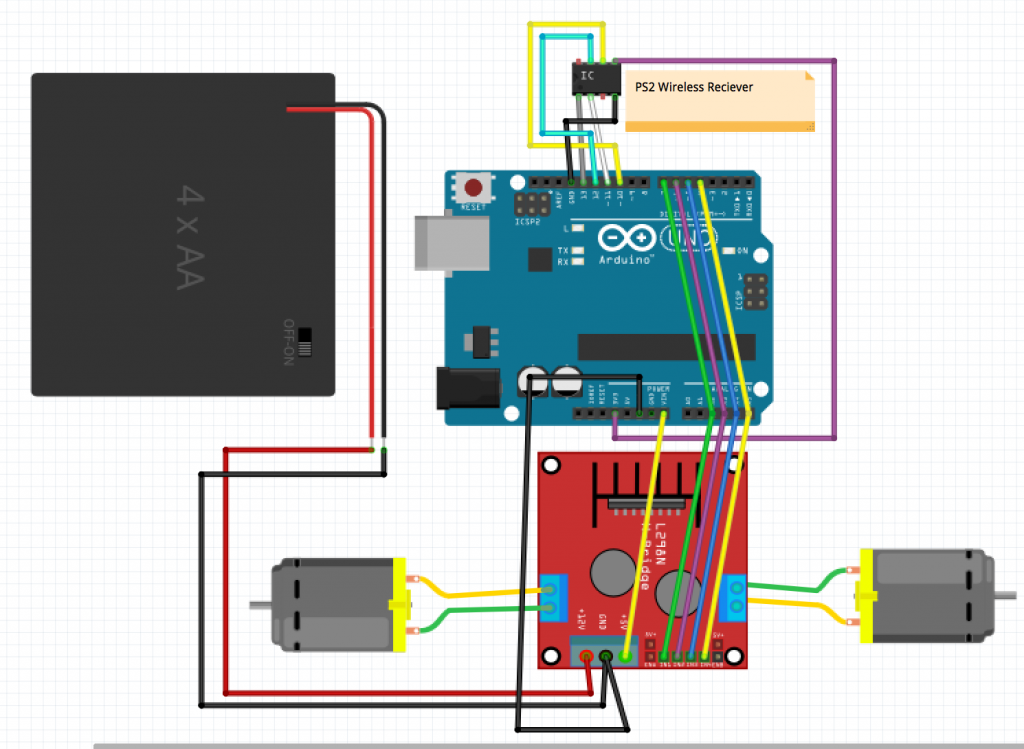
The Remote Controlled Robot Tank is controlled by a wireless PS2 controller that has an Arduino and a DC motor control to receive the information. The chassis consisted of a universal plate, track and wheels at the sides and a double gearbox fit onto the plate.
Final Milestone
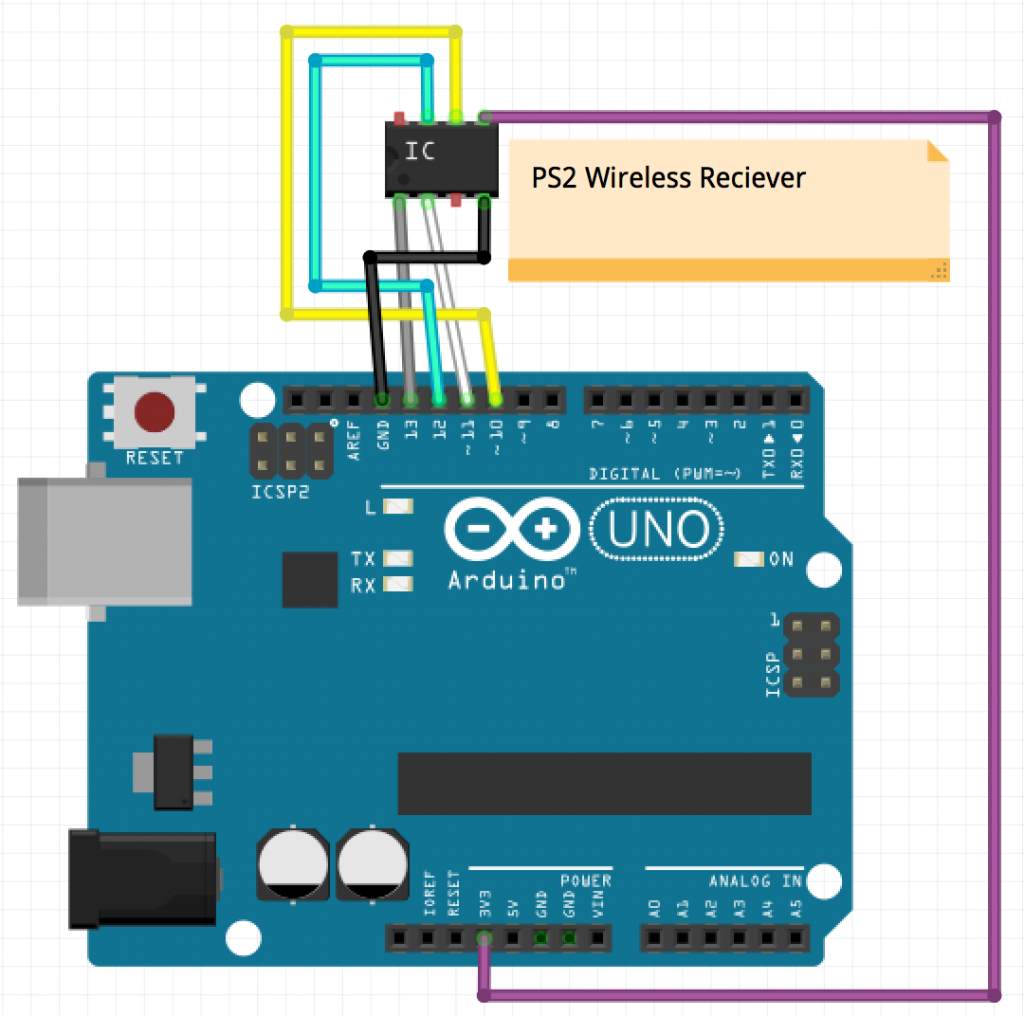
Hello my name is Kenji and I am a rising freshman to Leland highschool. For my main project I chose the RC Robot Tank and I have reached my final milestone and have finally completed the tank. From my second milestone, I added the PS2 controller and the wireless receiver that receives the instructions from the controller then transmits it to the Arduino and to the motor controller to turn the motors and drive the robot. During this time, I had to learn a lot of functions involved such as the if and else functions that helps to send the information appropriately without running into too many bugs. Some problems that I ran into was the wiring of the receiver, as you can see I have 6 wires from the receiver to the Arduino and they are labeled the Data, Command, Attention, Clock, 3.3V to power the receiver and Ground. After some research I found the proper connections and put Data to pin 10, Command to pin 11, Attention to pin 12, Clock to pin 13, 3.3v to the output power pin, and Ground to a ground pin. Another problem was importing the library from the Arduino website into my receiver and interface the controller with instructions, this part took me over 3 days to figure out and was very frustrating. I was able to finish the final milestone even though I hoped to finish much sooner, also since I am only doing only 2 weeks I do not have enough time to do modifications and hope to make some in the future.
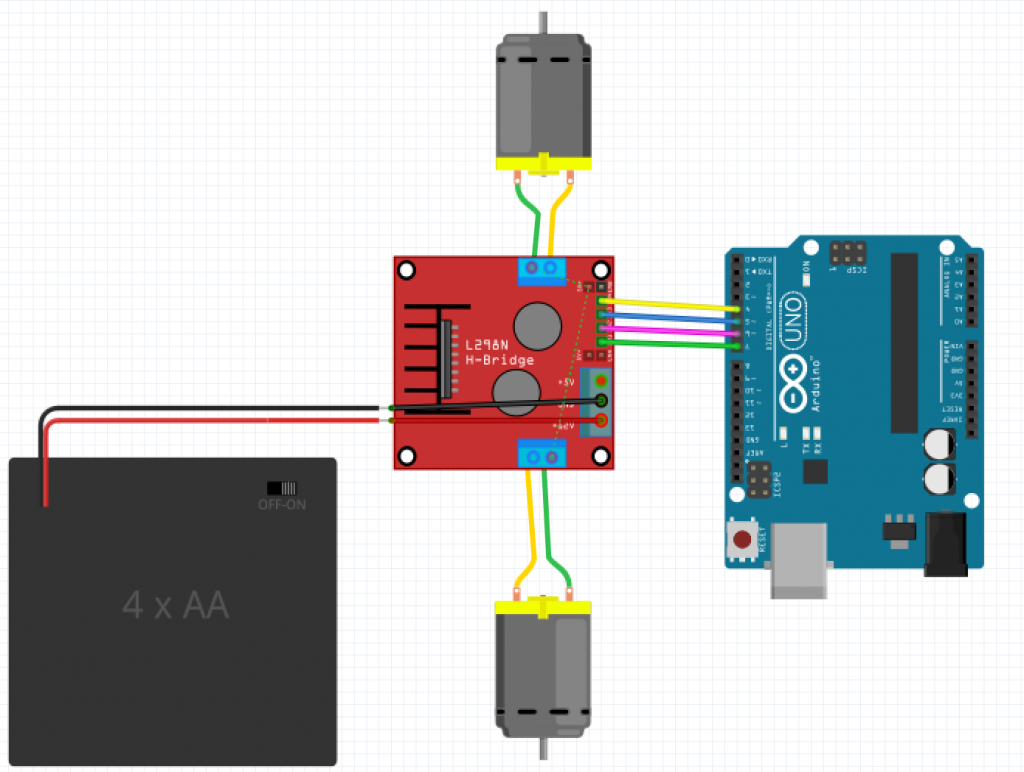
Second Milestone
I chose the Remote Controlled Robot Tank for my main project and I have reached my second milestone in completing this project. In my first milestone, I built the chassis and the structure of the robot while this milestone focused more on the programming and wiring of the robot. As you can see there is a lot of wiring between the arduino, motor driver, batteries and the gears which helps to send information to decide when to turn the gears. As of now, I am using the serial monitor within the arduino code to move the robot, forward, backwards, left and right. This will be switched to a PS2 controller in my third milestone. During this time, I had to learn a lot of the coding involved, the most important fact being that low with digitalWrite is the same as 0 in analogWrite and high in digitalWrite is the same as 255 in analogWrite. With this in mind, I would be able to make it move forward or backwards and also depending on the value of high, I would be able to make it move slower but with only the analogWrite since digitalWrite only allows the high or low and nothing else in between. Using the difference in speed I was able to make it turn left or right by allowing one wheel to rotate slower and thus turn the robot tank. I ran into many coding problems during this milestone and was also confused on many occasions on where the wires are supposed to go. As you can see all the wires are in a mess right now and I am going to solder them when I am confident in where they are supposed to go. I was able to finish the second milestone on time even though I hoped that I was able to finish this part earlier and I am very excited to move onto the third milestone and finish the project entirely.