
Howdy, my name is Juan. I am a rising senior at KIPP Sunnyside High School in Houston. For my starter project I did a Minty Boost and for my final project I did a voice controlled robot. The Minty Boost is simply a small battery powered charger for USB devices. I chose the Minty Boost because I can use it in my everyday life. For my final project I decided to do a voice controlled robot that knows four different languages because I am constantly trying to learn new languages and I got to design and program my own robot. I really enjoyed my experience at Bluestamp because it gave me an opportunity to get a hands on experience for doing something I always wanted to do, and that I will most likely end up doing.
Juan and Lucy \(^.^)/

^^^^^^^^^^^^^^^^^^^^^^^^^^^^^^^^^^^^^^^^^^^^^^^^^^^^^^^^^^^^^^^
Juan VR robot instructions
Simple instructions of how I made my robot are below, which are inspired by this instructable.
1. Research what I wanted to build, I chose the thing that was most interesting to me.
2. Come up with a BOM (Bill Of Materials) for the things I am going to need to build my robot
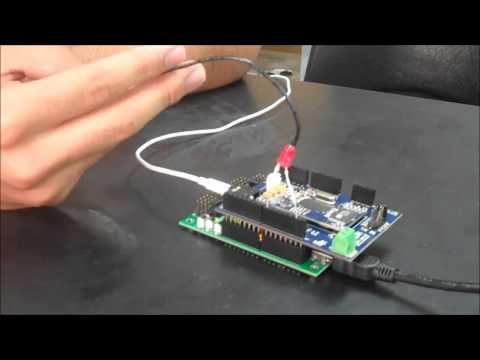
3. When I had all my materials I began with with downloading the Arduino program, the easy VR commander, and the quick synthesis 5
4. I did my first Arduino program for the VR by telling an LED to blink on and off, this code can be found online
5. I built a virtual model for how I wanted my robot to look using Google Sketchup
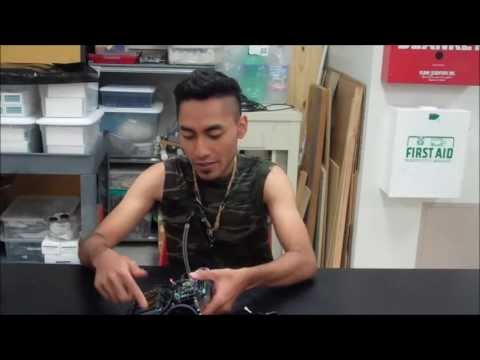
6. Once the model was drawn to scale I began building in. I drilled holes in specific locations in the Lexan glass and label where I wanted everything to go. While I was drilling a hole it accidentally chipped off a piece and I had to file it so it would come out smooth. I later used these broken holes for a replacement of back wheels and zip tie holders for the battery
7. I programmed my robot to take simple commands in English, then I replicated the D6 command chip on the VR shield to an external LED so it could be easier to get feedback. I also programmed the servos that way they respond whenever I give them an action.
8. I began to program my robot in Spanish using the easyvr commander
9. I wanted more feedback from my robot so I decided to give it a voice, so that it would talk to me whenever it heard a command, or whenever I needed to repeat something. I did this by using the quick synthesis 5 and recorded WAV. files.
10. I added French and Japanese to LUCY that way she can know 4 languages. I continuously tested her to make sure she was working on each one and she seems to be working fine.
11. Added a speaker so LUCY can talk to me
Juan’s BOM
materials needed in order to build the robot, shows the website, parts needed and the cost
BSE, Voice Controlled Robot BOM
Juan’s VR Code
the Arduino code I used to control and program my voice controlled robot
Juan’s Robot Schematic
simple diagram for how the robot was made

Voice Control Robot Model
This is how I planned to make my robot at the beginning, everything drawn to scale. But, as I came close to finishing it I changed things up a bit.
voice controlled robot to scale


Final Video; Voice Controlled Robot Milestone 3; English, Spanish, French, Japanese, and colorful LED
I add French and Japanese commands into my robot along with another LED that changes colors according to what language its listening for.
here is my third milestone:
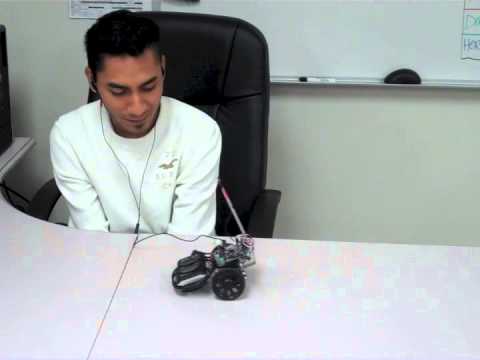
Voice Controlled Robot Milestone 2; Body, LED, Movement, and Response
For my second milestone I was able to give my robot a body and I was able to program code into it and tell it what to do. The robot has simple commands, and I also added a LED to respond to the D6 light that way it would be easier to recognize commands. I also allowed my robot to speak back to me for more feedback.
here is my second milestone:
Voice Controlled Robot Milestone; LED ON and OFF
For my first milestone my Voice Controlled robot, also know as BOB, was able to to turn a LED on and off just by me telling it. This was a huge milestone because it’s basically the backbone of the project, Now that I know I can tell BOB what to do, I can give BOB different commands. The different commands are actually my next step in the project because that way I’m able to give BOB commands with servos instead of LED’s.
here is my first milestone:
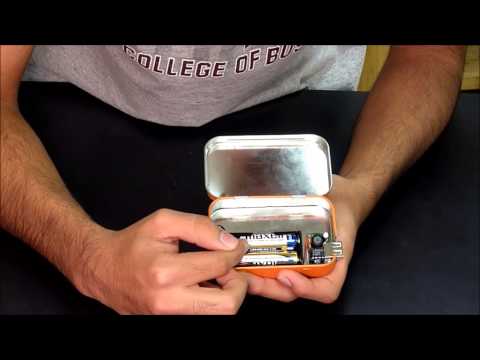
My Starter Project, The Minty Boost
The Minty Boost is simply a portable charger that’s designed to power a USB powered device by using two AA batteries. It works by converting 3 volts to a total of 5 volts, it uses a LT1302 chip which causes current to flow through the board. Thanks to the diode in the board, it acts as an energy boost that calls for a higher voltage. This new voltage is kept constant the entire time when it’s used and when it’s not being used there’s a loop from 3 volts to 5. With all the conversions that’s are done, there’s are resistors on the board so the current can flow evenly throughout the board. Along with all these little things an inductor is also found on the board in order to not only stop it from burning but to slightly increase the voltage that’s being produced.
The process was fairly simple, but I did encounter a small problem in the build of the board. The small problem I encountered was that the the board was just sucking up energy from the batteries. It turned out that I put the chip upside down; after I switched the positioning of the chip, the right amount of current was flowing through the board. From this I learned that the smallest thing can cause a huge problem and it made me more aware and attentive to be careful to the little things. “You learn from your mistakes.” From this lesson learned I carried it to my intensive project and it made it a lot better because I would have made small mistakes but you live you learn.
Here is my video hope you enjoy (:
Reflection
My experience at Bluestamp was a one-of-a-kind experience that I would have never imagined doing. Ever since day one I was introduced to soldering and lots of things that I knew nothing about. As I got more involved into my projects I encountered many difficulties but I sooner overcame them and made my projects better then ever. I am really happy that I got a chance to work on my project mechanically, electrically, and software wise. From my experience with this program I have decided engineering is one of the things I would like to do in college.