Harry Potter Sorting Hat
Hi, my name is Joey, and I am making the Harry Potter Sorting Hat. The sorting hat will be based off of the Harry Potter books and movies. The hat talk and move and speak, while sorting people into the four houses, Gryffindor, Slytherin, Hufflepuff, and Ravenclaw.
Engineer
Joey R
Intrest
Science, History
School
SAR High School
Grade
Rising Sophomore
Reflection
In BlueStamp, my knowledge of engineering grew tremendously. When I first walked into BlueStamp just six weeks ago, I was a curious engineer with little engineering knowledge. However, I can now proudly say that my growth in engineering has rapidly increased. I had a blast while building and learning, and I am now ready to take the next step in my engineering career. I would now like to continue my pursuit of knowledge by learning and using Raspberry Pi’s and other platform for development.
Final Milestone
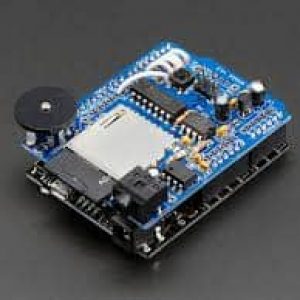
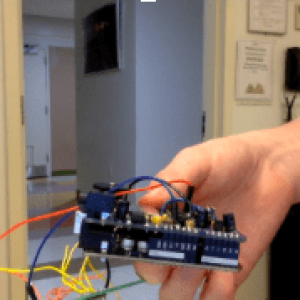
For my final milestone, I completed my project, the Harry Potter Sorting Hat. Specificity, I got the hat to move and speak at the same time. The Sorting Hat can talk and move, and it can sort the wearer into a house. In order to get the hat to speak, I used an Arduino wave shield. The wave shield allows me to play audio. After downloading four YouTube clips to my computer, I went into examples in Arduino, clicked on the example WaveHC, and then proceeded to click on the example daphc. Daphc is a mode which plays every .WAV file it finds on the SD card in a loop. From there, I then used Arduino to make a code that gets the hat to speak through the wave shield. The next component of my project was getting the hat to move. The first step to do this was making a mechanical link, two markers, a screw, and a rubber band. I then attached a servo motor to the bottom of the link. The servo had wires that attach to a perfboard, which transmits the signal to the Arduino. After using Arduino to code the servo, the hat was able to move. I really enjoyed this project, mainly because it involved a lot of different types of engineering. This project required a lot of design, mechanical work, and coding, and I really expanded my knowledge in a lot of areas. However, there are two things that I could add that would really improve my project. The first thing is adding a distinguishing variable when sorting the user into a house. This way, the sorting will not be random, and there will be some logic to the sorting. The second piece to my project that is missing is that Sorting Hat authentic look. Perhaps some paint or some cloth will do, but I really look forward to making the hat look like the original one. I really enjoyed building the project, and I hope to continue exploring engineering in the near future.
#include <SoftwareServo.h>
//#include <Servo.h>
SoftwareServo joeyservo;
/*
* This example plays every .WAV file it finds on the SD card in a loop
*/
//#include <Servo.h>
#include <WaveHC.h>
#include <WaveUtil.h>
//Servo servo;
SdReader card; // This object holds the information for the card
FatVolume vol; // This holds the information for the partition on the card
FatReader root; // This holds the information for the volumes root directory
FatReader f; // This holds the information for the files we’re play
WaveHC wave; // This is the only wave (audio) object, since we will only play one at a time
uint8_t dirLevel; // indent level for file/dir names (for prettyprinting)
dir_t dirBuf; // buffer for directory reads
/*
* Define macro to put error messages in flash memory
*/
#define error(msg) error_P(PSTR(msg))
// Function definitions (we define them here, but the code is below)
void play(FatReader &dir);
//////////////////////////////////// SETUP
void setup() {
SoftwareServo::refresh();
Serial.begin (9600);
joeyservo.attach(6);
joeyservo.write(180);
delay(2000);
joeyservo.write(140);
delay(2000);
//Serial.begin(9600); // set up Serial library at 9600 bps for debugging
putstring_nl(“\nWave test!”); // say we woke up!
putstring(“Free RAM: “); // This can help with debugging, running out of RAM is bad
Serial.println(FreeRam());
// if (!card.init(true)) { //play with 4 MHz spi if 8MHz isn’t working for you
if (!card.init()) { //play with 8 MHz spi (default faster!)
error(“Card init. failed!”); // Something went wrong, lets print out why
}
// enable optimize read – some cards may timeout. Disable if you’re having problems
card.partialBlockRead(true);
// Now we will look for a FAT partition!
uint8_t part;
for (part = 0; part < 5; part++) { // we have up to 5 slots to look in
if (vol.init(card, part))
break; // we found one, lets bail
}
if (part == 5) { // if we ended up not finding one 🙁
error(“No valid FAT partition!”); // Something went wrong, lets print out why
}
// Lets tell the user about what we found
putstring(“Using partition “);
Serial.print(part, DEC);
putstring(“, type is FAT”);
Serial.println(vol.fatType(), DEC); // FAT16 or FAT32?
// Try to open the root directory
if (!root.openRoot(vol)) {
error(“Can’t open root dir!”); // Something went wrong,
}
// Whew! We got past the tough parts.
putstring_nl(“Files found (* = fragmented):”);
// Print out all of the files in all the directories.
root.ls(LS_R | LS_FLAG_FRAGMENTED);
}
//////////////////////////////////// LOOP
void loop() {
SoftwareServo::refresh();
int one;
one = random(1,5);
Serial.println (one);
if (one == 2)
{
playcomplete(“GRYFFI~1.WAV”);
}
else if ( one==1 )
{
playcomplete (“SLYTHE~1.WAV”);
}
else if (one == 3)
{
playcomplete (“HUFFLE~1.WAV”);
}
else
{ playcomplete (“RAVENC~1.WAV”);
}
//playcomplete(“GRYFFI~1.WAV”);
//root.rewind();
//play(root);
Serial.print(“Servo angle”);
Serial.println ( joeyservo.read());
delay(20);
}
/////////////////////////////////// HELPERS
/*
* print error message and halt
*/
void error_P(const char *str) {
PgmPrint(“Error: “);
SerialPrint_P(str);
sdErrorCheck();
while(1);
}
/*
* print error message and halt if SD I/O error, great for debugging!
*/
void sdErrorCheck(void) {
if (!card.errorCode()) return;
PgmPrint(“\r\nSD I/O error: “);
Serial.print(card.errorCode(), HEX);
PgmPrint(“, “);
Serial.println(card.errorData(), HEX);
while(1);
}
/*
* play recursively – possible stack overflow if subdirectories too nested
*/
void play(FatReader &dir) {
FatReader file;
while (dir.readDir(dirBuf) > 0) { // Read every file in the directory one at a time
// Skip it if not a subdirectory and not a .WAV file
if (!DIR_IS_SUBDIR(dirBuf)
&& strncmp_P((char *)&dirBuf.name[8], PSTR(“WAV”), 3)) {
continue;
}
Serial.println(); // clear out a new line
for (uint8_t i = 0; i < dirLevel; i++) {
Serial.write(‘ ‘); // this is for prettyprinting, put spaces in front
}
if (!file.open(vol, dirBuf)) { // open the file in the directory
error(“file.open failed”); // something went wrong
}
if (file.isDir()) { // check if we opened a new directory
putstring(“Subdir: “);
printEntryName(dirBuf);
Serial.println();
dirLevel += 2; // add more spaces
// play files in subdirectory
play(file); // recursive!
dirLevel -= 2;
}
else {
// Aha! we found a file that isnt a directory
putstring(“Playing “);
printEntryName(dirBuf); // print it out
if (!wave.create(file)) { // Figure out, is it a WAV proper?
putstring(” Not a valid WAV”); // ok skip it
} else {
Serial.println(); // Hooray it IS a WAV proper!
wave.play(); // make some noise!
uint8_t n = 0;
while (wave.isplaying) {// playing occurs in interrupts, so we print dots in realtime
putstring(“.”);
if (!(++n % 32))Serial.println();
delay(100);
}
sdErrorCheck(); // everything OK?
// if (wave.errors)Serial.println(wave.errors); // wave decoding errors
}
}
}
}
// Plays a full file from beginning to end with no pause.
void playcomplete(char *name) {
// call our helper to find and play this name
playfile(name);
while (wave.isplaying) {
joeyservo.write(140);
delay(150);
SoftwareServo::refresh();
joeyservo.write(180);
delay(150);
SoftwareServo::refresh();
/*
Serial.println(“start loop”);
servo.write(180);
Serial.println(“turn 90 degrees”);
delay(1000);
servo.write(140);
Serial.println(“turn back to zero”);
delay(1000);
*/
// do nothing while its playing
}
// now its done playing
}
void playfile(char *name) {
// see if the wave object is currently doing something
if (wave.isplaying) {// already playing something, so stop it!
wave.stop(); // stop it
}
// look in the root directory and open the file
if (!f.open(root, name)) {
putstring(“Couldn’t open file “); Serial.print(name); return;
}
// OK read the file and turn it into a wave object
if (!wave.create(f)) {
putstring_nl(“Not a valid WAV”); return;
}
// ok time to play! start playback
wave.play();
}
Third Milestone
For my third milestone, I got the hat to appear as if it is speaking. Upon startup, the hat will sort the user into a house. To do this, I used an Arduino wave shield. An Arduino wave shield enables someone to play a recording. I attach it to the Arduino, so the two can communicate. After soldering in a couple of wires so that they would remain stable in the wave shield, the real work began. I used an online site called wondershare. This website allows me to download videos to my computer. Using wondershare, I went to Youtube, found four videos of the Sorting Hat sorting students into the four houses, and downloaded it to my computer. From there, I went into examples in Arduino, clicked on the example WaveHC, and then proceeded to click on the example daphc. Daphc is a mode which plays every .WAV file it finds on the SD card in a loop. After getting to this setup, I then proceeded to code. Using a site from Adafruit, I was able to get the four audio recordings to play one after another. Going a step further, I was able to insert a code that would make the recording random. This part of the code tells the Arduino what to play. I created an integer which the integer is set to a random number between one and four. The second part of the code tells the computer to randomize the files, thus giving the user a chance at getting any house. The second part of the code tells the computer to randomize the house, and then picked up a specific file on the house it ended up landing on. After plugging in headphones to the headphone jack in the waveshield, the Arduino ran the four YouTube recordings in a random sequence, thus enabling me to reach my third milestone. After achieving this milestone, I am confident in my coding abilities. Using Arduino really expanded my comfort level with coding, and I now feel confident to undertake more challenging coding projects in the future.
Second Milestone
Hi, my name is Joey, and I just completed the second milestone of my project, the Harry Potter Sorting Hat. The second milestone was getting the hat to appear as if its mouth was moving. First, I made a mechanical link. To do this, I had to take 8 pens, cut off the ends of the pen, and get rid of the inside of the pen. From there, I cut off all but ten centimeters on all 8 pens. Then, using a ¼ of an inch drill, I drilled a hole on the colored part of the marker. I then put a screw through my self constructed hole. After that, I put a nut in the screw to secure the edge. Due to the fact that my screw was so long, I had to shave off the parts of the screw that I was not using. Next, I put my servo motors on a perfboard. I had to solder in all of the wires, and I had to connect the perfboard to the Arduino via wires. After completing that task, my next step was attaching the mechanical links to the servo motors. I did this using hot glue. Finally, I was ready to put the perfboard into the hat. Using zip ties, I pinned both the perfboard and the Arduino to the base of my hat. Then, I used an exacto knife to cut an opening in the back of the base of my hat for the wires to go through. After soldering them in, I was ready to code. Using an online video, I was able to figure out how to code a servo motor to make a 90 degree sweep in order to test my wiring.
https://www.youtube.com/watch?v=SfmHNb5QAzc&t=139s
After running a couple of tests to figure out the ideal angle for the servos to be positioned, I now have a hat that can make an illusion like it is talking. Now, after finishing this crucial step, I feel like I can really excel with my lasts steps. Even though I spent a lot of time working on this milestone, I think that investment was well worth it, and I am ready to move on and finish the Sorting Hat.
void setup() {
Serial.begin (9600);
servo.attach(6);
servo.write(0);
delay(2000);
}
void loop() {
Serial.println(“start loop”);
servo.write(80);
Serial.println(“turn 90 degrees”);
delay(1000);
servo.write(170);
Serial.println(“turn back to zero”);
delay(1000);
}


First Milestone

Figure 1:
Figure 1: The Chord which can be seen above

Figure 2: Where to draw the lines on the paper which can be seen above

Figure 3: An example of how the four lines should look on the hat can be seen above.

Figure 4: Where to install the cardboard which can be seen above
My first milestone in my project, the Harry Potter Sorting Hat, was the physical construction of my hat. My first task in constructing the hat was to assemble all of the required materials for this undertaking.
- Cardboard
- 5 sketch pens
- Construction paper
- 4 nuts and bolts
- Power supply board
- 5 servo motors
- Computer
After I confirmed that all the parts were indeed present, I then proceeded to the next part of the procedure, carving out a cone. To attain this image, I used a singular piece of construction paper. After fishing out all the appliances essential for the end goal, my project was officially kicked off. My first task was to make a circle, and then I cut along a chord of a circle. See figure 1. This will enable me to get the cone to remain in place as the project progresses.
From there, I drew and then later cut along several lines that I made. I started drawing my line from the bottom center of the paper. From that point, I drew that line all the way to the side of the paper right in the middle vertically. In the picture below, I drew two lines both starting at the bottom of the page below point O perpendicular to line D (in the circle with the chord cut off.) I then drew the lines to the point where line segment D touches the circle on both sides respectively. I then proceeded to cut along my self inscribed lines. After achieving this crucial step, I then grabbed the left corner and rolled it along the page. By doing this action, I made the paper stretch out into the shape of a cone. After a few minor adjustments, my cone was complete.
From there, I then proceeded to complete my next step: drawing and sketching out parts of the cone. I drew a line around two and a half inches from the bottom of the hat, drew a half circle about six inches from the bottom. The last part of this was marking a spot three and a half inches along the spine of the hat. From there, I drew four lines that go across the hat. Each line is three quarters of an inch apart from each other. From here, I had to cut along the fresh lines on the cone in order to proceed with my project.
The last major undertaking needed to be accomplished in order to complete my milestone was attaching cardboard inside my hat.I first measured my hat and got the exact measurements needed for my cardboard. The measurements that I got was the diameter of the segments of the hat that I needed to insert cardboard into. The segments that I needed to get measurements for were the previous places that I drew and cut lines on my hat. From there, I went to permanently install the cardboard into my hat via glue gun. I did this twice, first near the bottom of my hat, and second near to the top of my hat. Finally, my last step was to join all parts of my hat together with a thin piece of paper. After cutting a piece of paper approximately three inches wide, I pasted the paper on the back of the hat in order to keep the two structures together.
For me, this part of the project was very interesting because I had to think outside of the box. Many instructions on the website that I was using was not so clear. This is why I have devoted myself to making such good instructions above.This forced me to come up with different ways to complete the tasks. Another challenge while completing this milestone was when I had to cut certain sections of the hat. I personally found it hard to find a way to find a good starting point to cut, and it took a lot of time and patience before I got the result that I wanted. Honestly, I did enjoy constructing the cone. Some of the highlights from that part of the project was using string to make a perfect circle and using an exacto knife to cut in some places inside the hat. After reaching my first milestone, I now feel ready to go on with the next step of my project because of this great STEM summer camps in New York.
Soruce: https://www.hackster.io/jegatheesan/full-animatronic-sorting-hat-with-custom-software-22-433c8f
Figure 1: The Chord
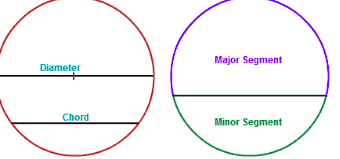
Figure 2: Where to draw the lines on the paper

Figure 3: An example of how the four lines should look on the hat
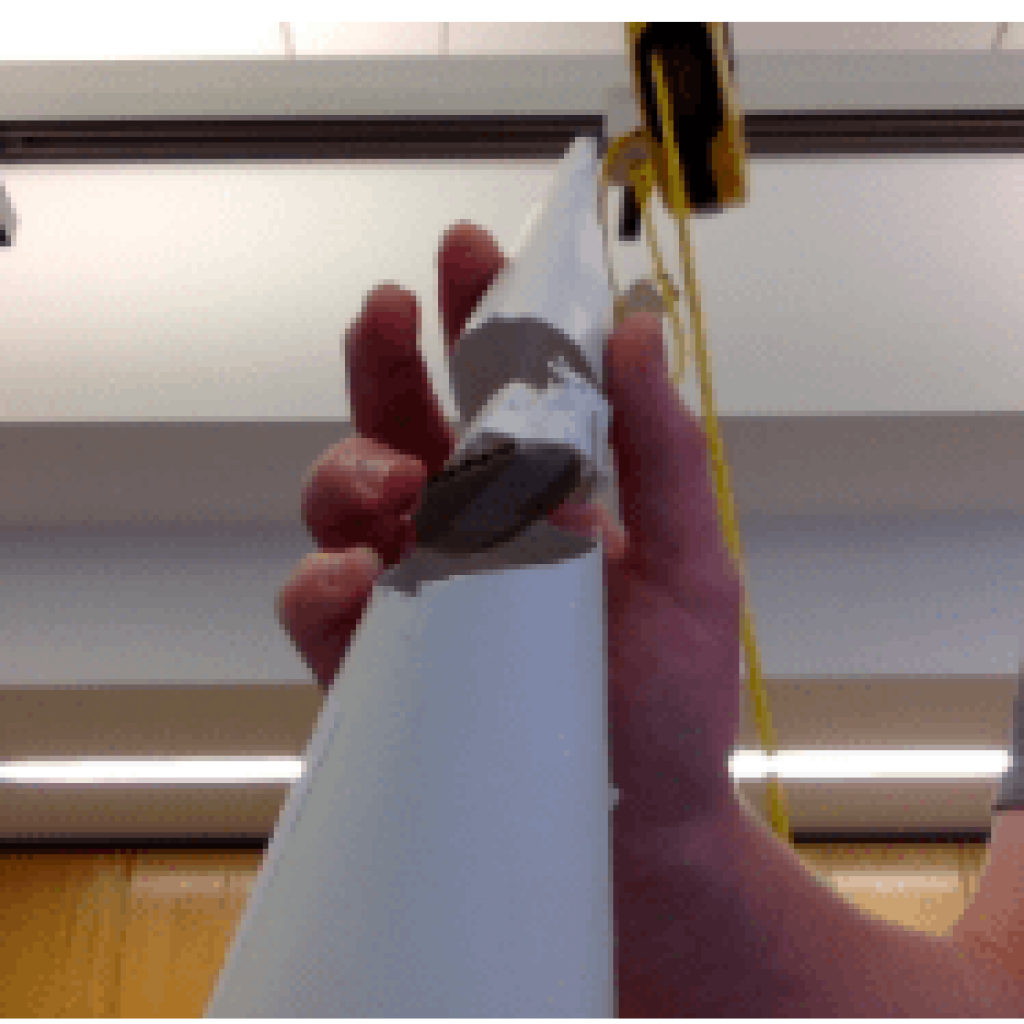
Figure 4: Where to install the cardboard
Binary Blaster
Binary Blaster
